| Please Wait Loading ..... |
 |
Quick Navigation
Nothing can beat a sip of soul-kissing aromatic coffee in the morning. Coffee is love, giving you the energy to start your day. Without coffee, there is nothing left in this life. So, considering the love for coffee, buying a coffee machine was a must. So, give me a warm welcome to the coffee makers’ owners’ community.
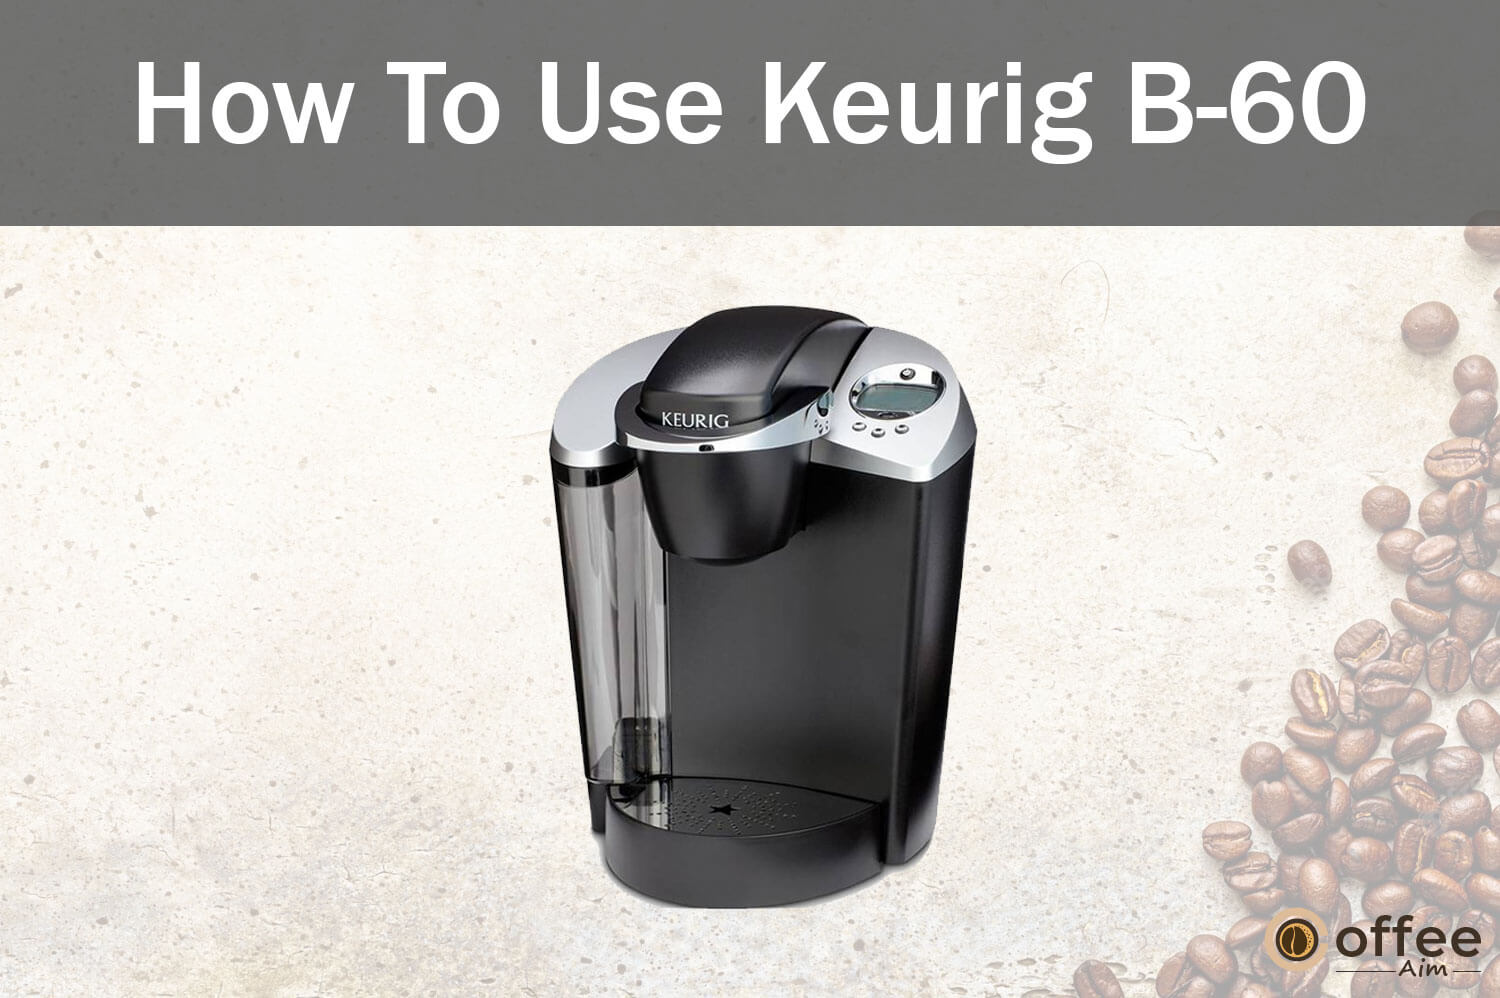
But now, your problem is “How to use this newly bought Keurig B-60”, but I will tell you not to worry! You have landed at the right guide; in this article, we will discuss “How to use Keurig B-60” in detail, from setup to cleaning. Whether you are a newbie or Barista, this article will be a “full stop” to all your Keurig-related problems.
So, let’s get started!
Taking precautions is always a better decision to avoid any damage in the future. However, if you want to just skip the safety precautions and start using your coffee maker, then think for a minute about what if you caught an injury or damage to your machine just because you were unaware of handling your coffee maker. For example, you can’t place your coffee maker near the stove, oven, or water supply (sink). Furthermore, which switch should you choose to plug in your brewer? Ignoring these precautions can lead to fire eruption, electrocution, or any other damage to yourself and your coffee maker.
So, carefully read all the safety precautions and protect yourself from danger.
It is to understand the features and specifications of the products you have bought for your household. Knowing the features can help you use the product more effectively and efficiently. It is because these features determine how you can use the product.
Furthermore, if you find these features incompatible with you and your home, then better is to return the machine before using it.
Let’s look at the Key Features of your Keurig B-60.
| Specifications | Details |
| Product Line/SystemKeurig | 1.0 Special Edition |
| K-Cup Compatibility | Unlicensed K-Cups, Keurig 2.0 licensed K-Cups, and ground coffee with the My K-Cup |
Brew Sizes | 6 oz (177.4 ml) |
| 8 oz (236.6 ml) | |
| 10 oz (295.7 ml) | |
| Water Reservoir | 48 oz |
| Water Filter | Compatible but not included |
| Display | LCD message center, 3 brew buttons |
| Temp Control | No |
| Strength Control | No |
Dimensions | 10.1 inches Width |
| 13.2 inches Depth | |
| 13.3 inches Height | |
| Weight | 7.6 lbs |
| Other Features | Quiet Brew Technology Auto-On/Off24-hour digital clock removable drip tray comes with K-Cup variety pack |
When you open the box of Keurig B-60, there will be essential parts that you should check first. If you do not find all these parts in the box, then you may return your brewer. These essential parts are mentioned below. So, let’s check them out!
The first thing you will find is your “Keurig B-60 coffee maker. It has a modern design, an additional “10 brew size,” and an LCD messaging center. It will make your coffee-making experience fun and convenient.
Here, you will get a booklet containing all the instructions for setup and coffee making. This literature also guides you about cleaning and maintenance of your Keurig B-60.
Keurig provides you with a complementary variety of K-Cups in the box. So, at first, you don’t have to purchase coffee capsules. Just insert these coffee capsules into your coffee maker and brew a delicious cup of coffee.
You will find a warranty card inside the box, which will explain everything about the warranty period (one year) and the process of acquiring this warranty for your Keurig B-60.
It’s time to unpack your newly purchased Keurig B-60. Be very careful while unpacking your brewer to avoid any damage to it. So, let’s unpack by following the instructions given below.
Warning: Plastic bags can cause harm to your children; therefore, it is better to keep them away from bags.
Note: Save the packaging material to use while transporting your brewer in the future.
As unpacking is over, now it’s time to know about each part of your Keurig B-60. Understanding the function and purpose of each part is necessary to use your coffee maker correctly. So, without further delay, let’s explore all the parts of your Keurig B-60 and their functions.
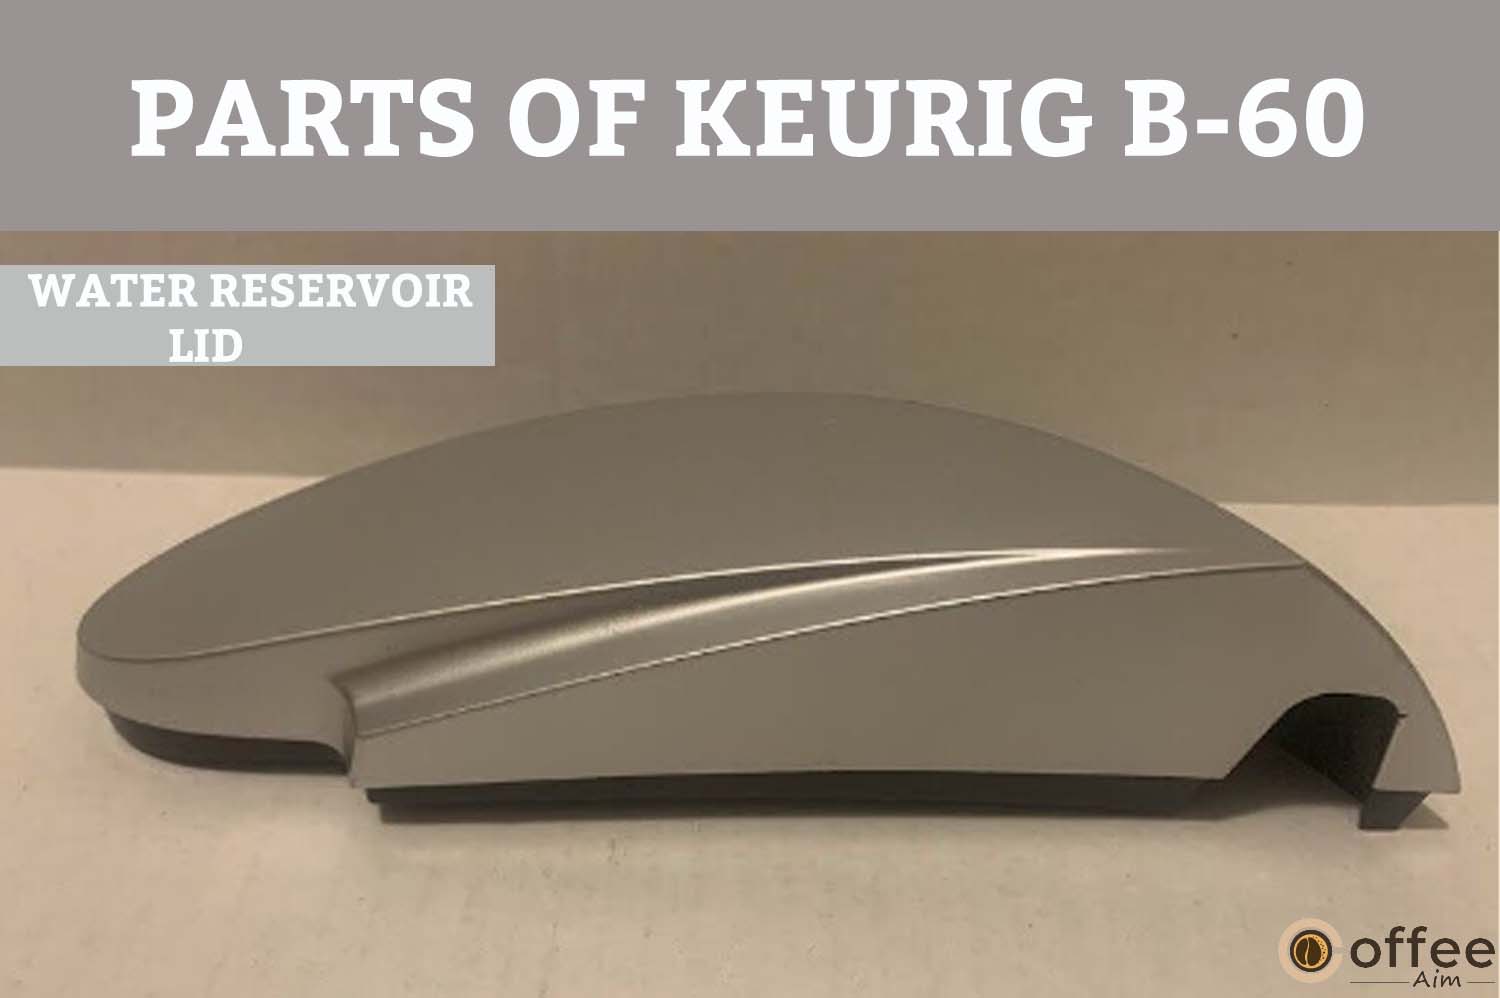
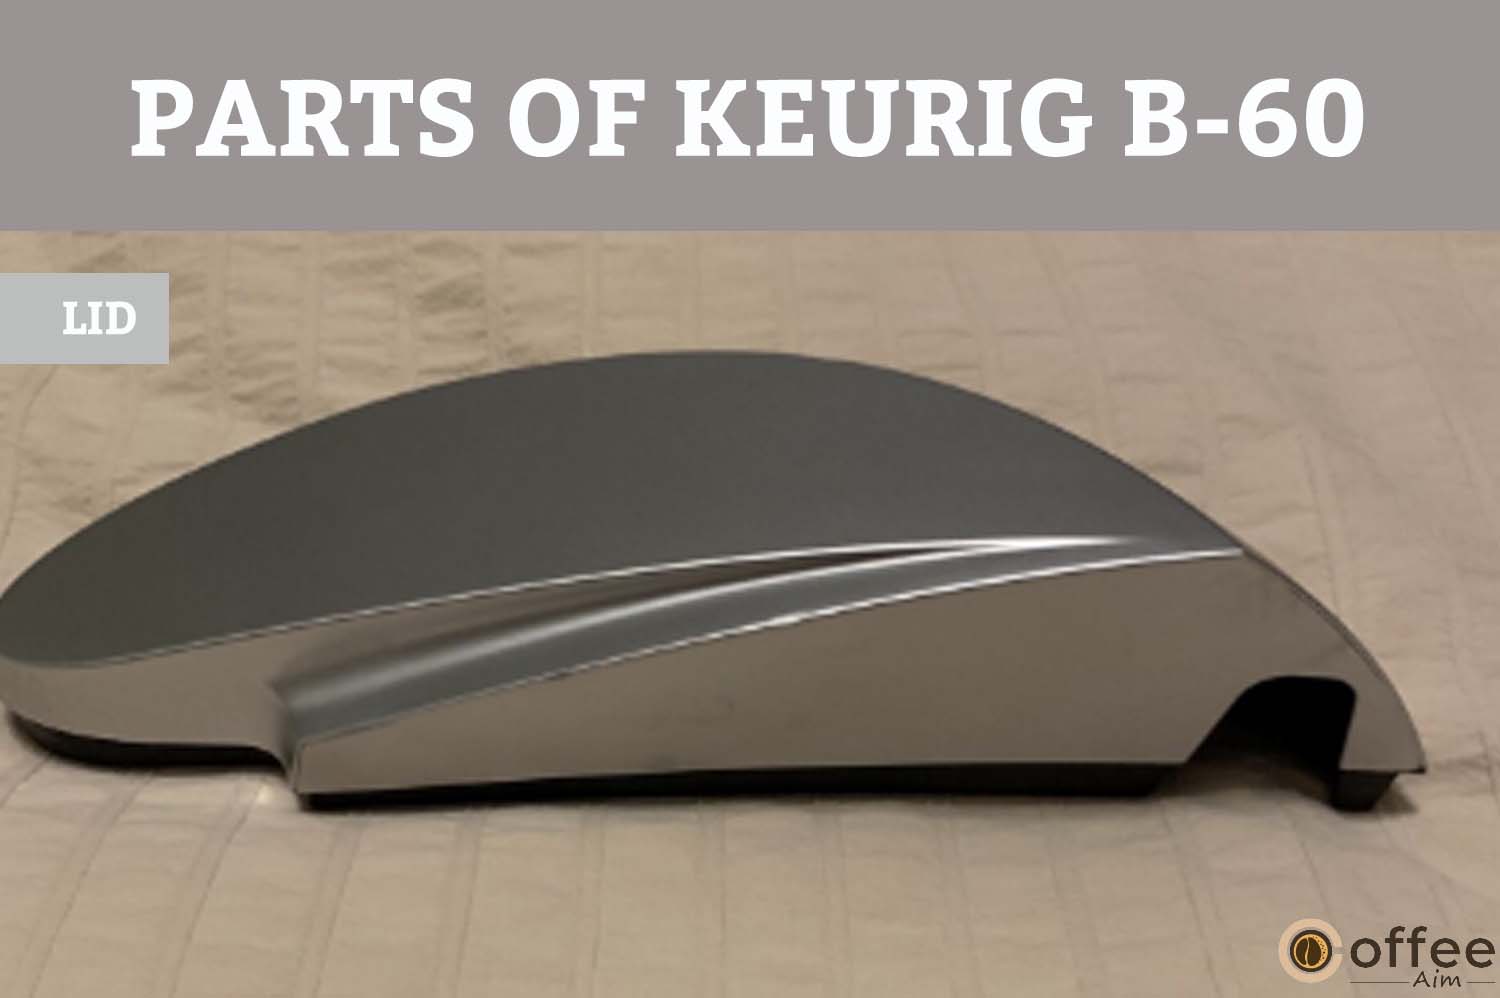
It is present upon the water reservoir and covers the stored water inside from dirt and also prevents any spillage while the brewing process. It is made up of plastic, easy to remove and wash.
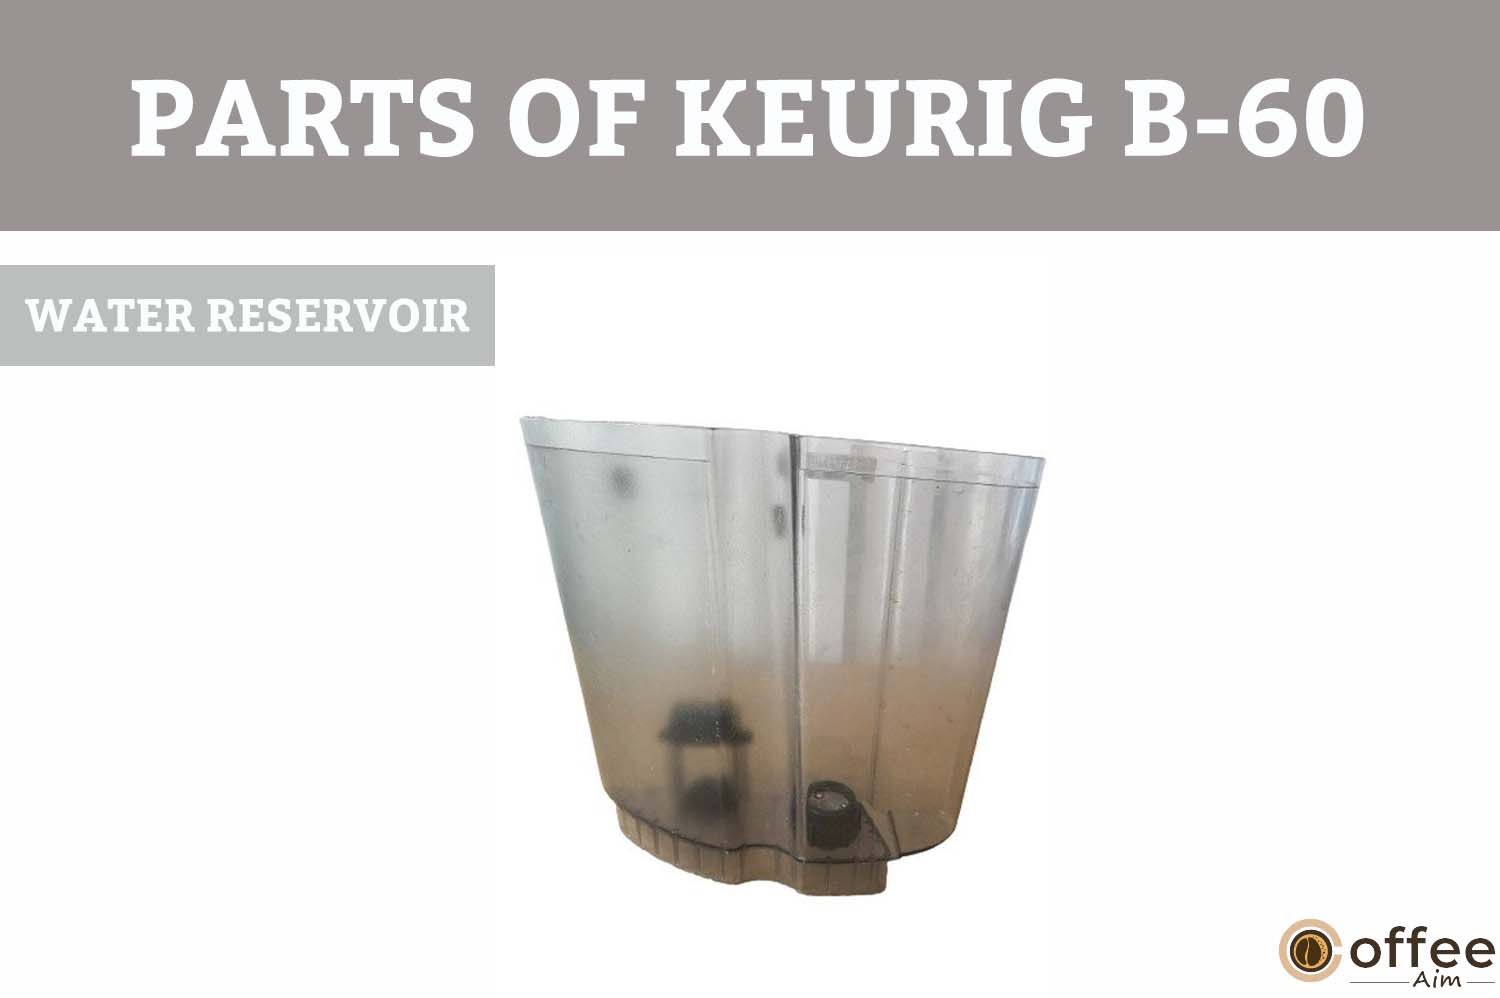
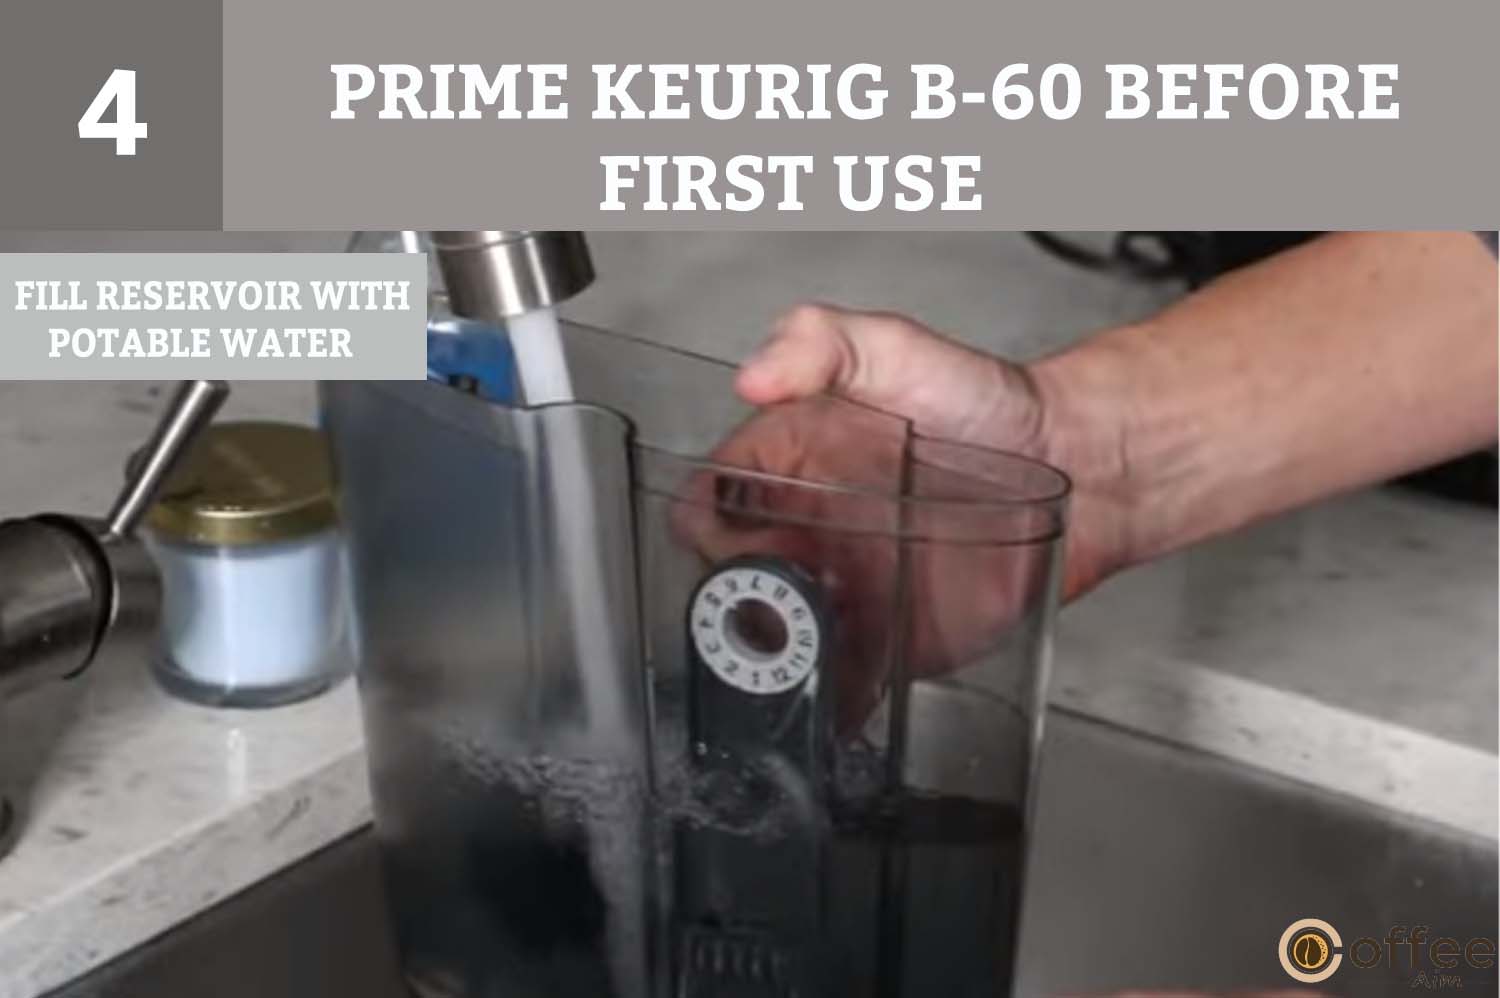
The Water Reservoir is located on the Keurig machine’s left side. This part is used to store the water. It has the capacity to store 48 oz of water, so you don’t need to fill the water to make a coffee every time.
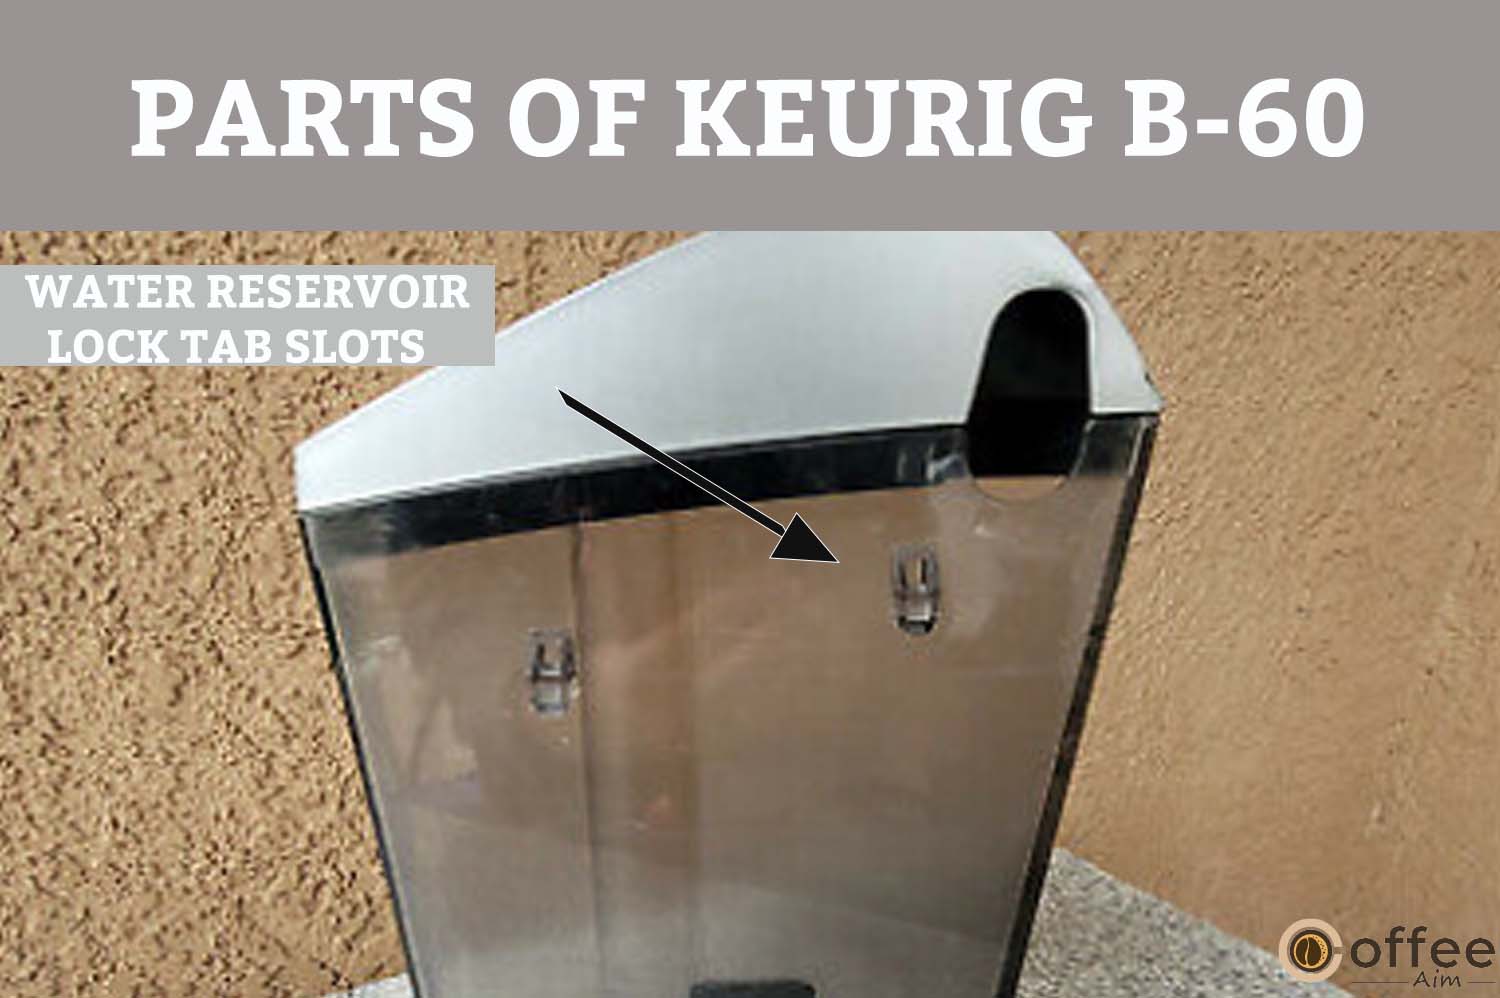
These two slots are present on your brewer’s body and are used to attach the water reservoir securely.
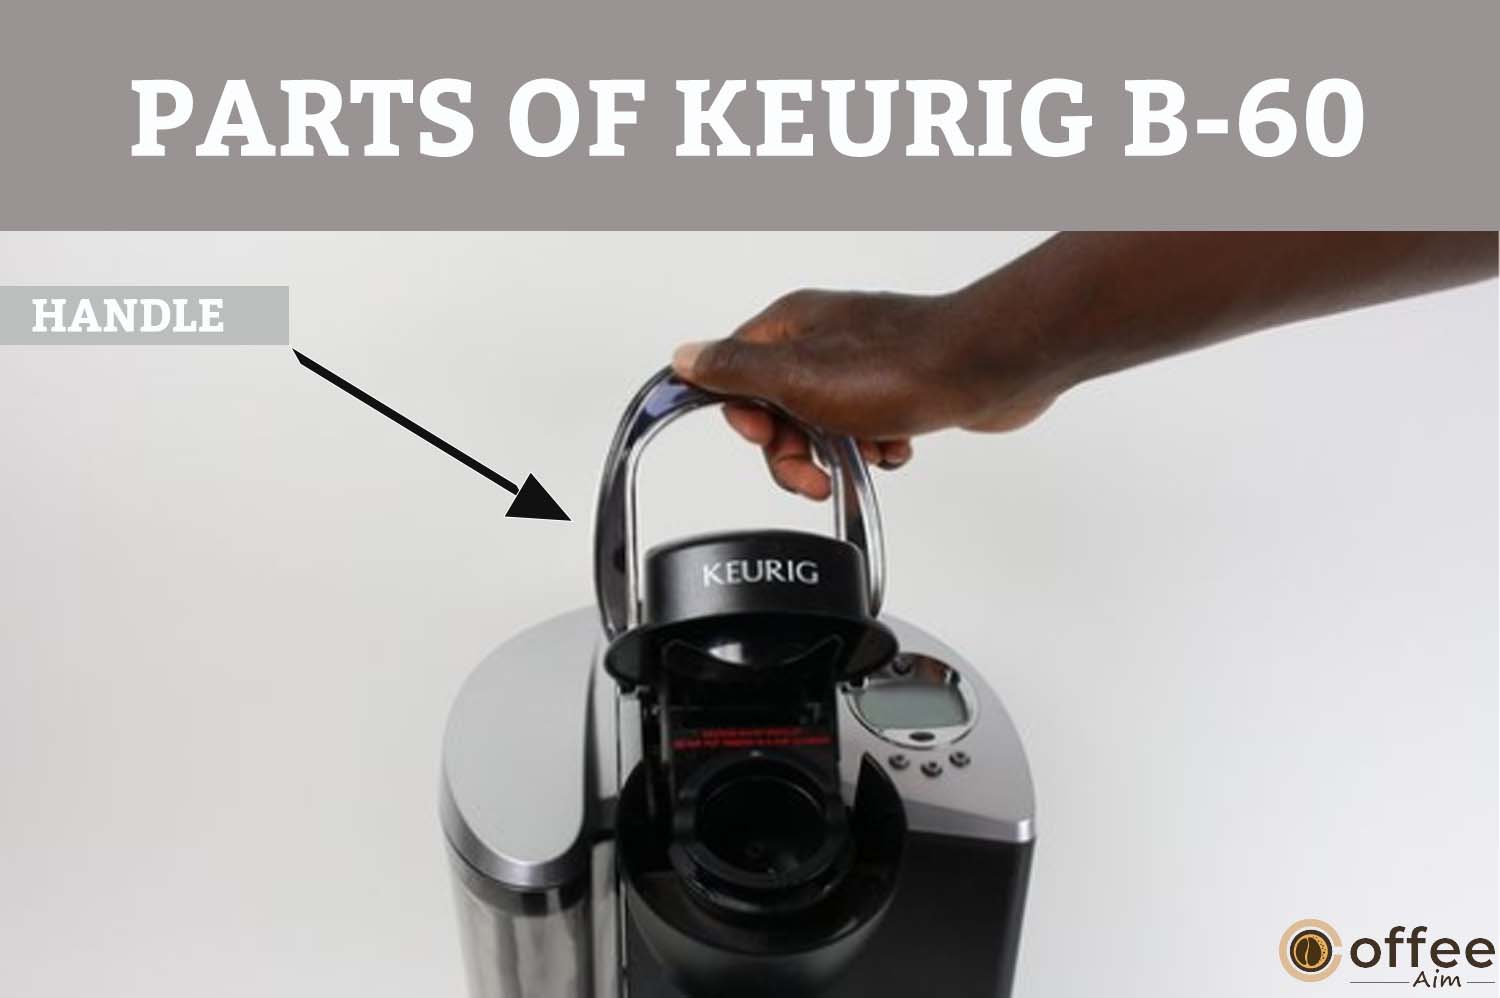
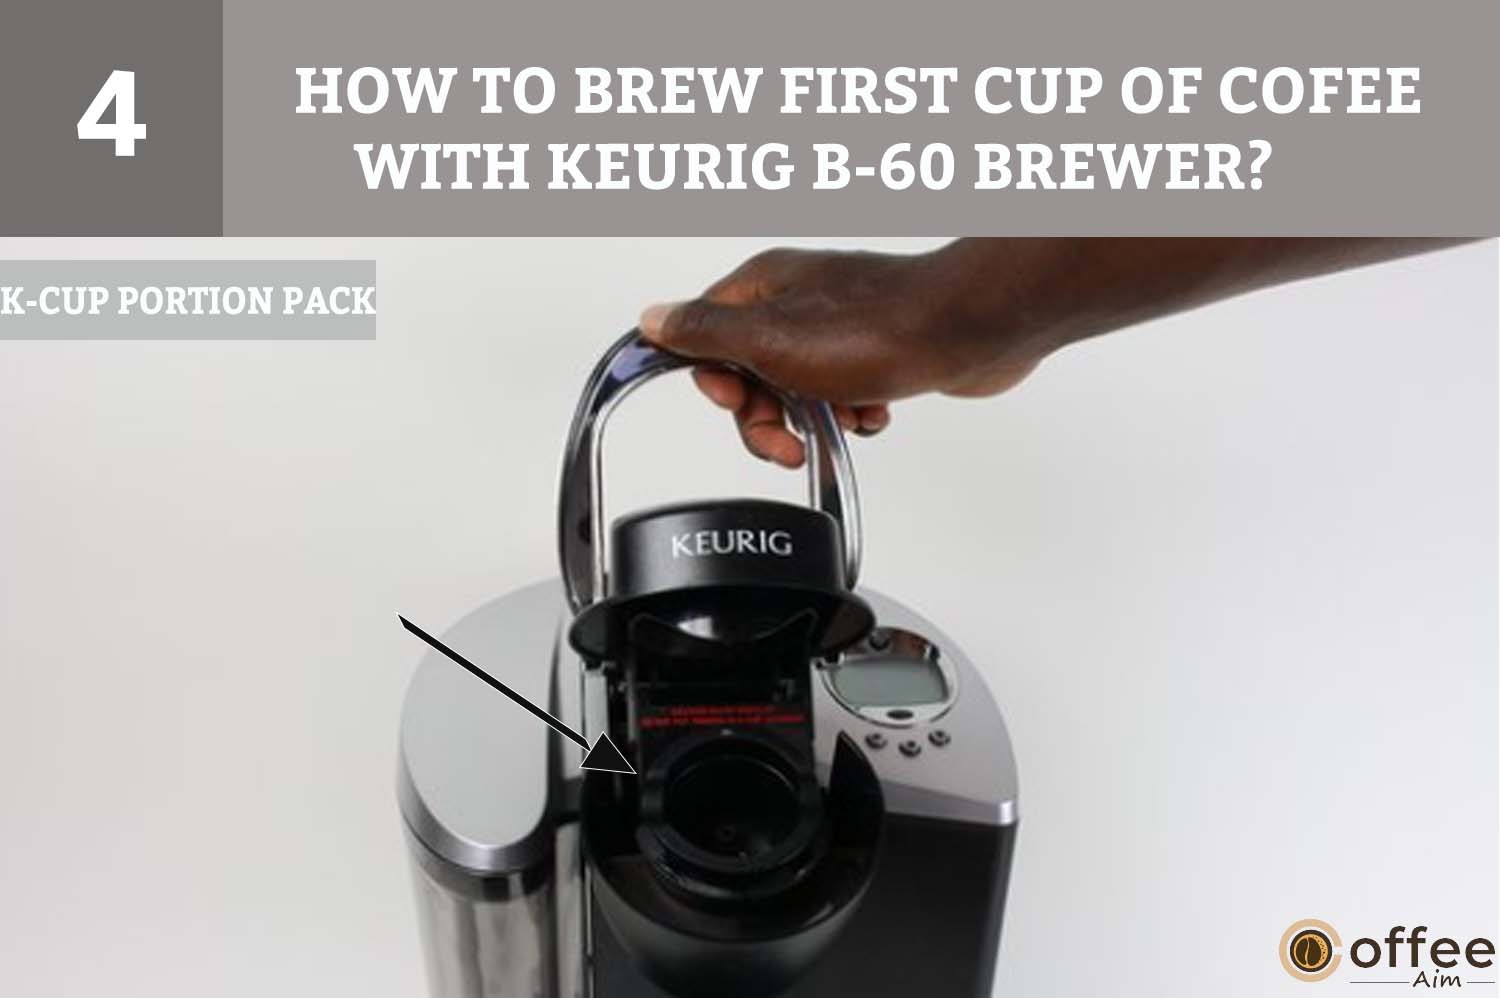
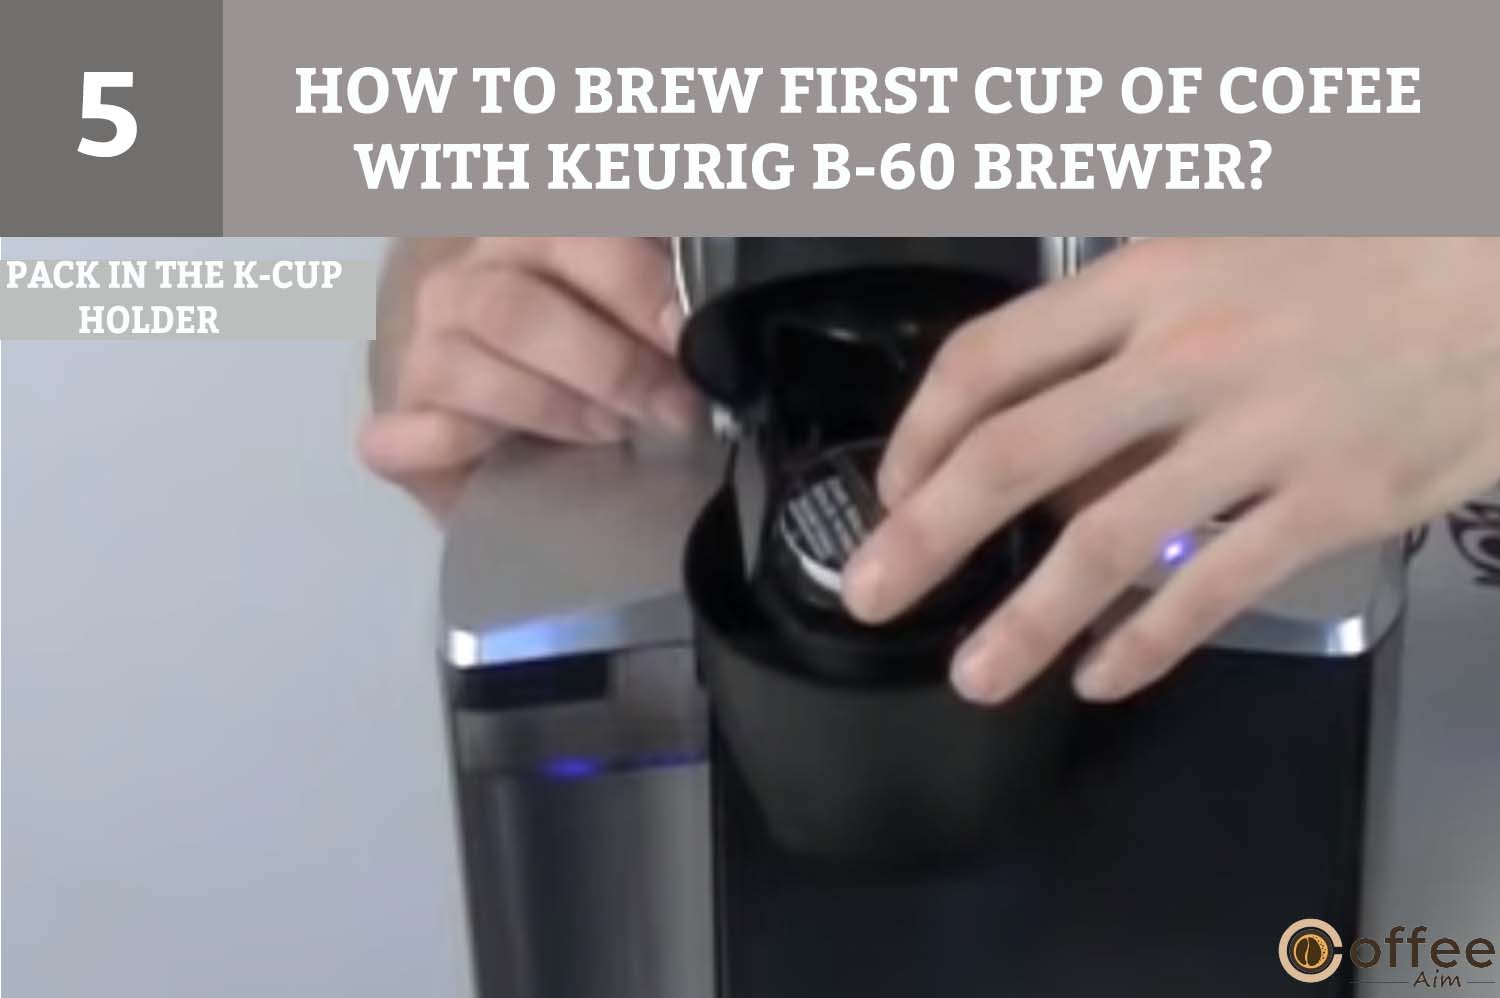
It is present on the upper front of your coffee maker. Lift the handle to open the K- Cup holder, where you will insert your K-Cup pod for making flavorful coffee.
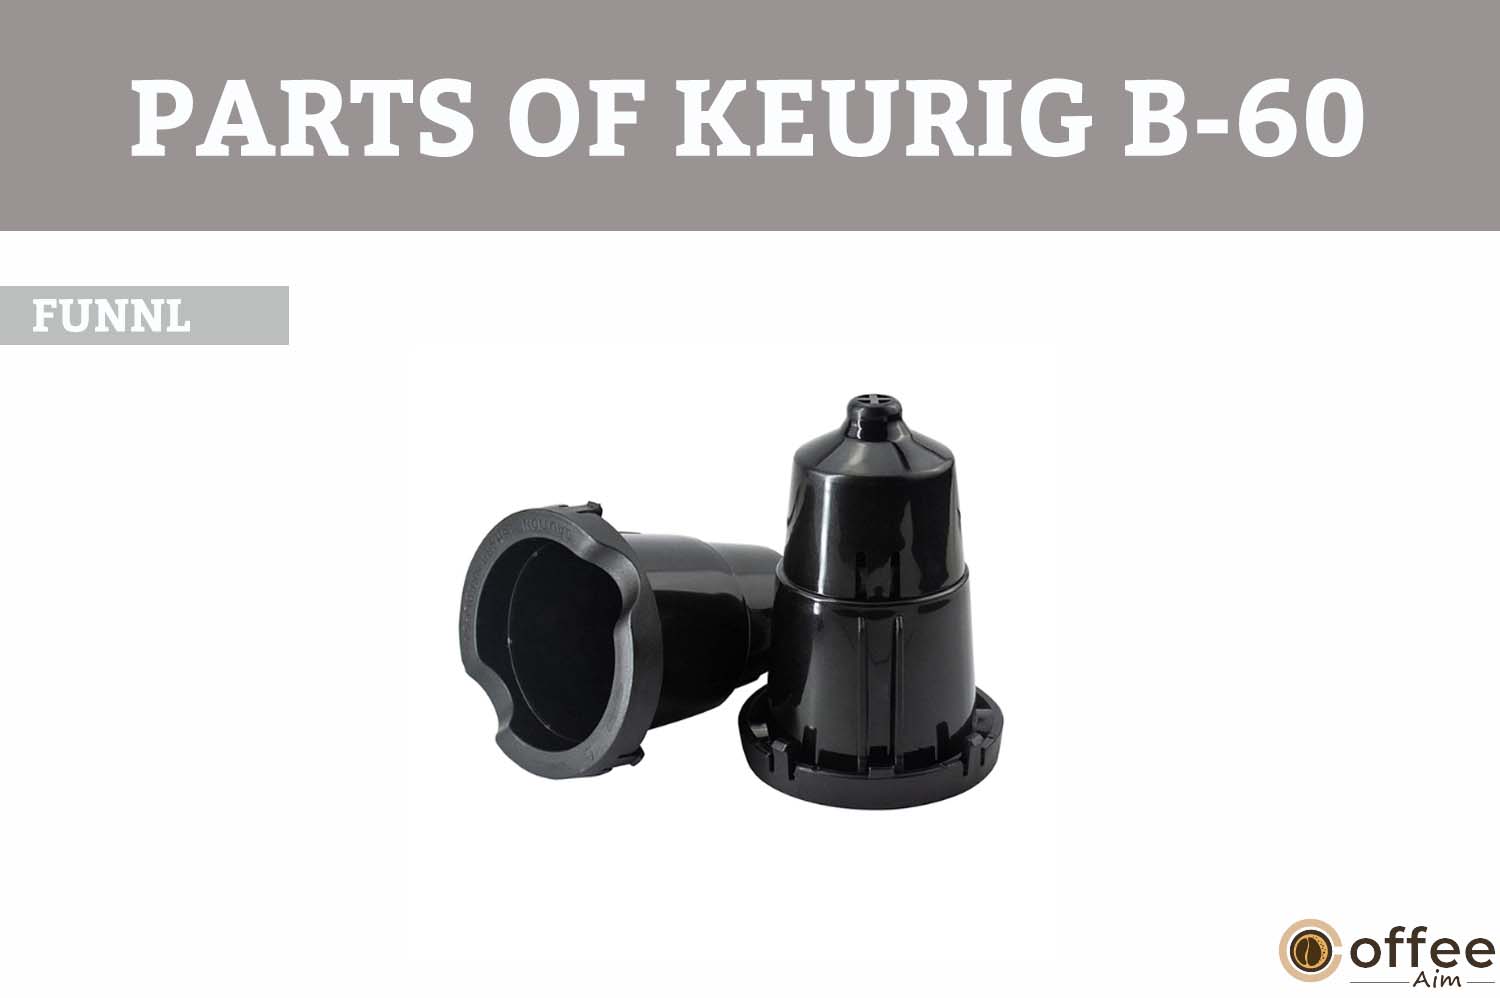
It is attached to the bottom of the K-Cup holder to help the coffee head toward the coffee outlet in the form of a stream.
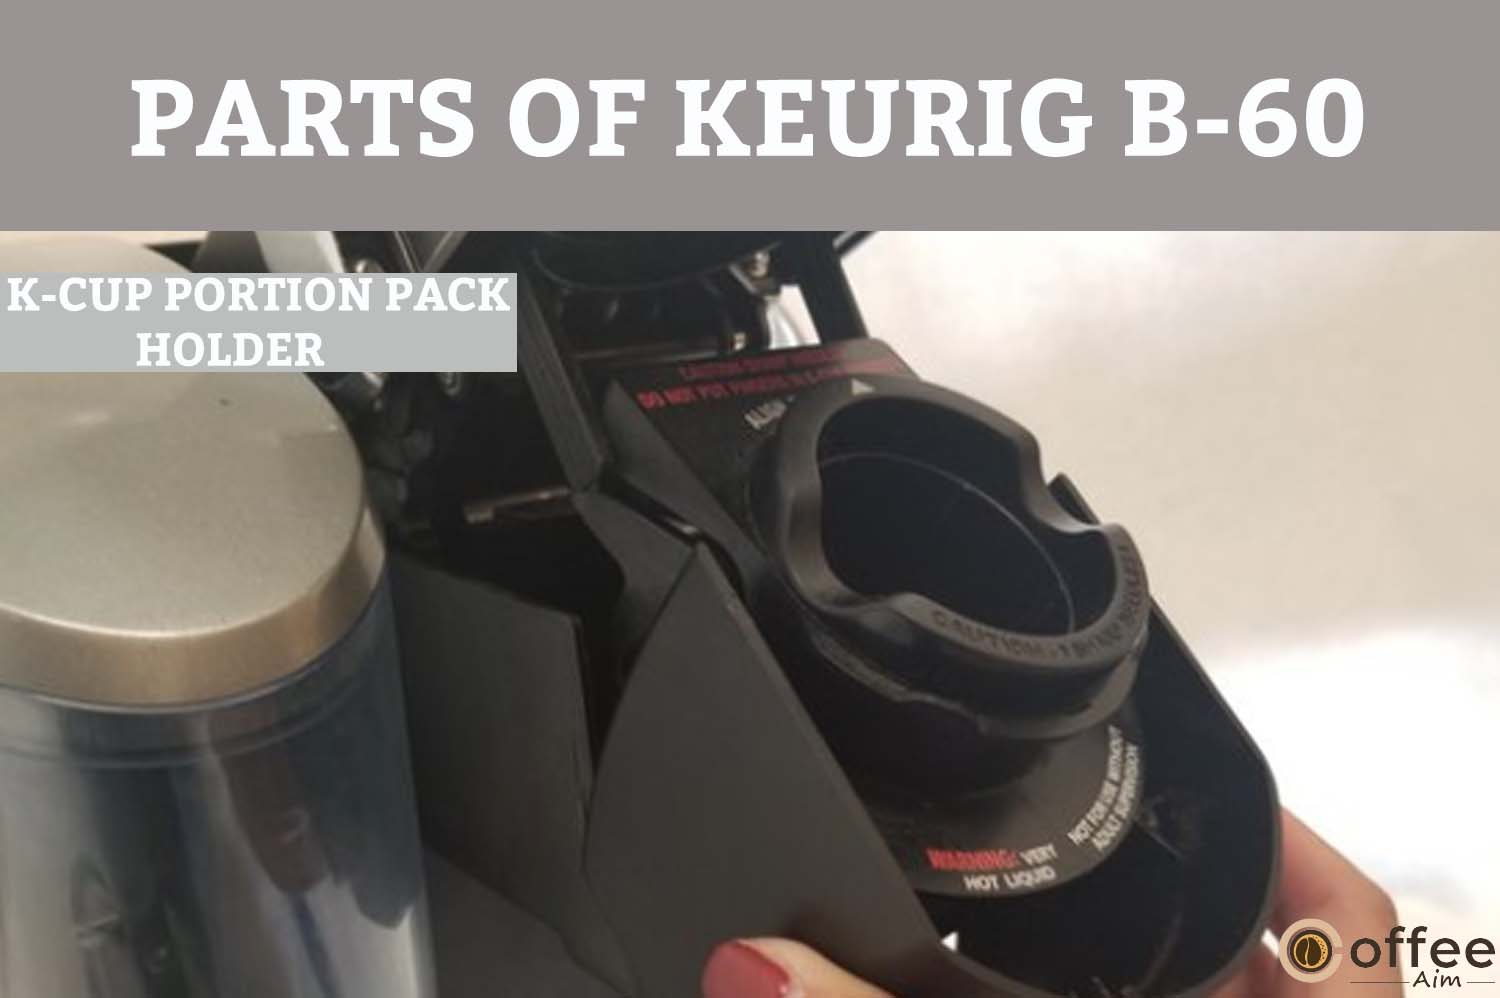
It is a space on the upper side of the brewer where you insert the K-cup pack into the K-cup holder.
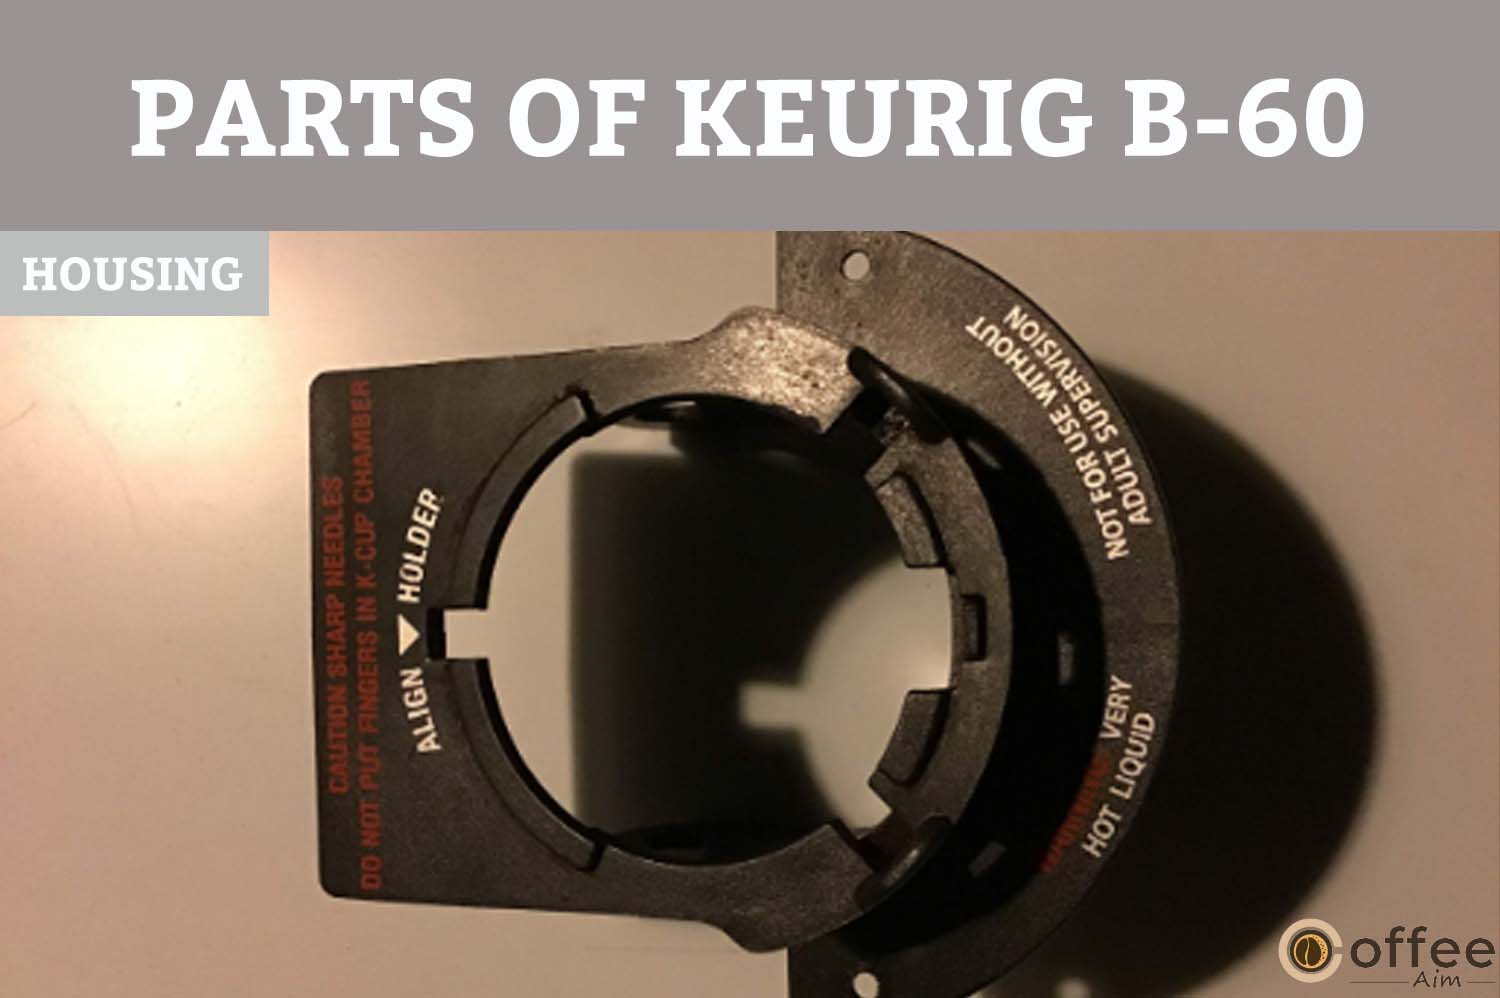
The lid on the K-Cup portion pack assembly protects the coffee pod and contains puncturing needles that poke the coffee capsule.
First, let’s know what is K-Cup portion pack assembly! So, the K-Cup Portion holder and funnel are collectively called “K-Cup portion pack assembly”. And the space where this assembly is adjusted in your brewer is called K-Cup portion pack assembly housing. It is the upper front area of your brewer.
This is the main body of your brewer that contains all the internal parts, such as the water pump, thermostat, etc.
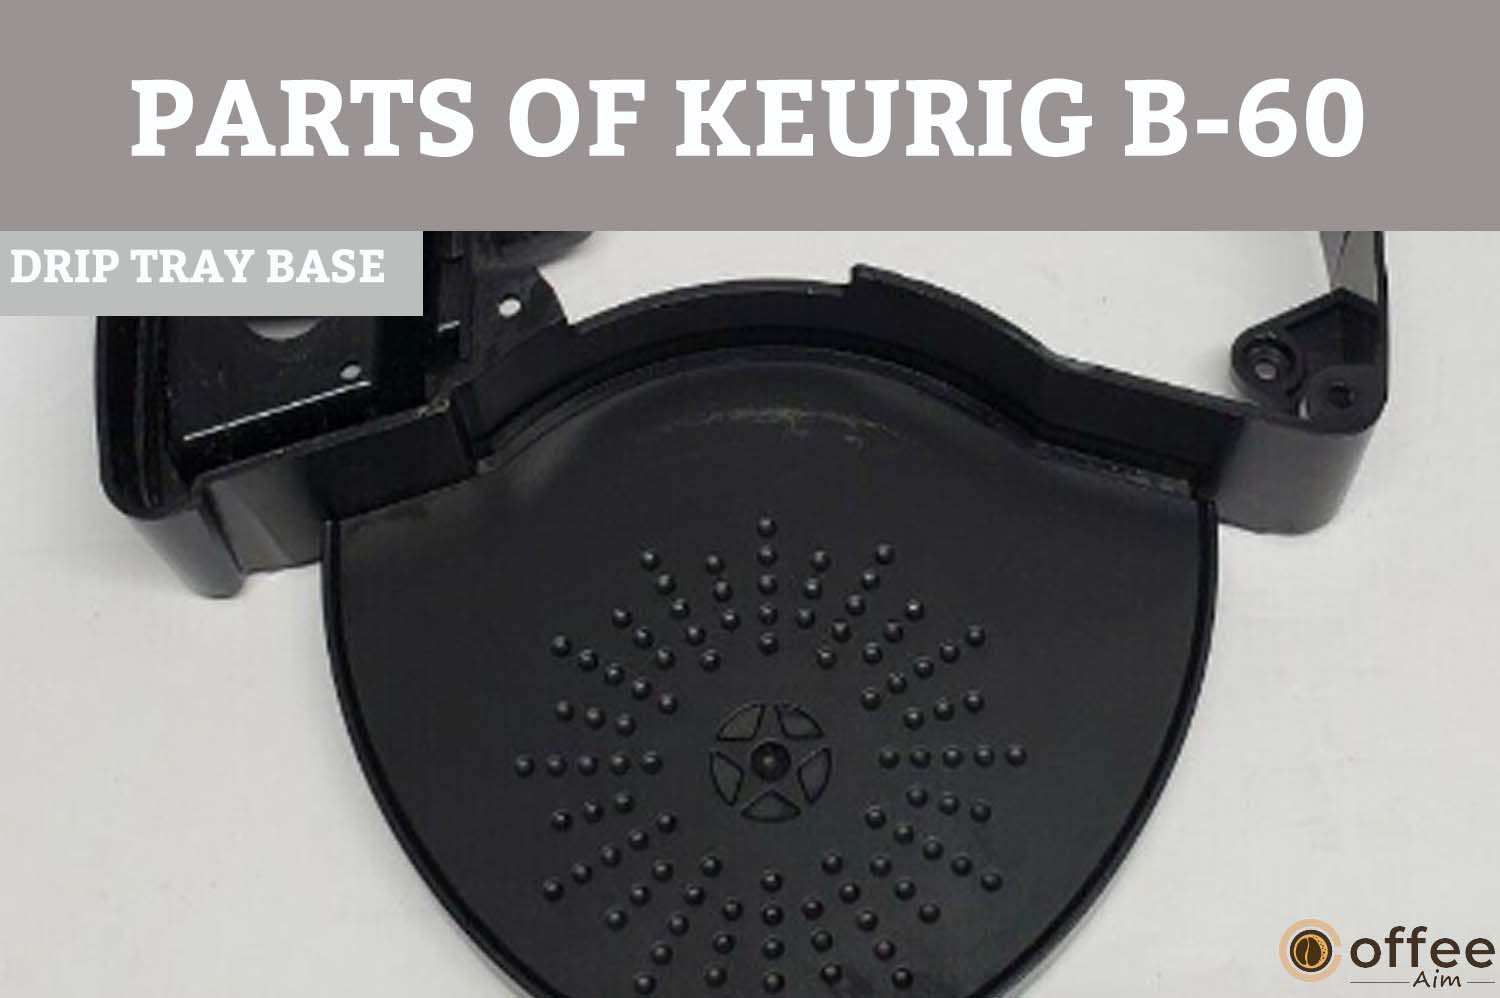
This part is like a lid to the drip tray and has a sieve-like appearance. It is the part where you put your coffee cup. The drip tray plate is also beneficial to control any mess while dispensing as it catches the spills/overflow of coffee/water.

It is present at the bottom of your Keurig coffee maker. Its sole purpose is to store coffee/water spills. It has a capacity of 8 oz, and you have to empty it periodically to avoid any mess.

Below the drip tray is the drip tray base. It supports the drip tray, and its sole purpose is to accommodate tall mugs (travel mugs). Thus, if you want to dispense your coffee in the travel mug, remove the drip and place your mug directly on the drip tray base.
It is present on the upper backside of your brewer and is used to manage the temperature of the brewer. It helps to circulate the steam and hot air outside the machine.

It is a wire originating from your brewer. You have to plug it into a power outlet before pressing the power button.

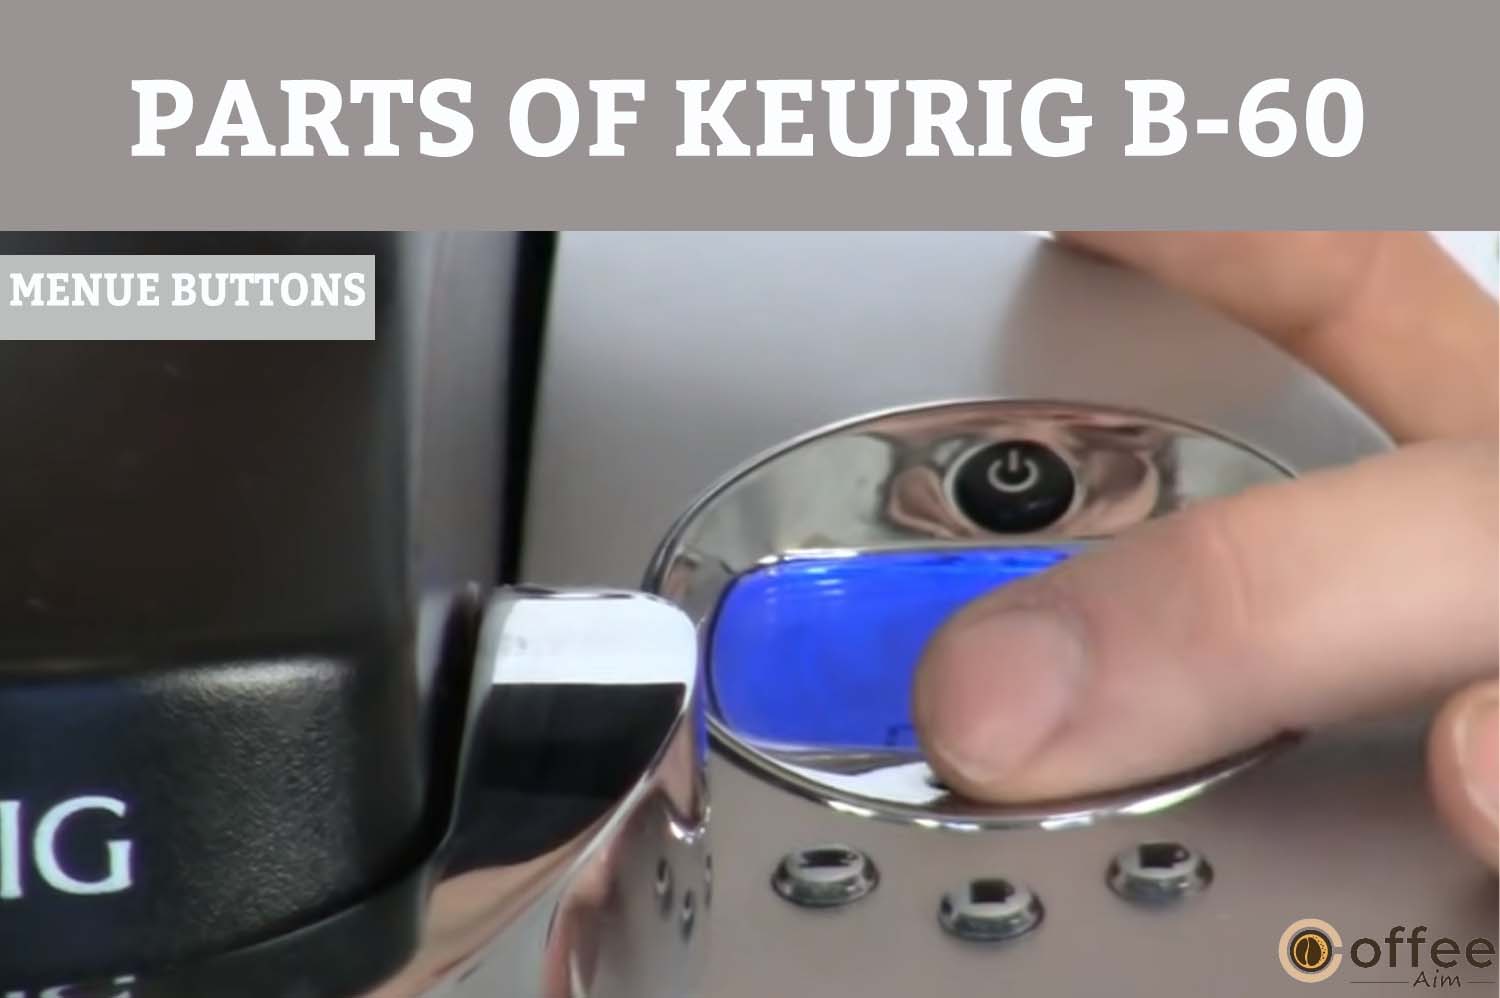
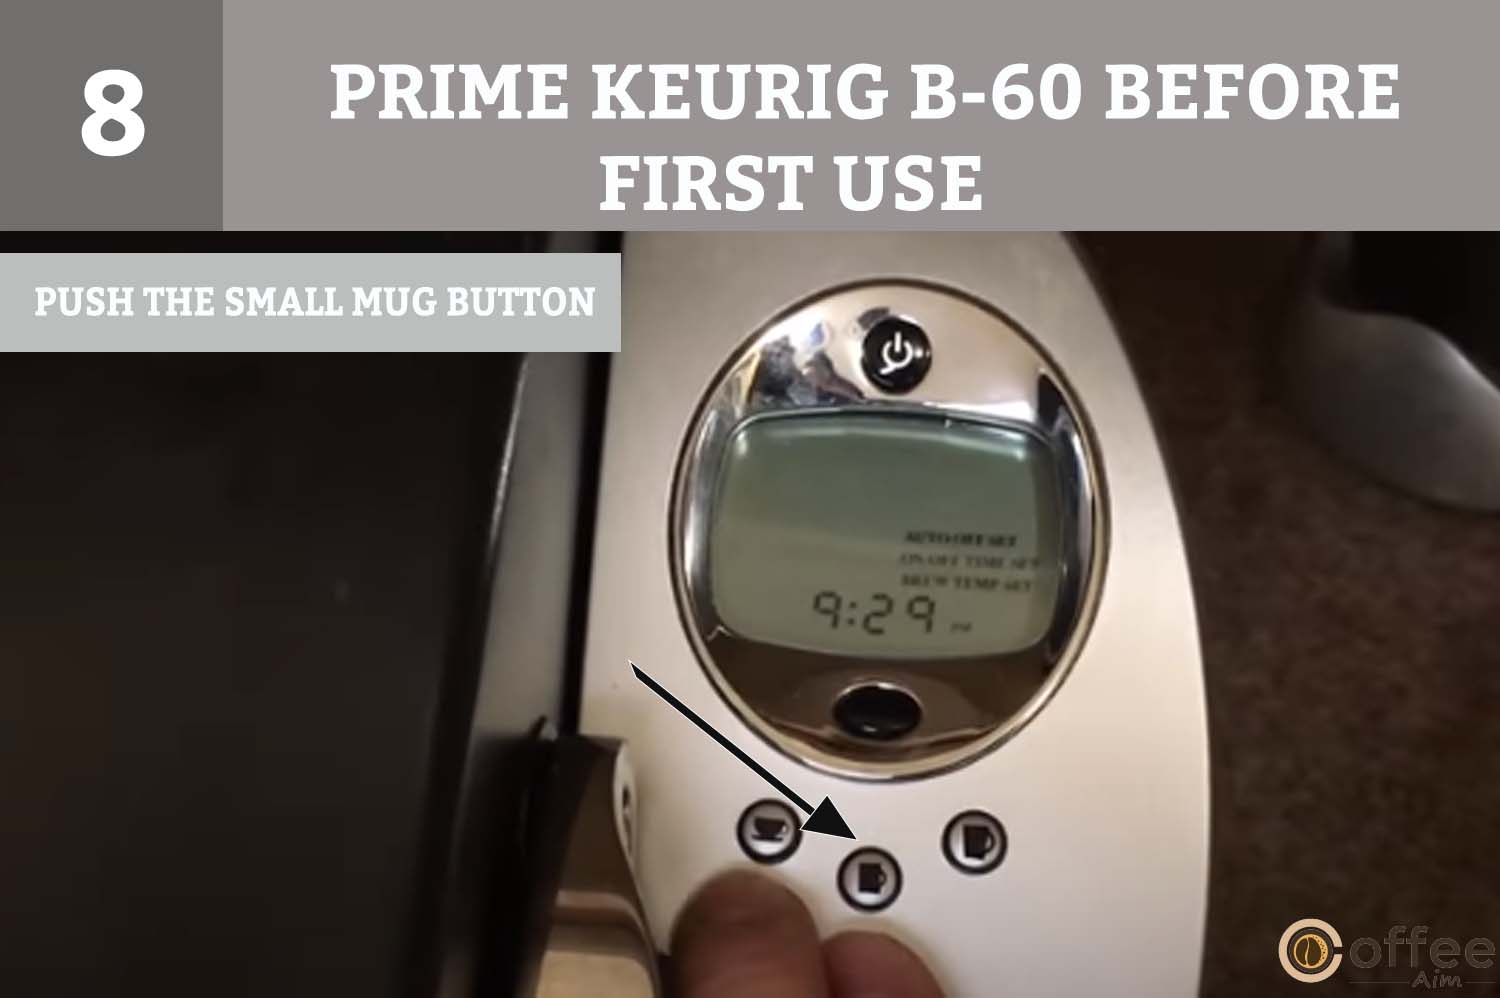
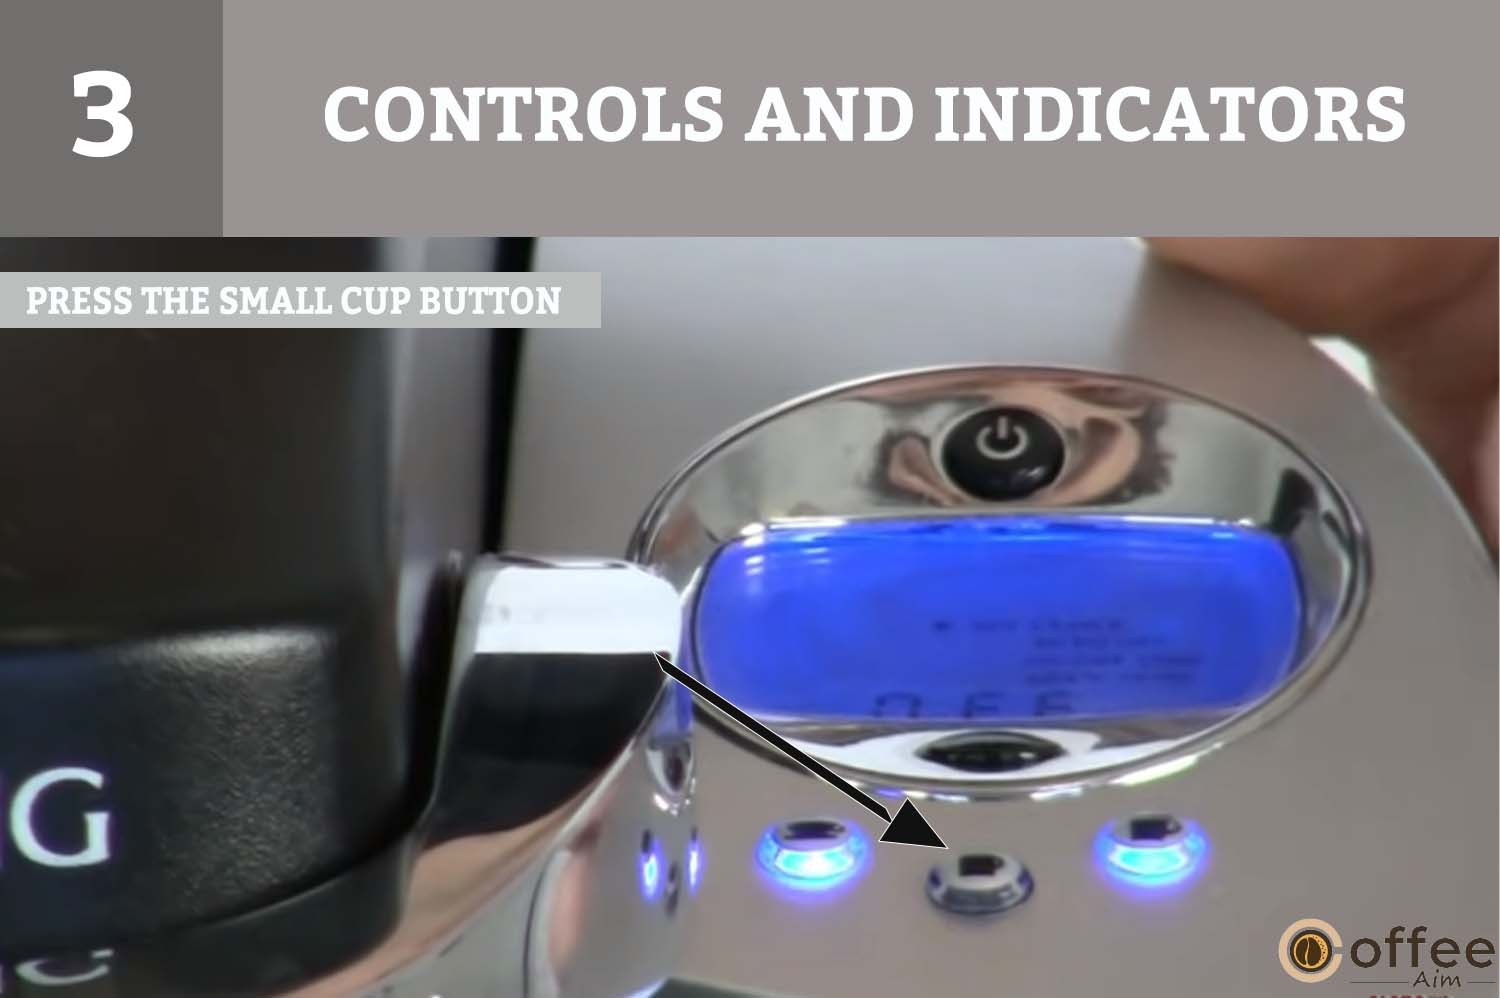
Choose the amount of coffee or tea you wish to brew by pressing these buttons: Small Cup Button, Small Mug Button, and Large Mug Button.
Small Cup Button will be a 5.25 oz serving
Small Mug Button will be a 7.25 oz serving
Large Mug Button will be a 9.25 oz serving

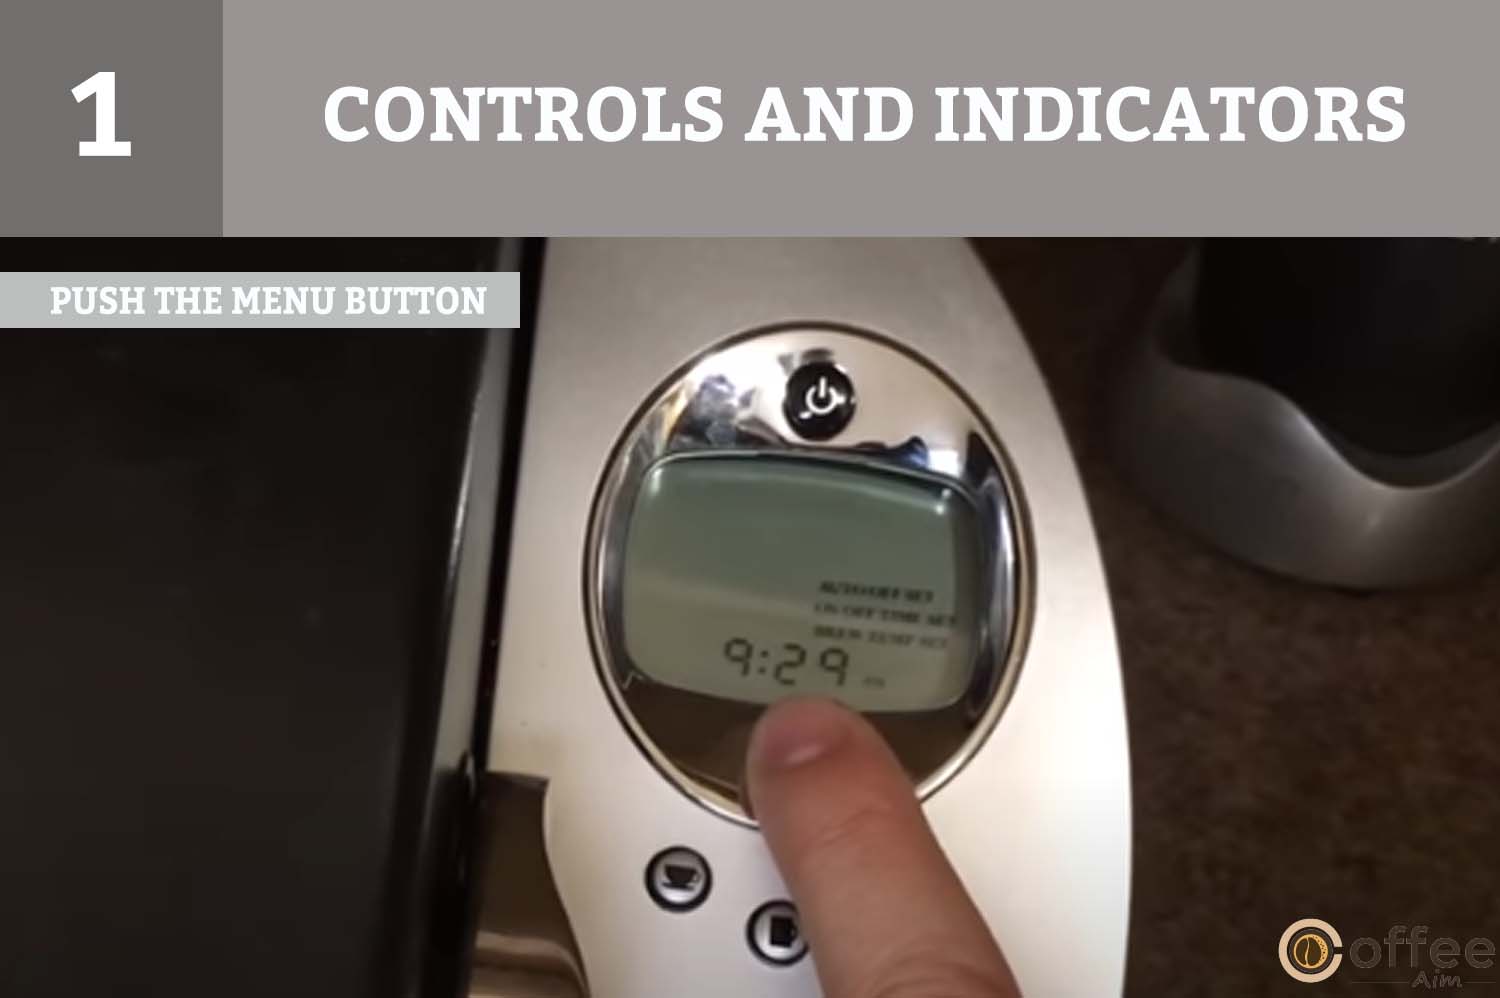
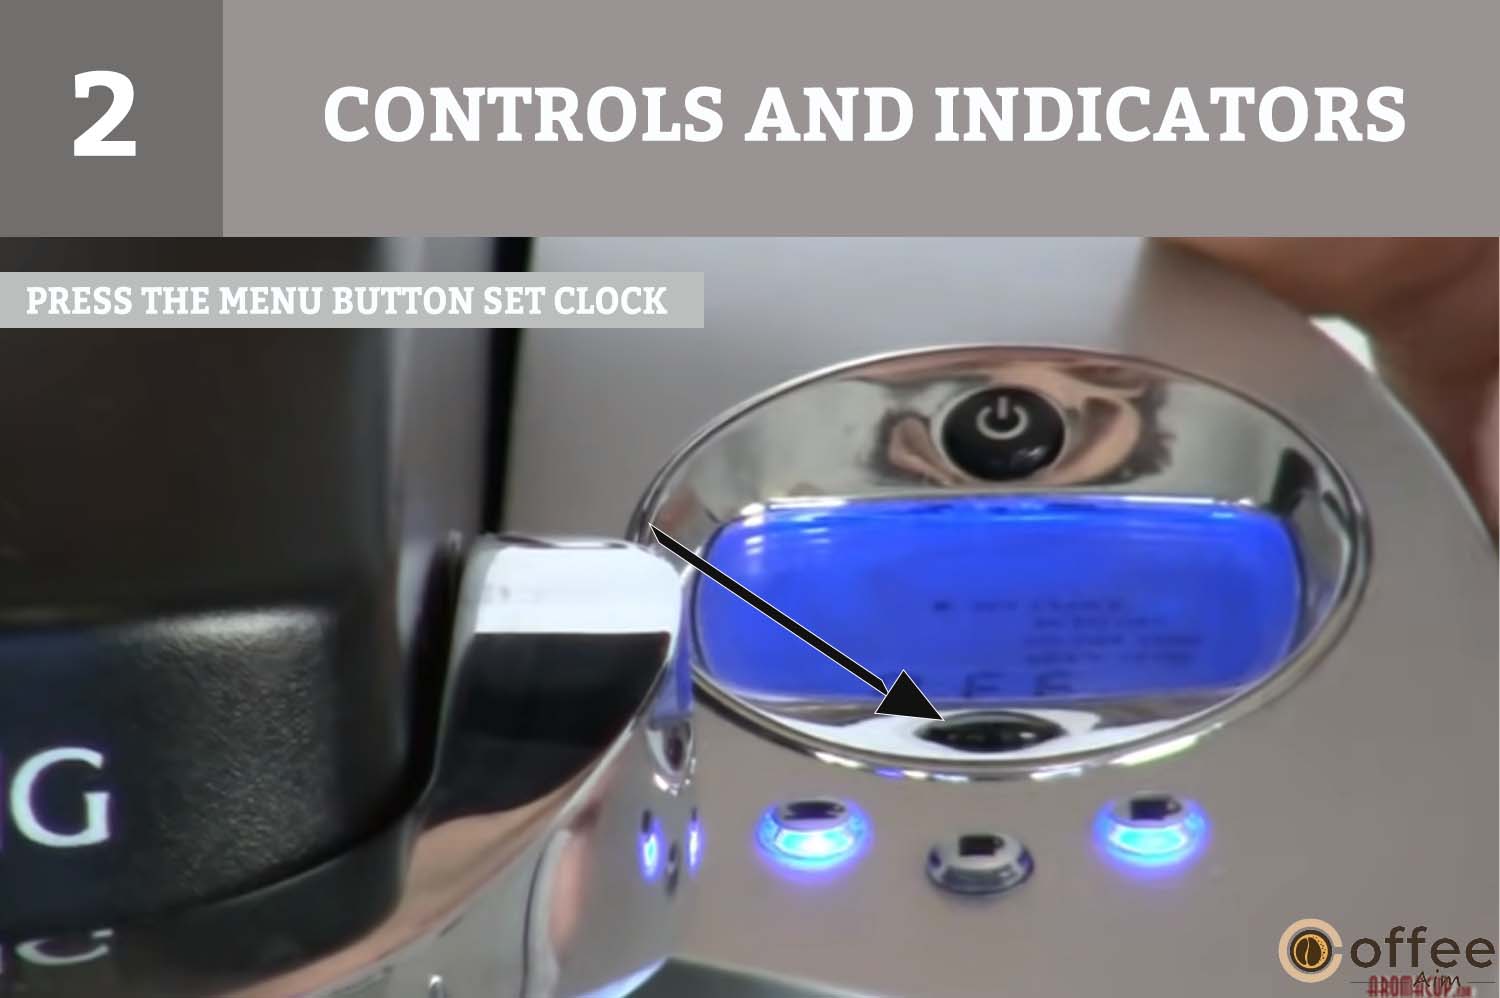
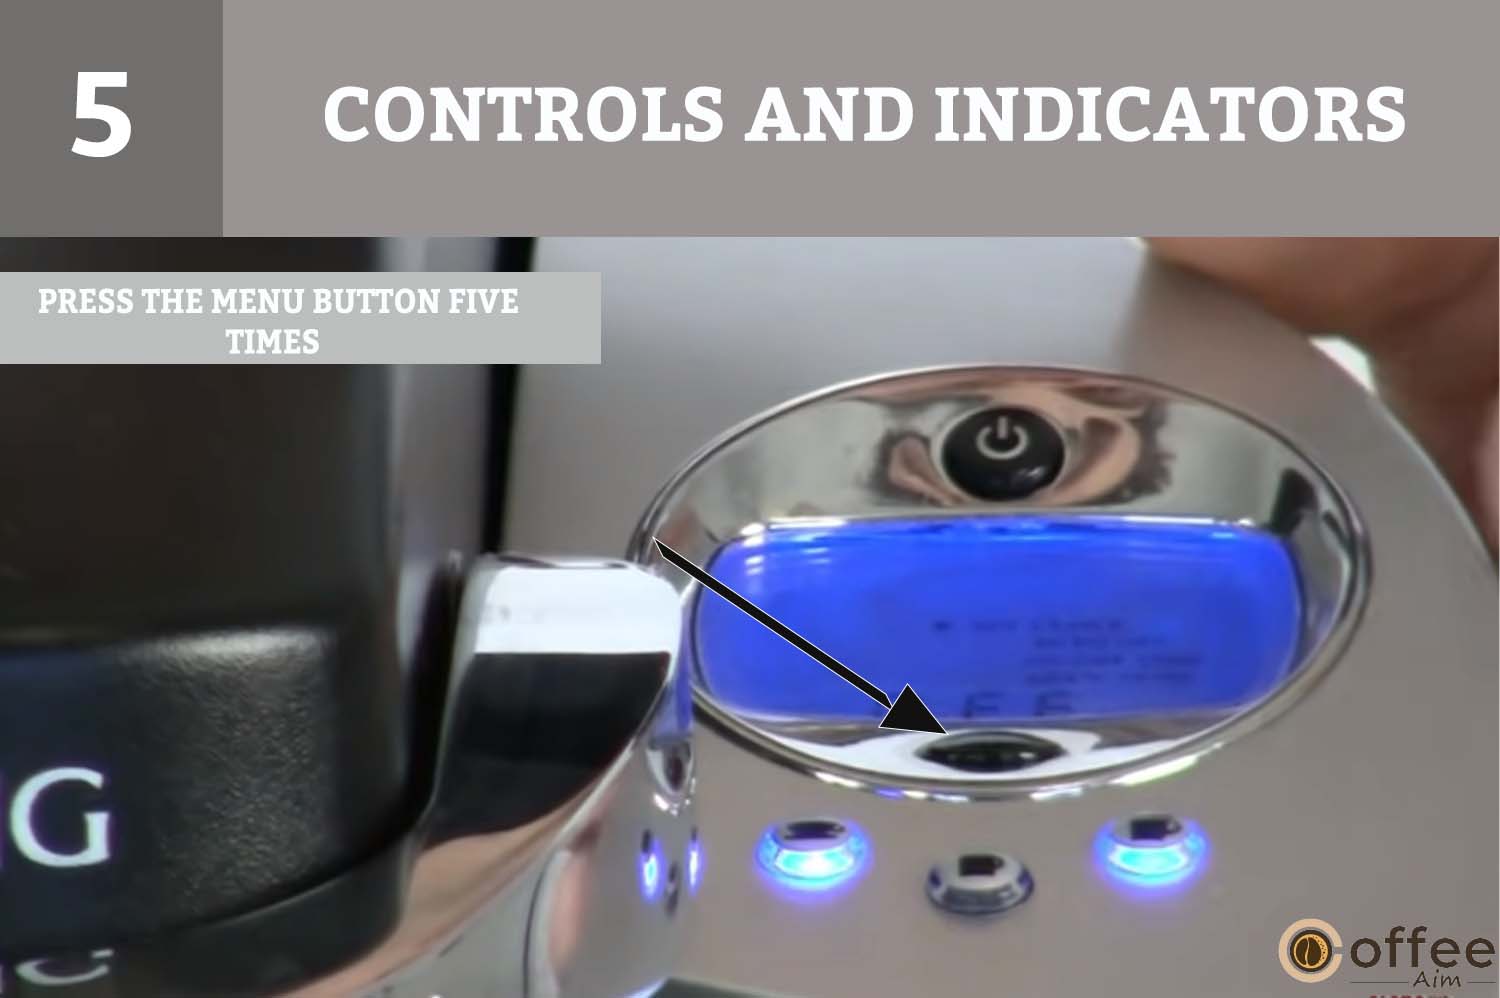
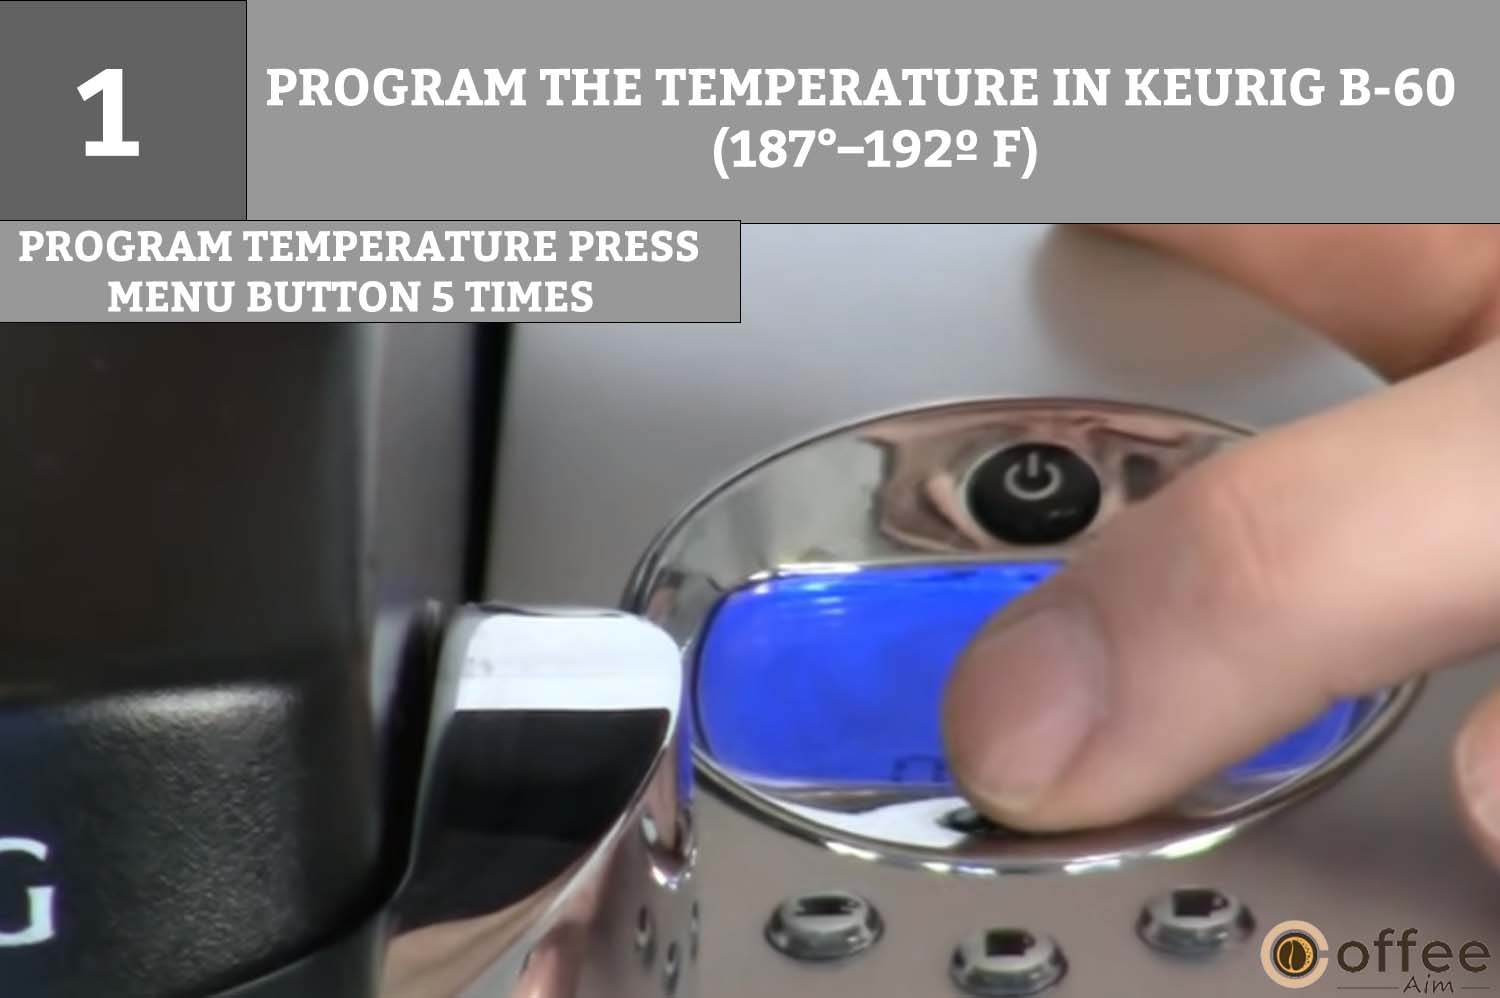
Press the “Menu button” to access all the settings and functions.
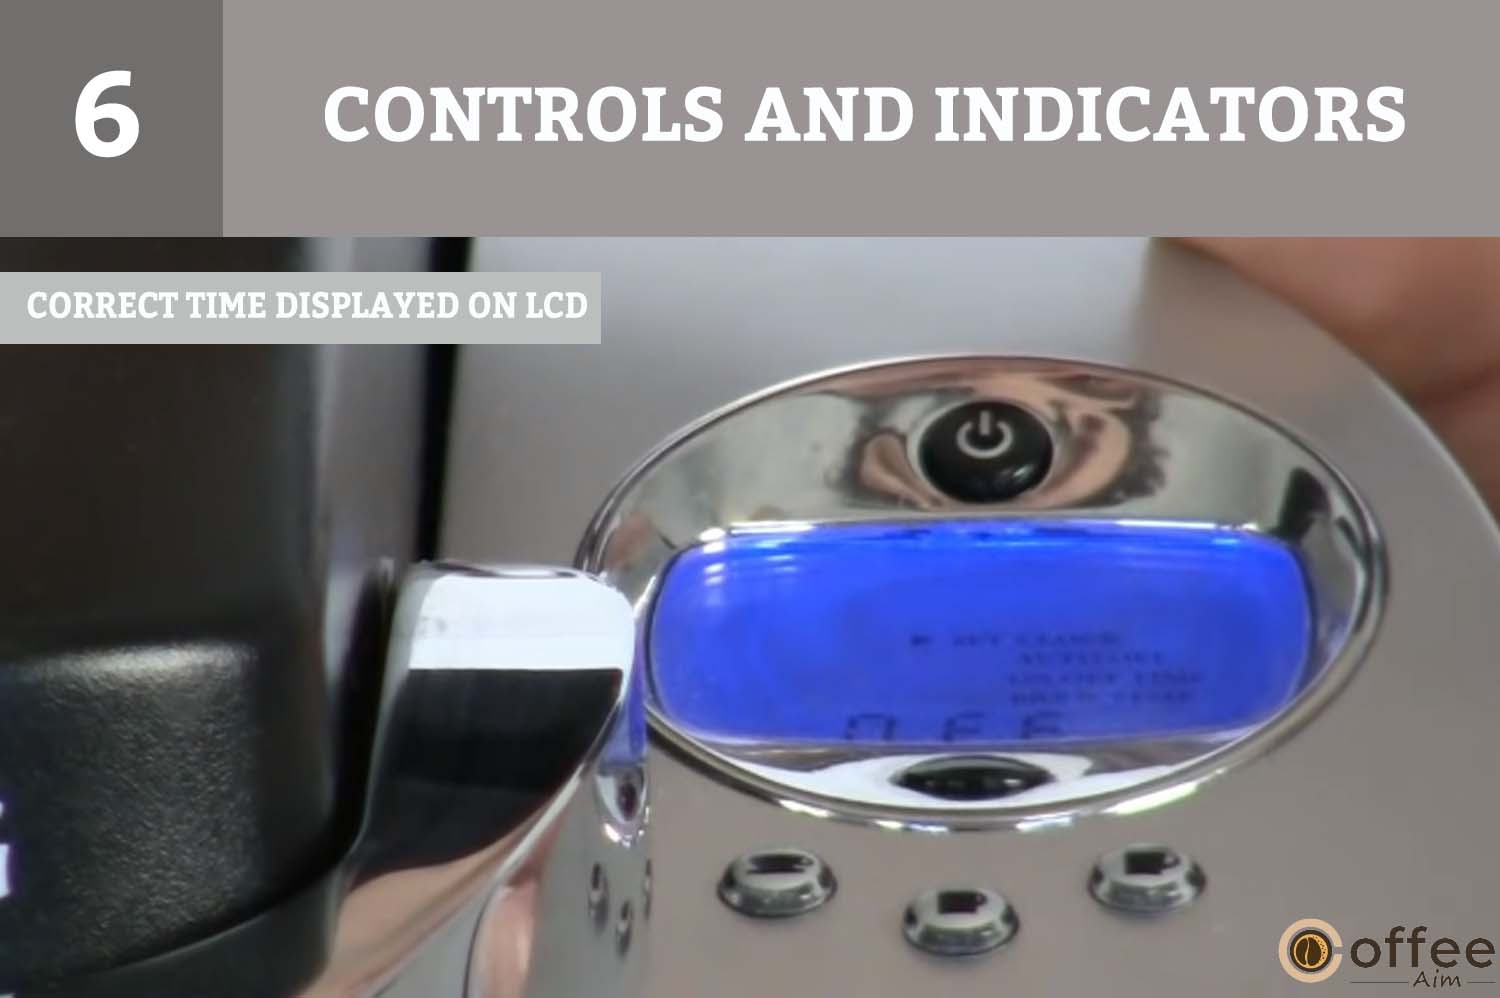
It locates in front of the machine. It will show you all the activities you are performing at the moment.
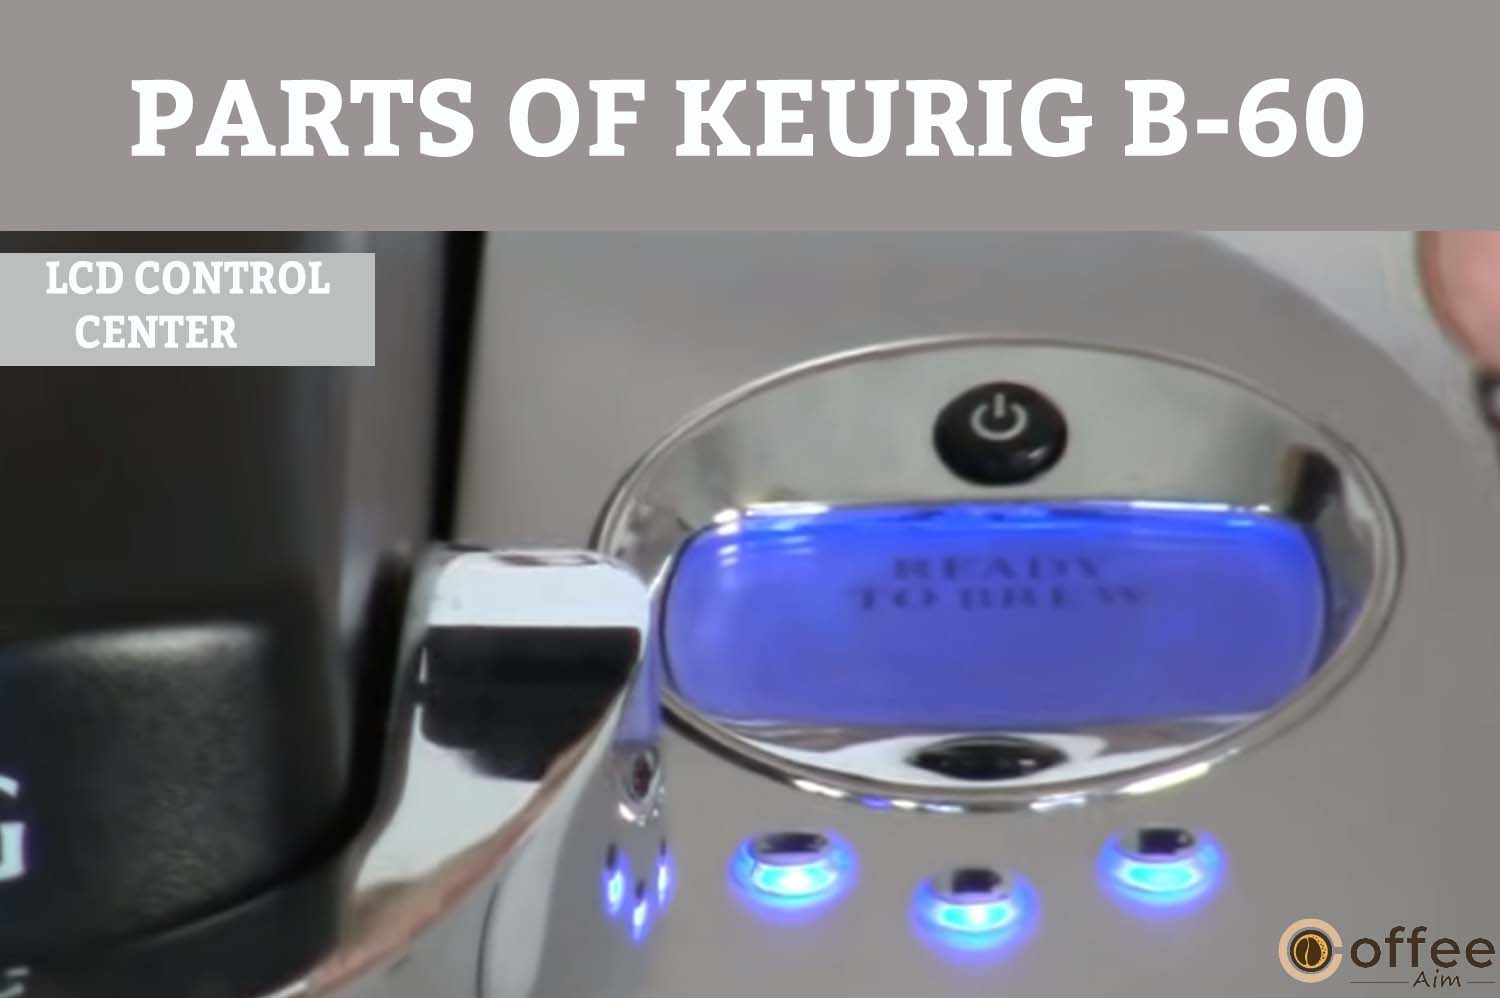
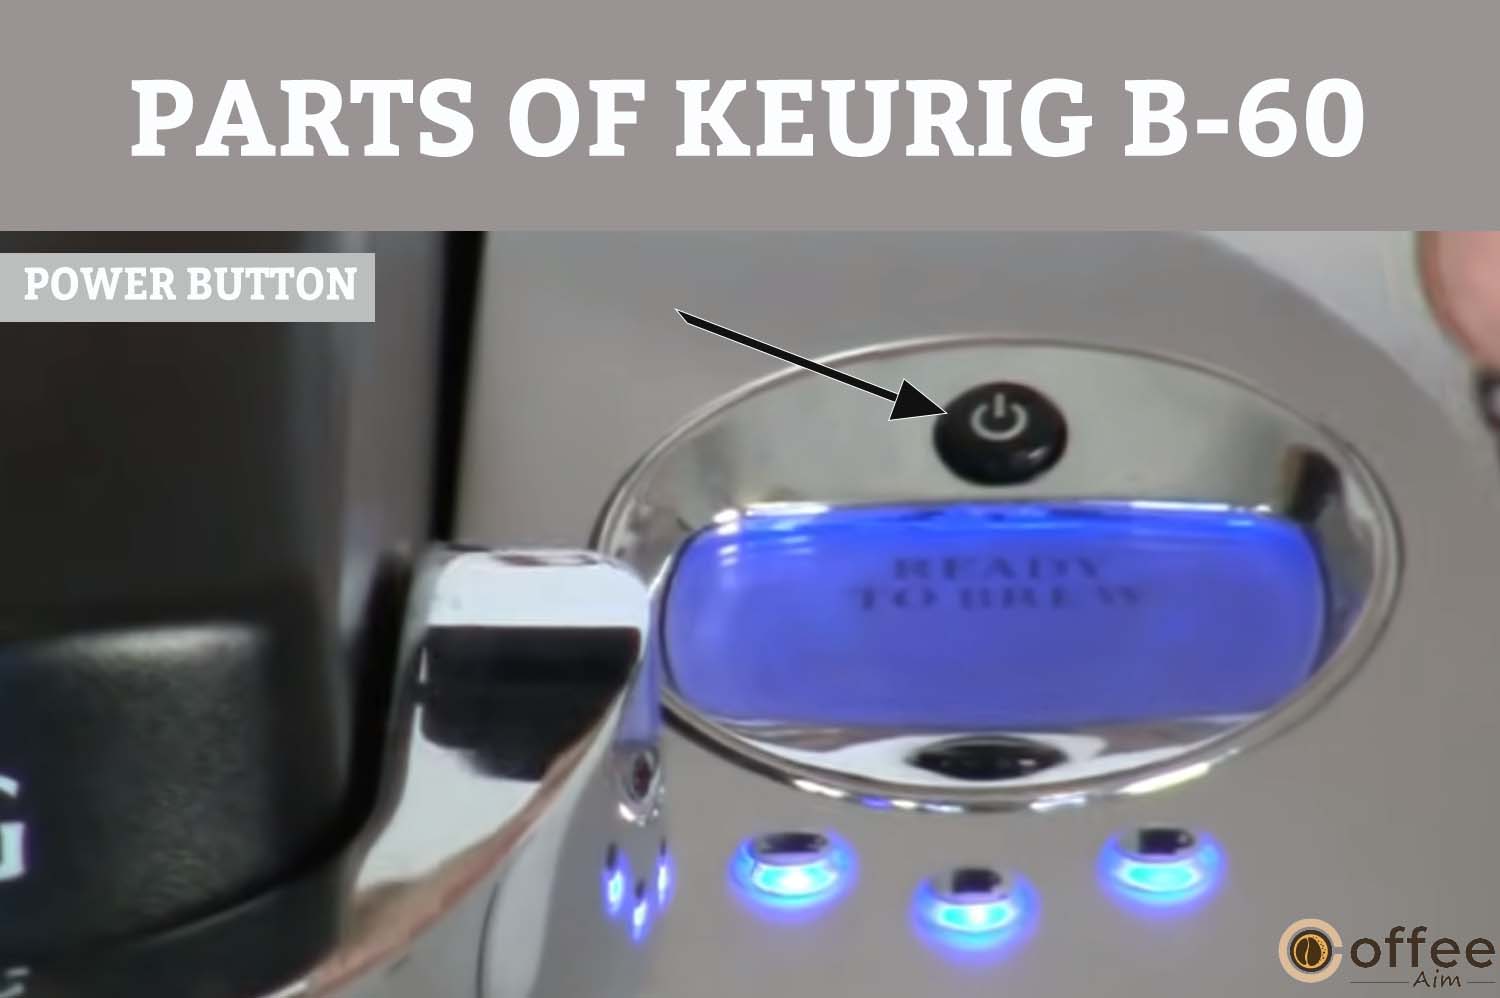
To power ON/OFF your brewer, press the power button.
To make your coffee-making journey smooth and fun, here I have listed some helpful hints. So, let’s check them out!
To enjoy a delicious cup of coffee every time you want, it is better to keep your brewer on every time. By this act, you will not have to wait for your brewer to first heat up. The Brewer can, however, be fully programmed to turn on and off according to your schedule. Or, if you wish, configure the Brewer to automatically switch off after a period of time. Making use of the Brewer convenient for you is very simple. Follow the directions in the “Program ON/OFF feature in Keurig B-60” section.
For best-tasting coffee, tea, or cocoa, use filtered water. Every location has different water quality. Therefore, it is better to use bottled water or water from a filter system if you detect an unfavorable flavor in your coffee, such as chlorine or other mineral tastes.
Your Keurig Brewer provides you limitless possibilities to choose the size, flavor, and brew that’s ideal for you thanks to its selection of more than 200 K-Cup variations and three brew sizes (Small Cup-5.25 oz., Small Mug-7.25 oz., and Large Mug-9.25 oz.). Choose an Extra Bold K-Cup and the appropriate brew size for a potent, robust cup (up to 30% more ground coffee than ordinary types). The flavor in your cup will be more potent the smaller the brew size. The flavor intensity in your cup decreases as the brew size increases.
Your Brewer might not work correctly if the electrical circuit is overburdened with other appliances. The Brewer has to be run on a separate circuit from other appliances.
Simply take off the drip tray assembly and set the travel mug on the drip tray base to brew into a travel cup.
It is recommended by Keurig to descale your coffee makers every 3-6 months or after 300 coffee cups. To see the descaling details, refer to the section “Descale your Keurig B-60” below in this article.
All is done, and now, it’s time to set up your Keurig B-60 to make it ready to brew a delicious cup of coffee for you. So, let’s begin!
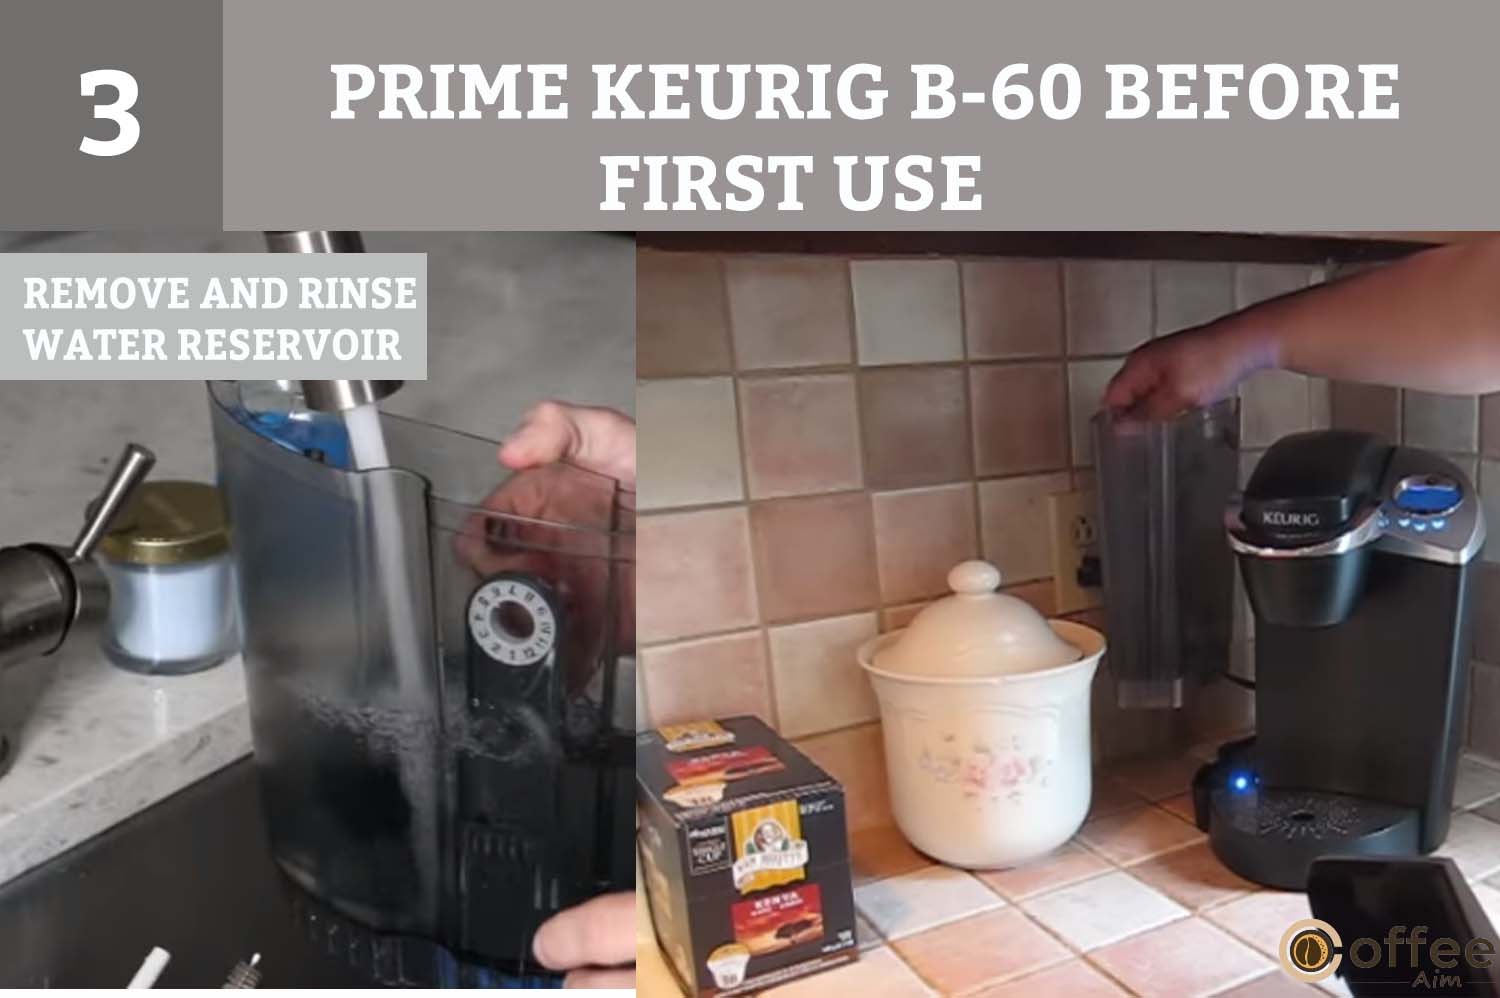
Note: You can only use Keurig B-60 Brewer once it has been set up for its first use.

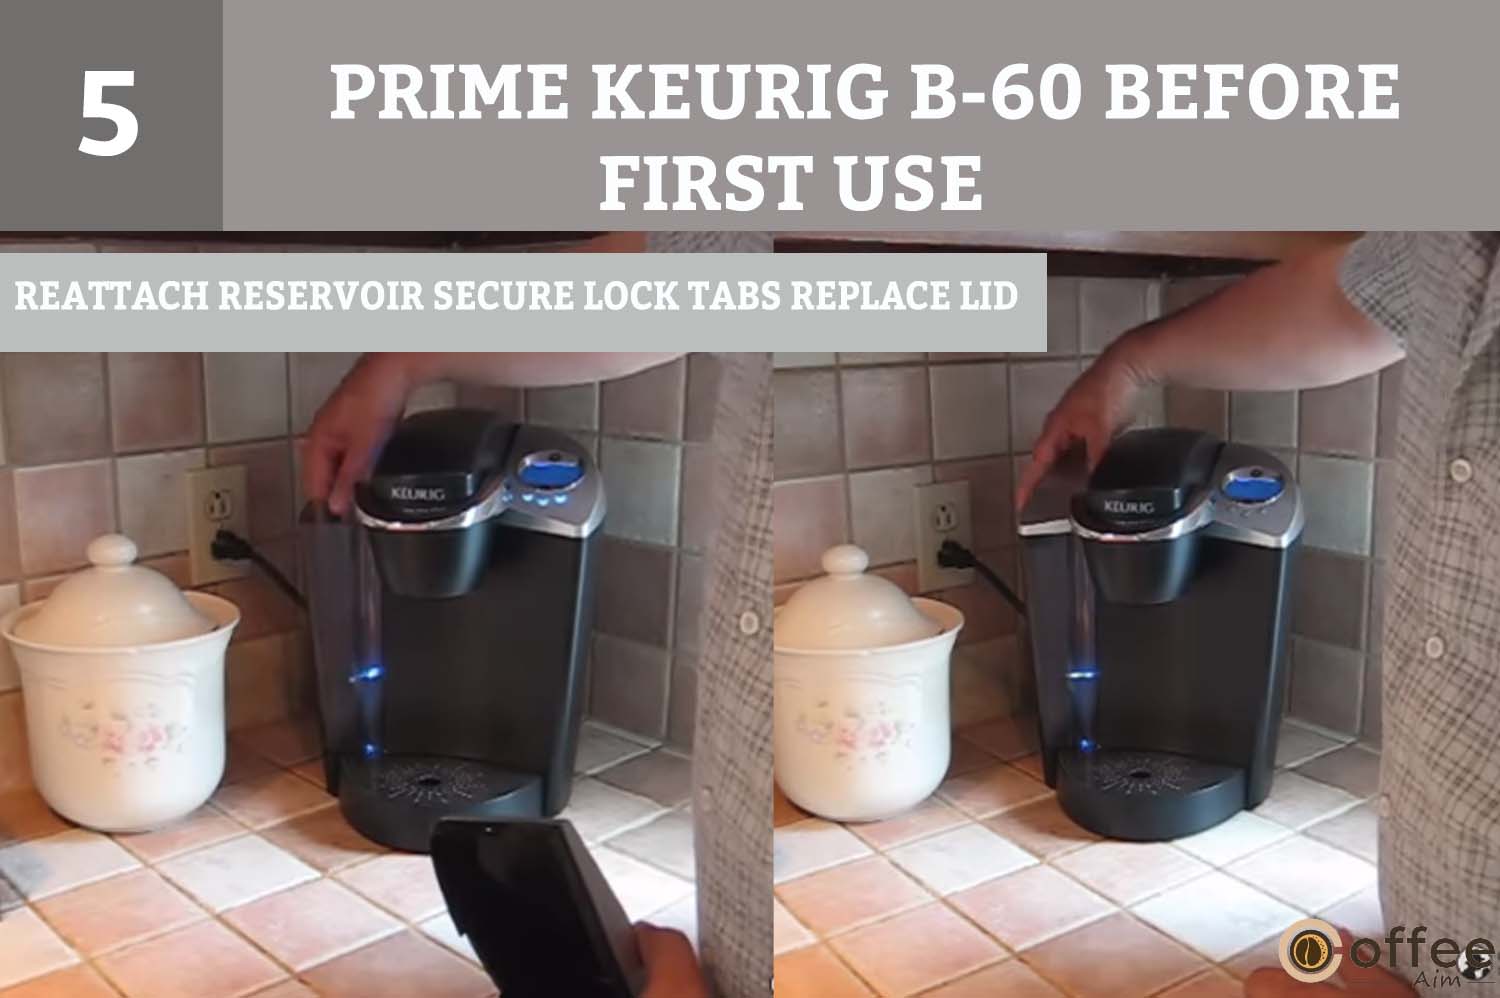

NOTE: Don’t insert K-Cup in the Pod holder during this process.
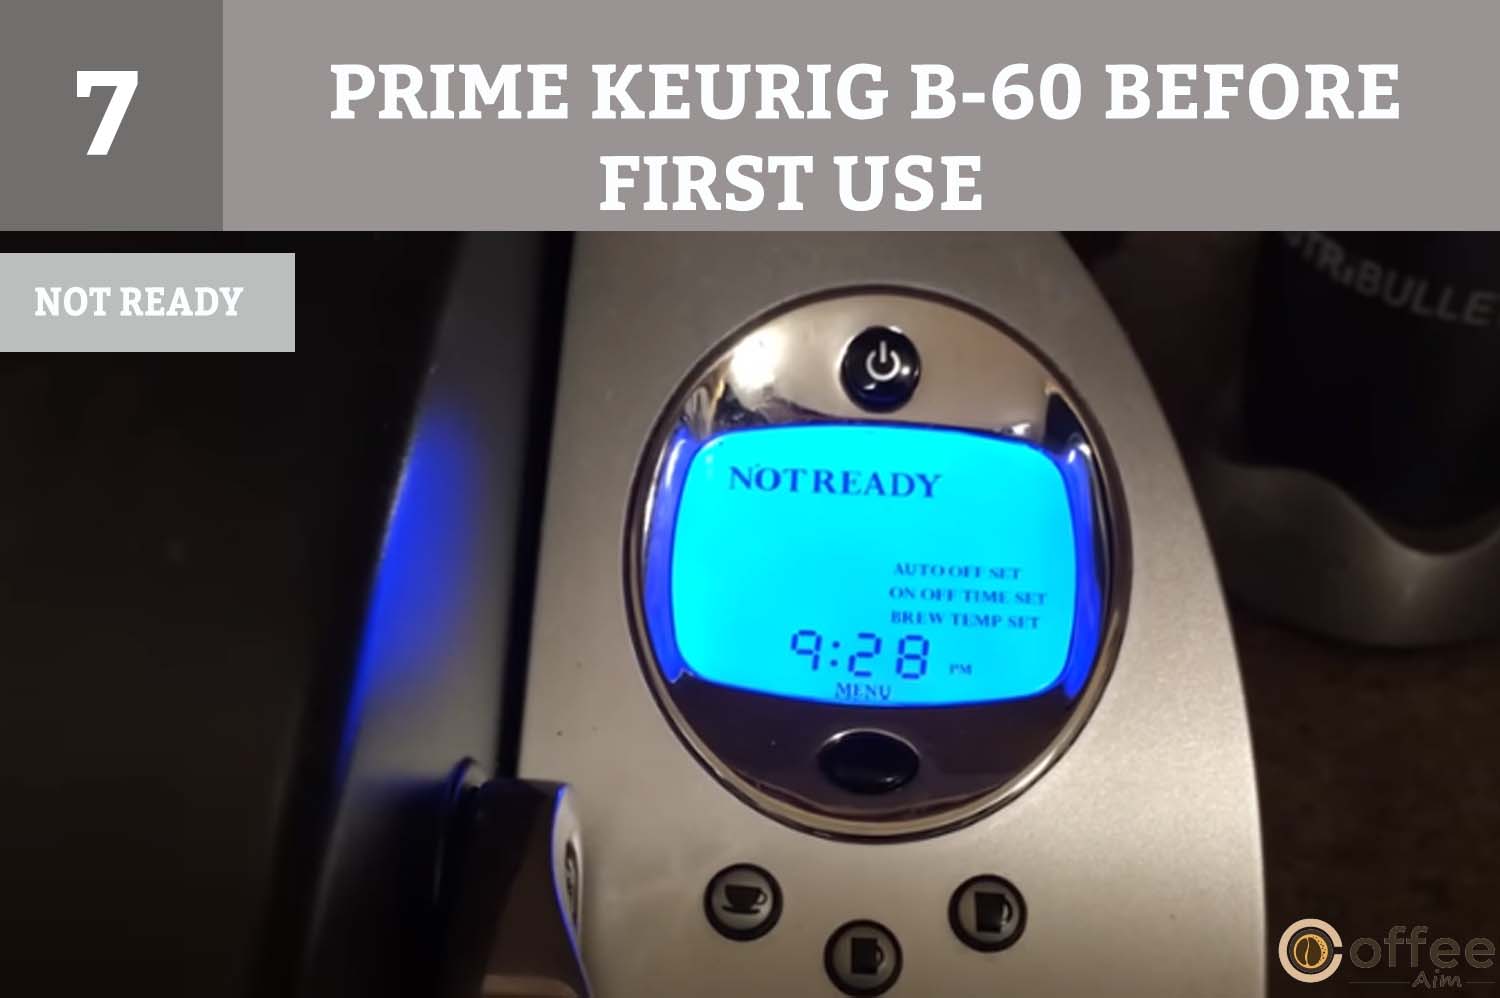
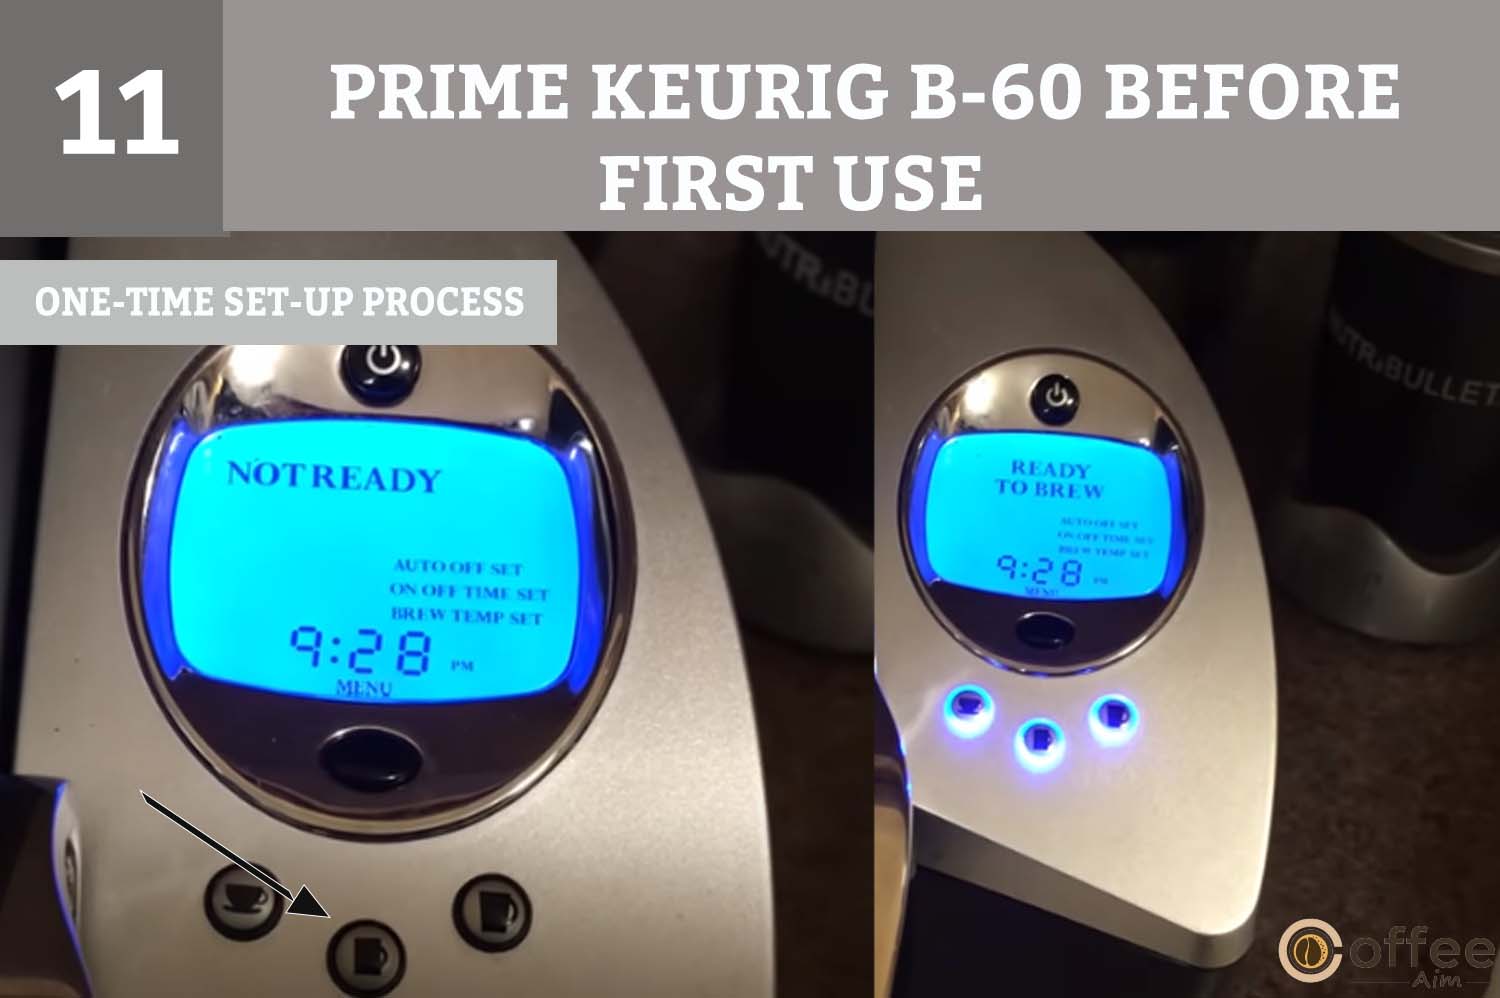
NOTE: The LCD Control Center will show “ADD WATER” if the Water Reservoir is empty or not installed. None of the buttons will work until the water is added to the Water Reservoir or it is placed back in its place.
NOTE: Don’t lift the Handle while the “Heating” is occurring.
NOTE: Coming a small amount of water from the vent and dripping into the reservoir is normal during this and subsequent heating. So, don’t worry!


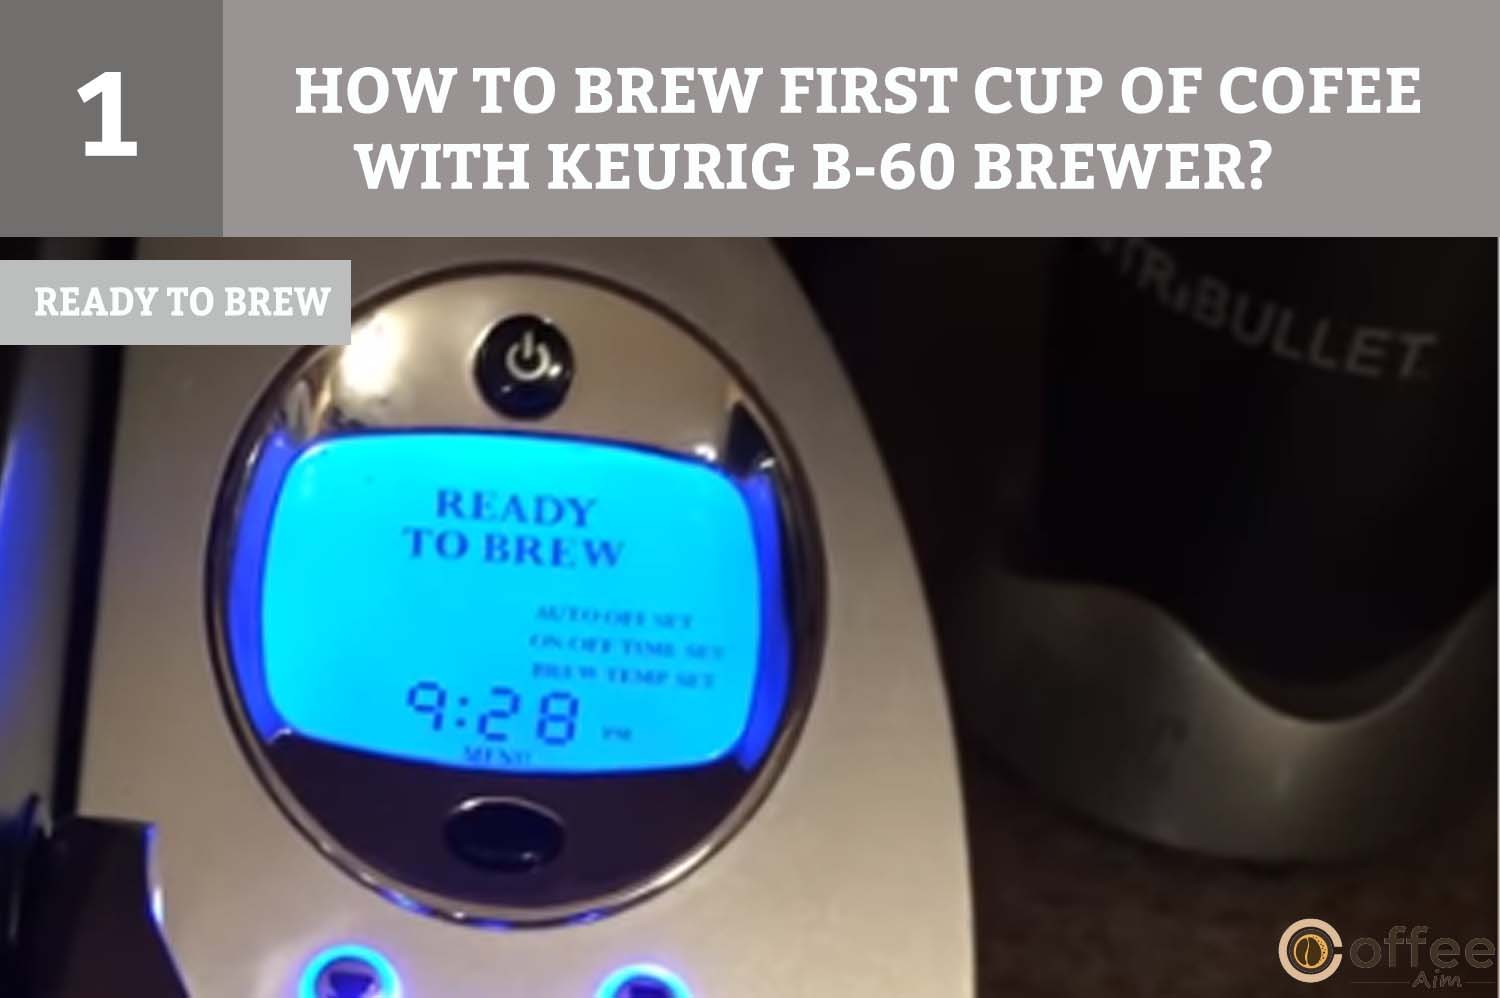
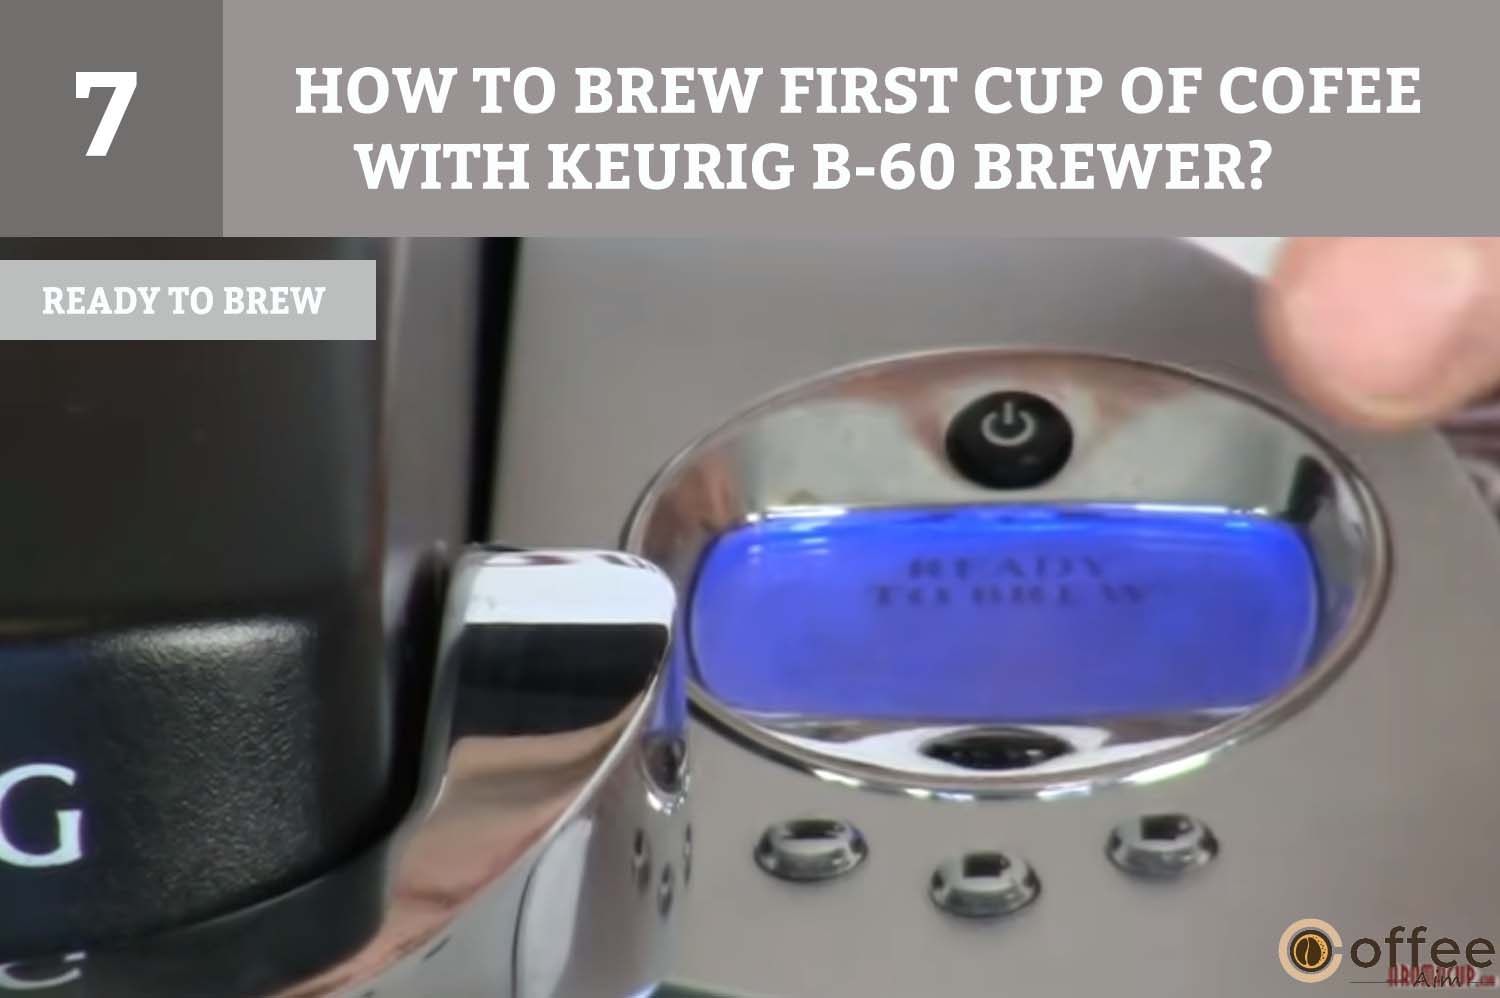
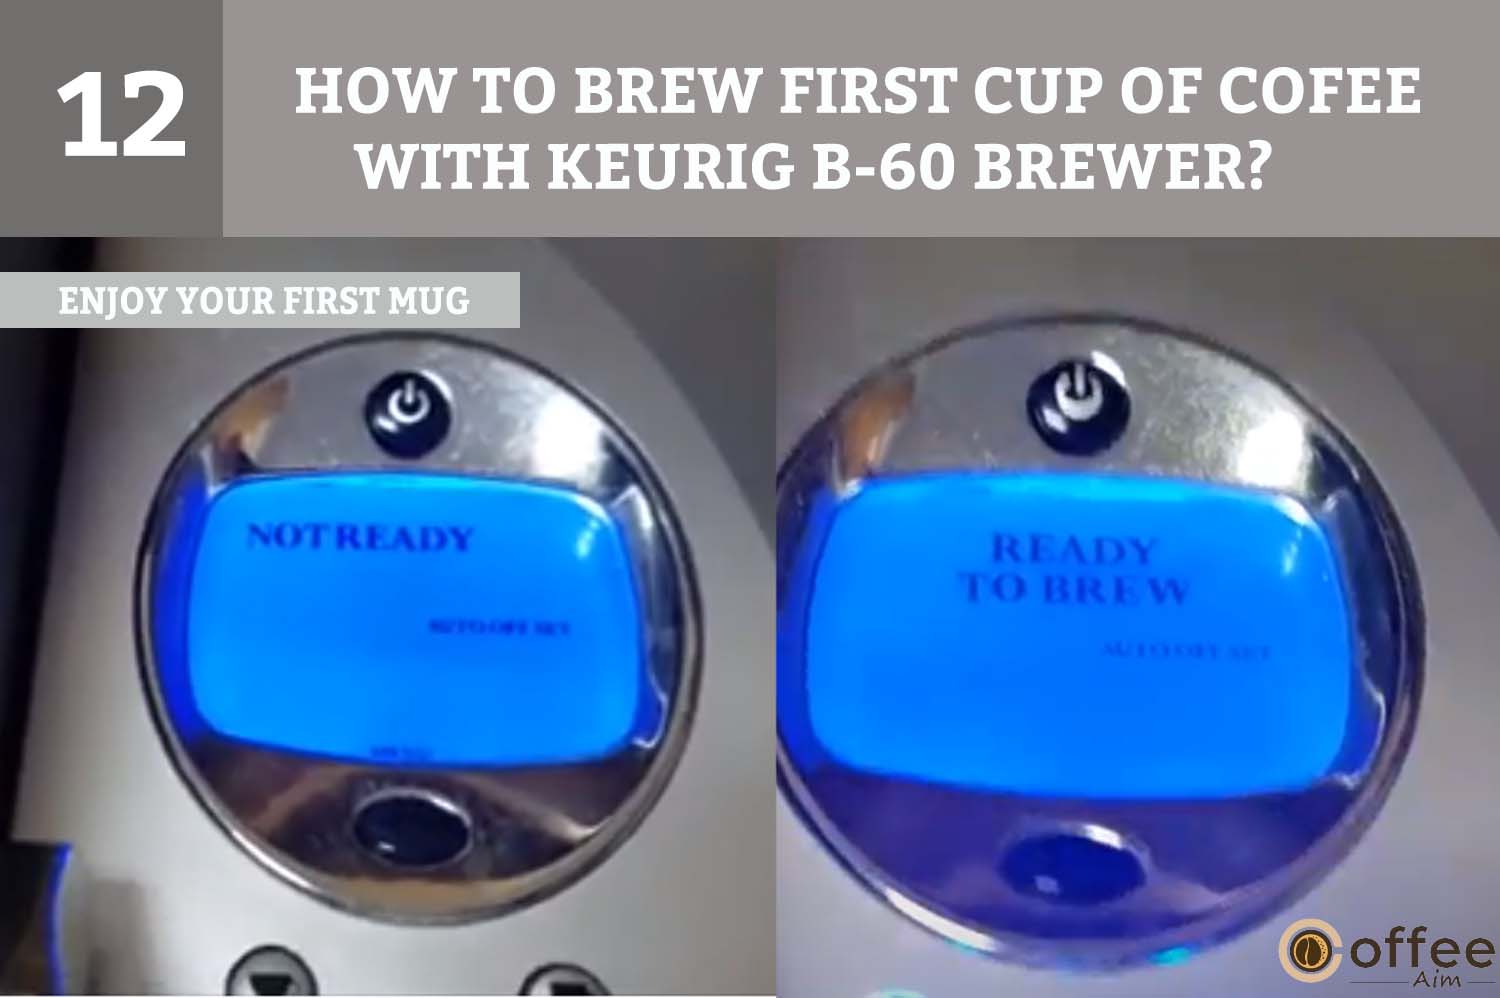
Note: Between two consecutive brews. Your brewer will take approximately 15 seconds, and after this time, “Ready to brew” will display on the screen.
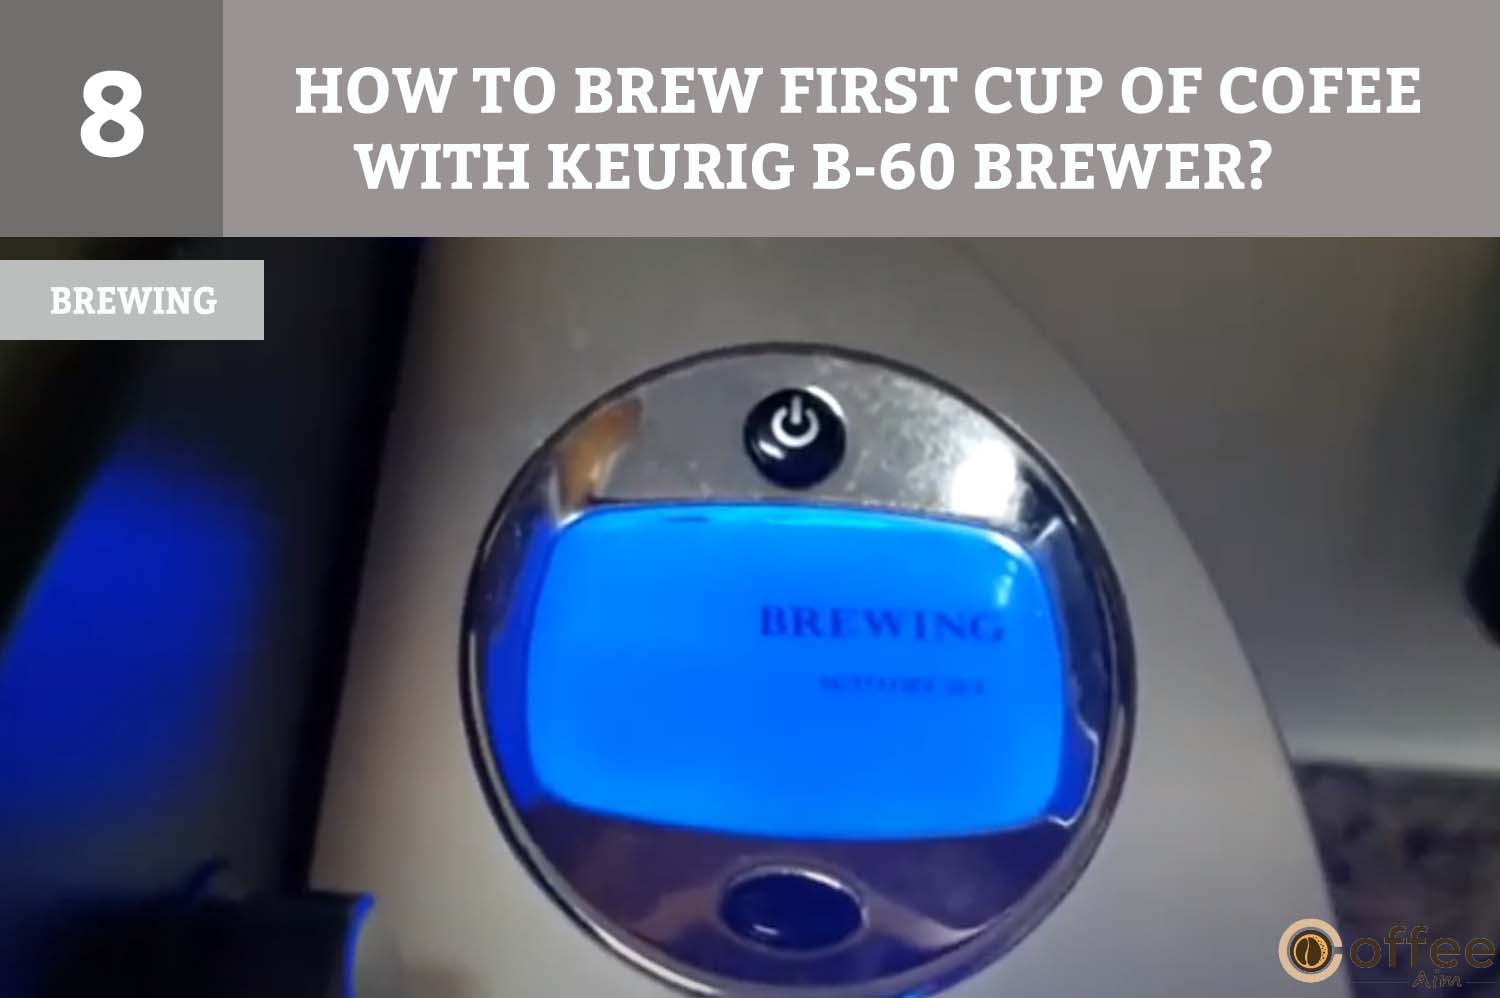
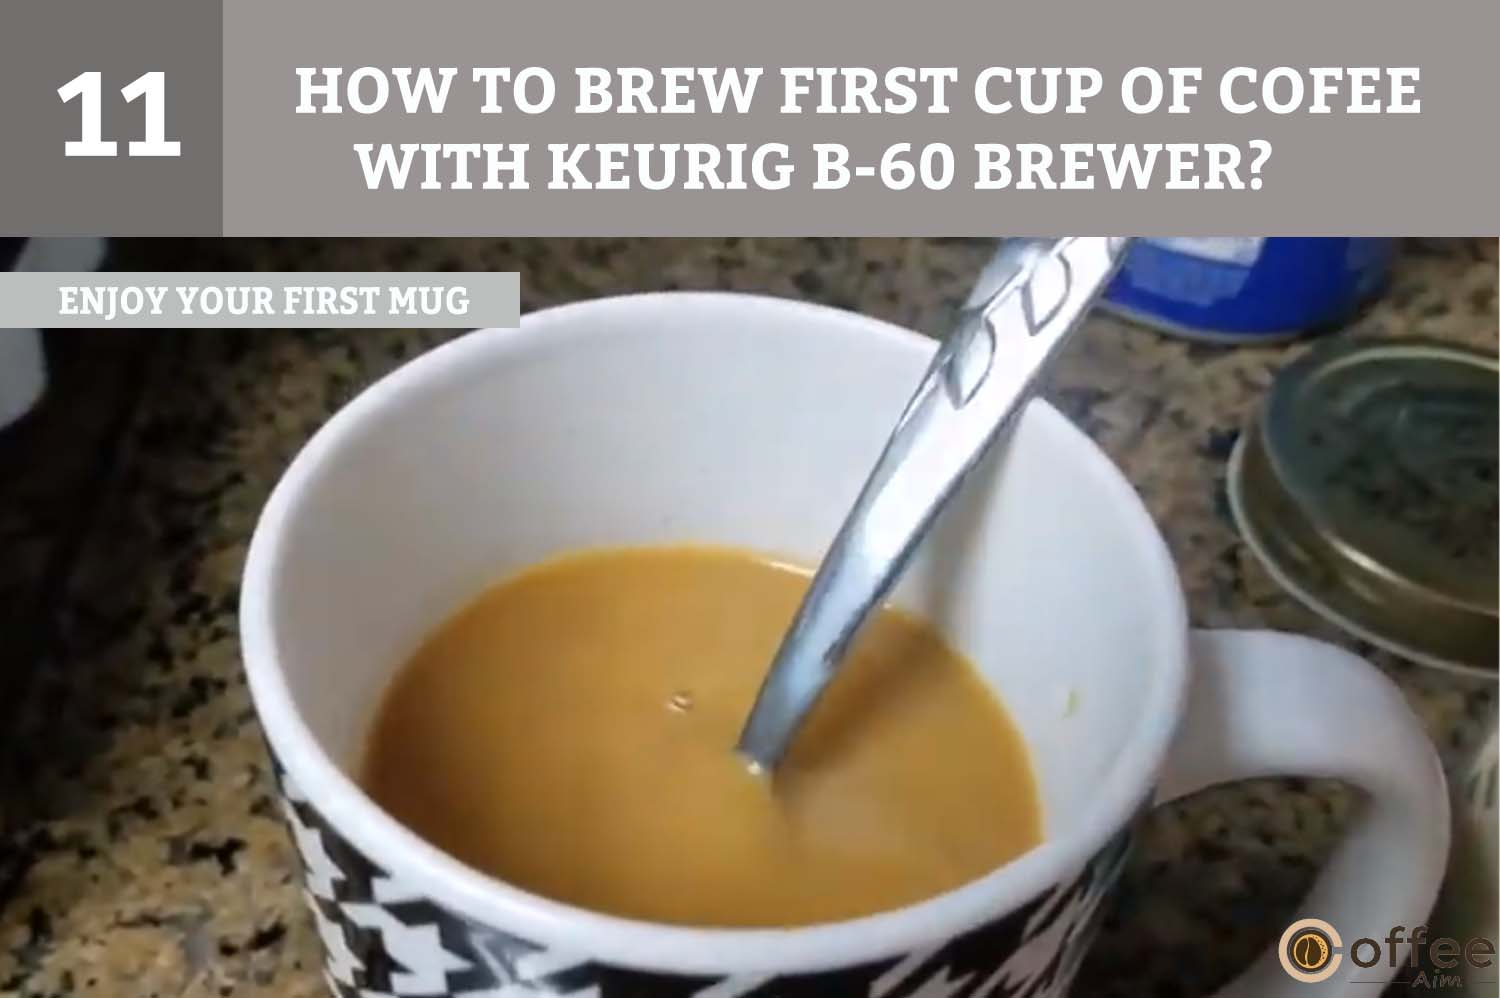
It’s time to brew your first cup of coffee with Keurig B-60 after setting up the machine. I know you can’t wait to hold your favorite coffee cup in your hands. Let’s make coffee making process fun with your newly bought Keurig B-60!


NOTE: If you don’t select and press any brew button within 60 seconds, the brewer will return to “Ready to brew” mode, and brew buttons will become inactivated to avoid accidental activation.
NOTE: There is extremely hot water in the K-Cup portion holder while brewing is in the process; therefore, don’t lift the handle and open the K-Cup portion holder assembly during brewing.

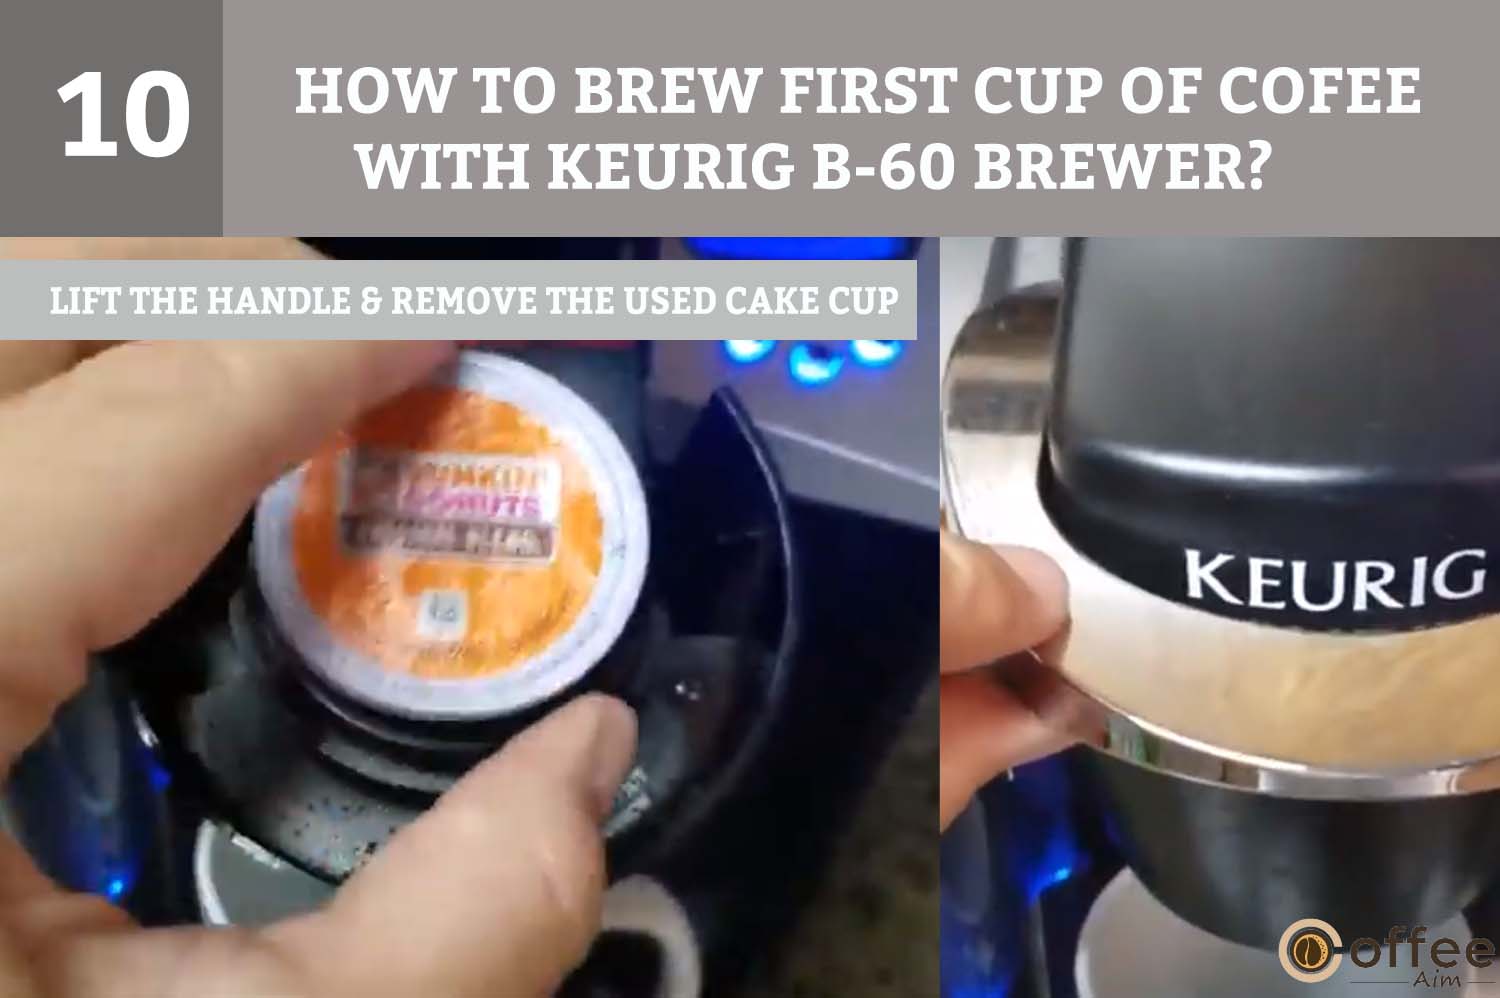
Note: K-Cup will be hot, so be careful while handling.
Do you want to stop the brewing process midway? It’s quite easy! Press the Power Button to turn the brewer “OFF”. The heating element will stop working, the flow of coffee, tea, or hot cocoa will stop, and the blue lights on the brew buttons and the Water Reservoir will also disappear.
NOTE: During your next brew, you might get less coffee or tea in your cup. You should perform a water-only cleansing brew after a terminated brew cycle. Next, you will get the exact volume of coffee that has chosen.
Do You want to know how to fill the water tank with water? No issue! It is simple. You only need to follow the steps that are listed below. Let it get going!
When the water level is low in the Water Reservoir, the LCD control center will show you “Add Water”. The blue light will also blink when the water needs to be added. The brewer will also not allow you to brew when ”ADD WATER” is displayed.
You can fill the water tank in two ways. Let’s see how!
IMPORTANT: You should not detach the Water Reservoir while the brewing process.
Your brewer comes with a function that produces hot water, so you don’t have to worry about it. So, brew hot water in your Keurig and make tea, soup, and hot chocolate through a packet. Let’s see how you can brew hot water!
Raise and lower the brewer’s handle without adding a K-Cup. The “READY TO BREW” message will appear on the LCD Control Center, and the Small Cup, Small Mug, and Large Mug Buttons will blink. Make sure there should be a Mug or Cup on the Drip Tray Plate before choosing the size you want.
Note: It is recommended to run a hot water brew cycle (without a K-Cup) after brewing a hot cocoa K-Cup.
You should drain the inner tank if you have not used your brewer for over a week. Do this by following these steps:
NOTE: If there is any problem with your brewer, then contact Customer Service at 1.866.901.BREW (2739).
Want to know how to change the default settings in your brewer? No more waiting as I am going to explain to you all about the control and indicators of your Keurig B-60. So, without further delay, let’s get started!
The clock setting is optional. The time will display on the LCD Control Center when the clock is set. Let’s get straight into the process!
NOTE: If you want to use the On/Off time programming feature, you have to set the clock.

Note: The clock won’t be displayed until the time is set, so if power is stopped to the Brewer by unplugging it or if power is lost, repeat the previous steps to reset the time.
The maker has three settings so you may make hot chocolate, tea, or fine coffee whenever you want. If you set the maker to turn on every morning, you will never again have to wait for it to warm up before brewing a gourmet cup of coffee. Let’s explore the three programming options!
You can leave the brewer on all the time so you can enjoy a fresh cup of coffee or tea and get cocoa anytime. When you want to turn it off, simply press the Power Button.
NOTE: The clock remains on if it is set, and you can’t make a cup of coffee, tea, and hot cocoa.
If you want to switch on the brewer again, press the power button and wait for the water to warm up.
Set Auto off mode in your brewer to turn it off automatically after a certain period of your last brew. To set the ON/OFF mode, you need to follow the steps mentioned below:
The clock in your Keurig coffee maker must be set to the correct time in order to use this programming feature. If the time isn’t set, the clock won’t show up. To set a specific On time, just follow these steps:
NOTE: The On/Off Time programming options and “AUTO-OFF” Timer can be set up to function separately or in cooperation. For instance, you may configure the Brewer’s On Time function to turn it on at 7:00 AM and its Auto Off Timer feature to turn it off two hours later.
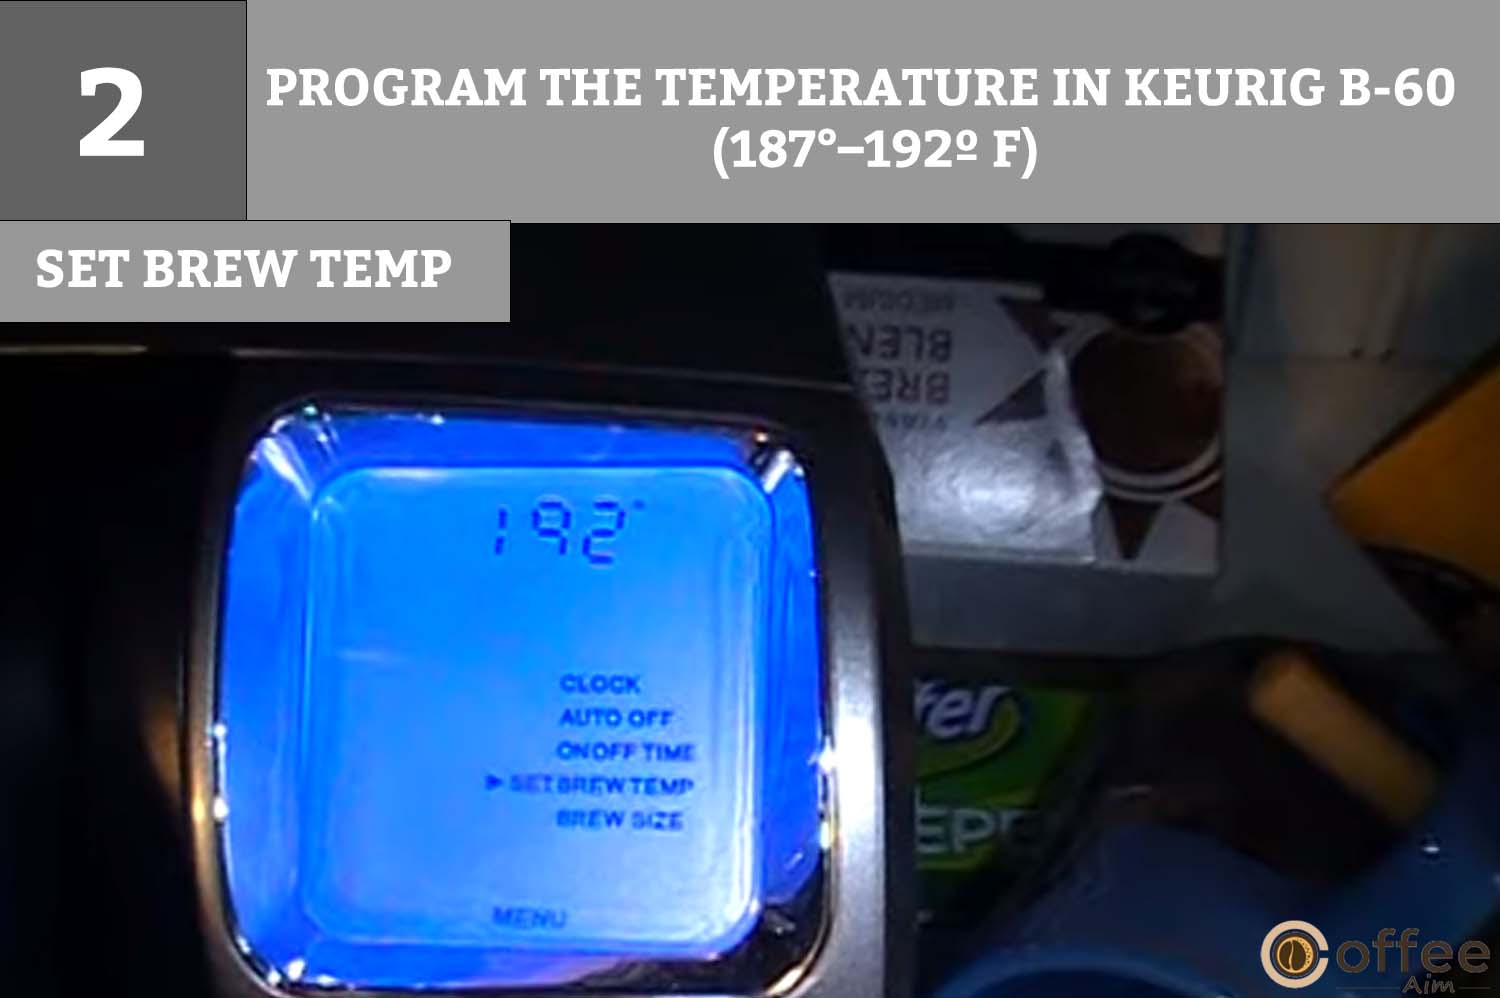
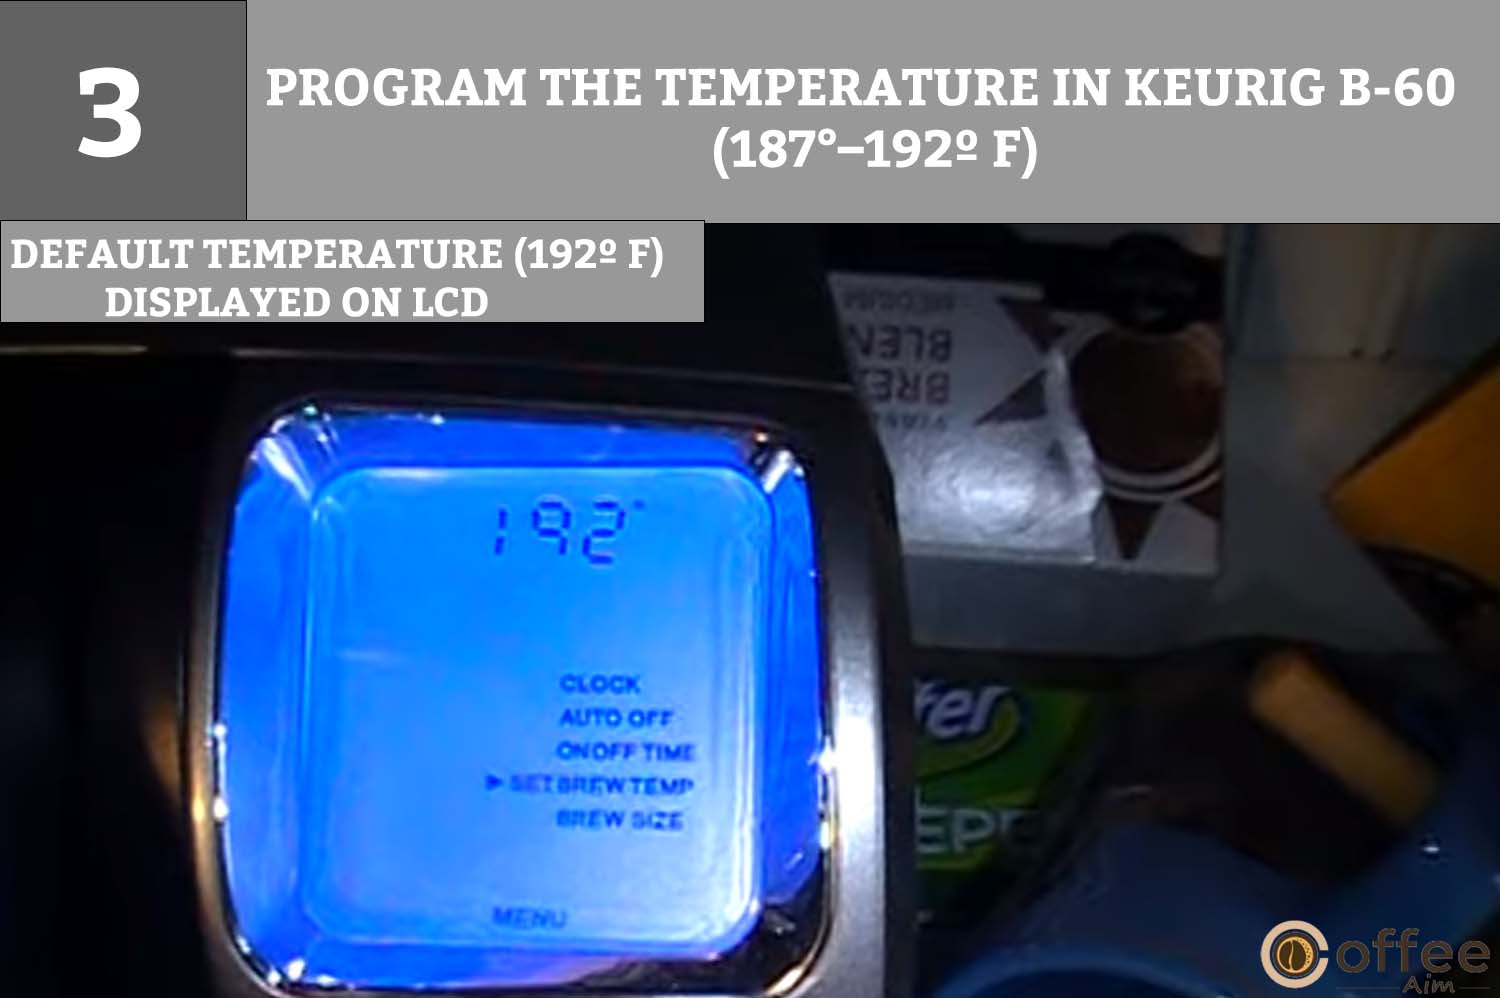
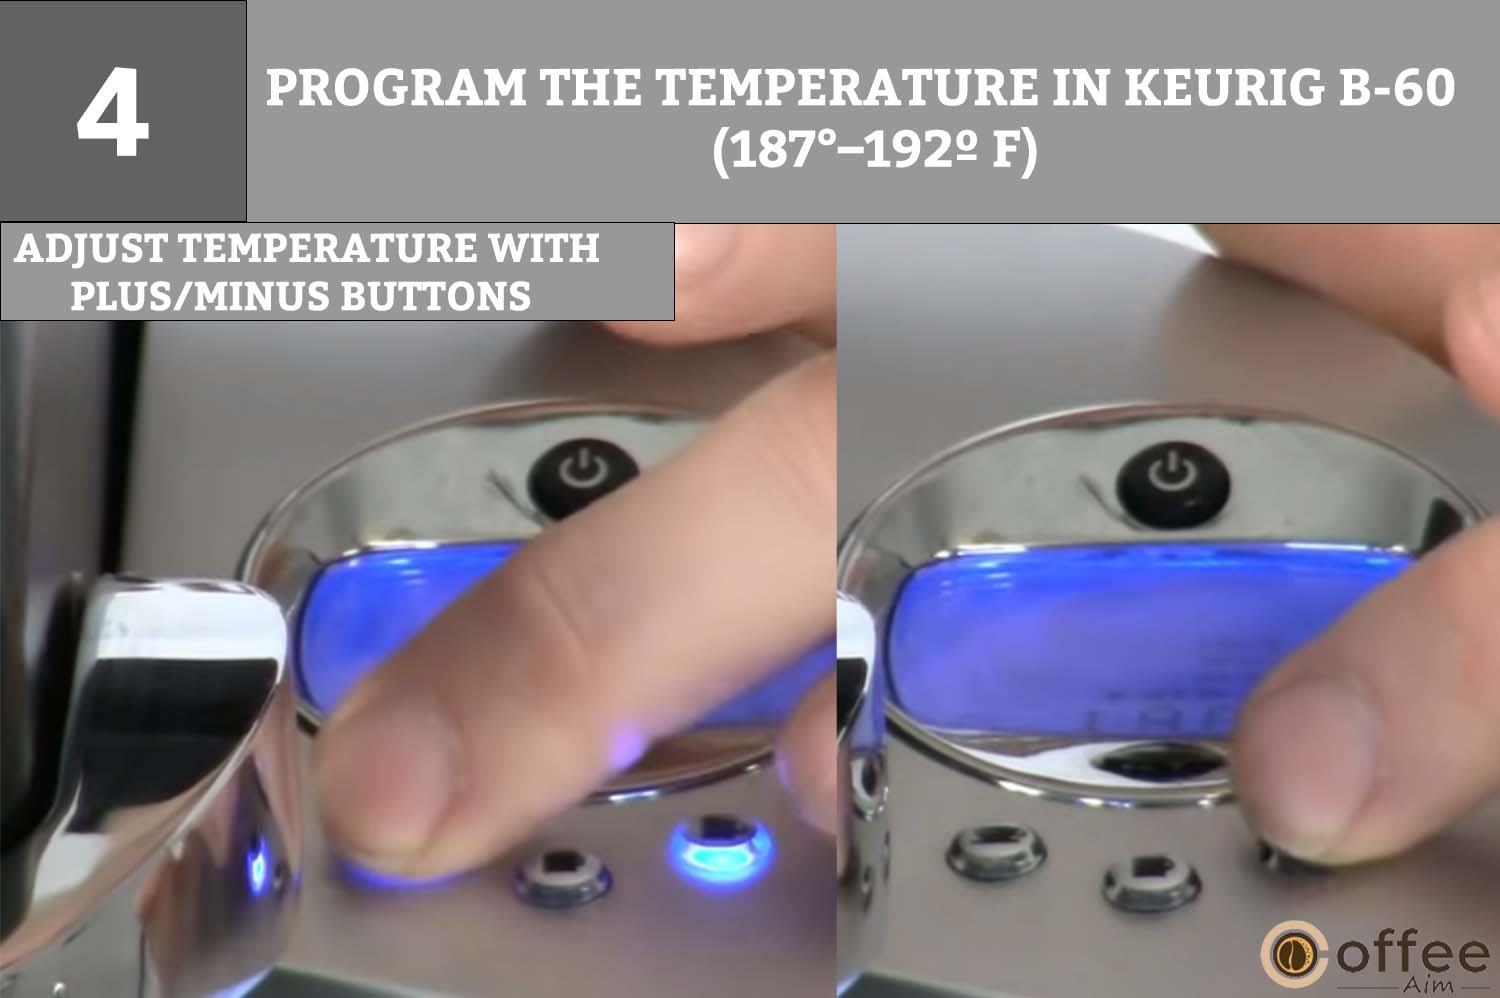
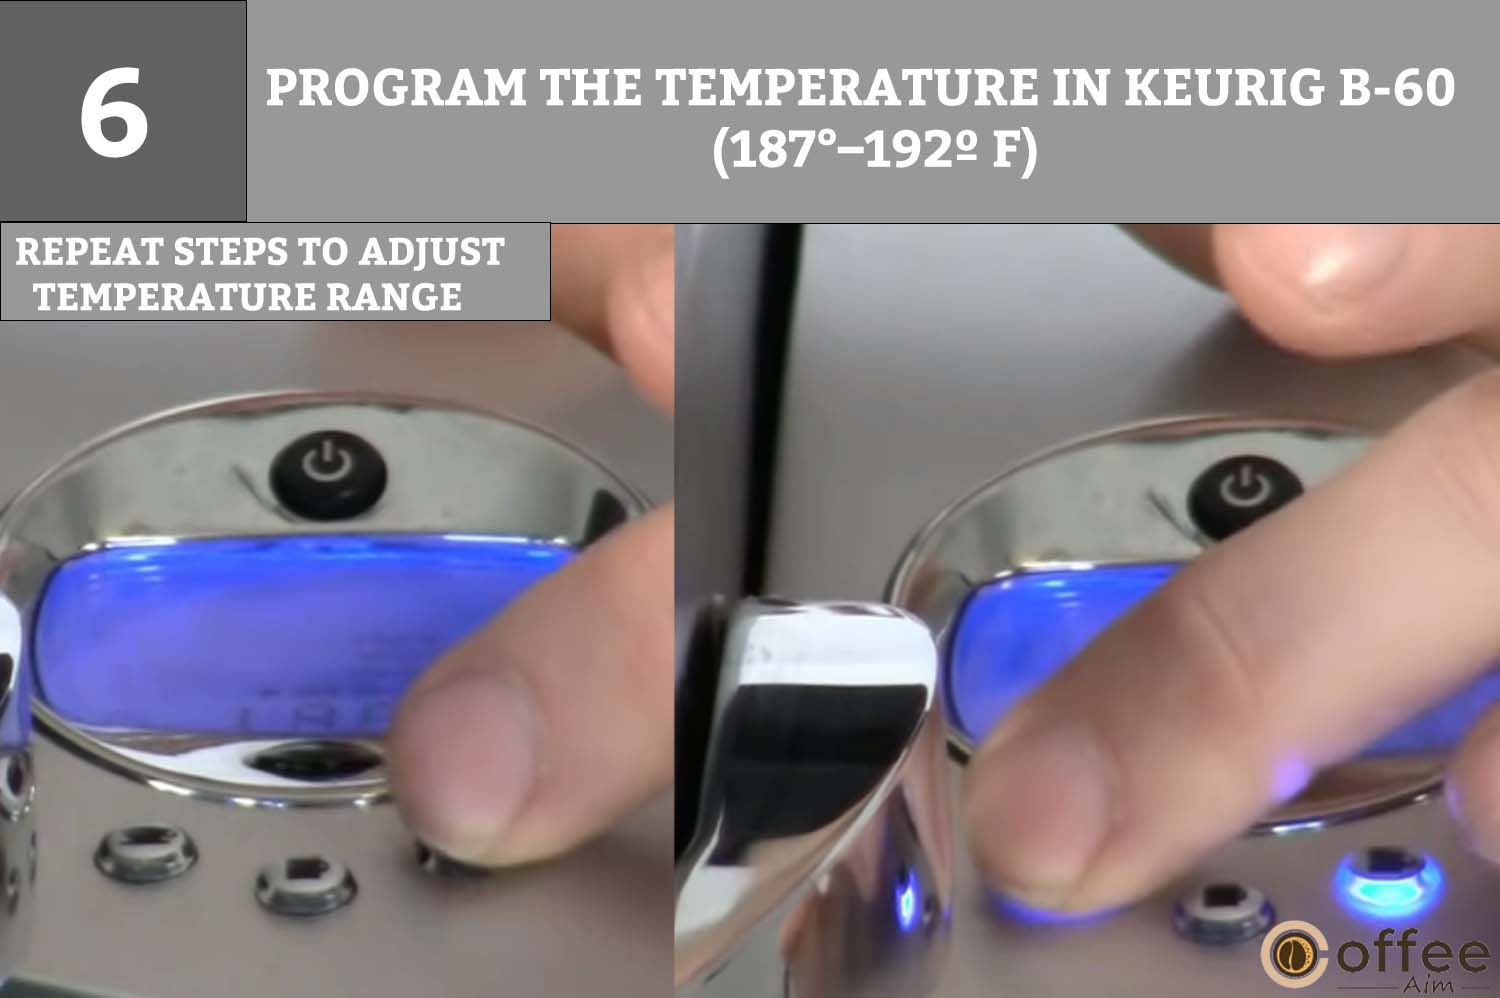
The brewer has already adjusted at 192 degrees, but if you want a cooler cup of coffee, tea, or hot cocoa, then you can decrease it by 5 degrees following these instructions.

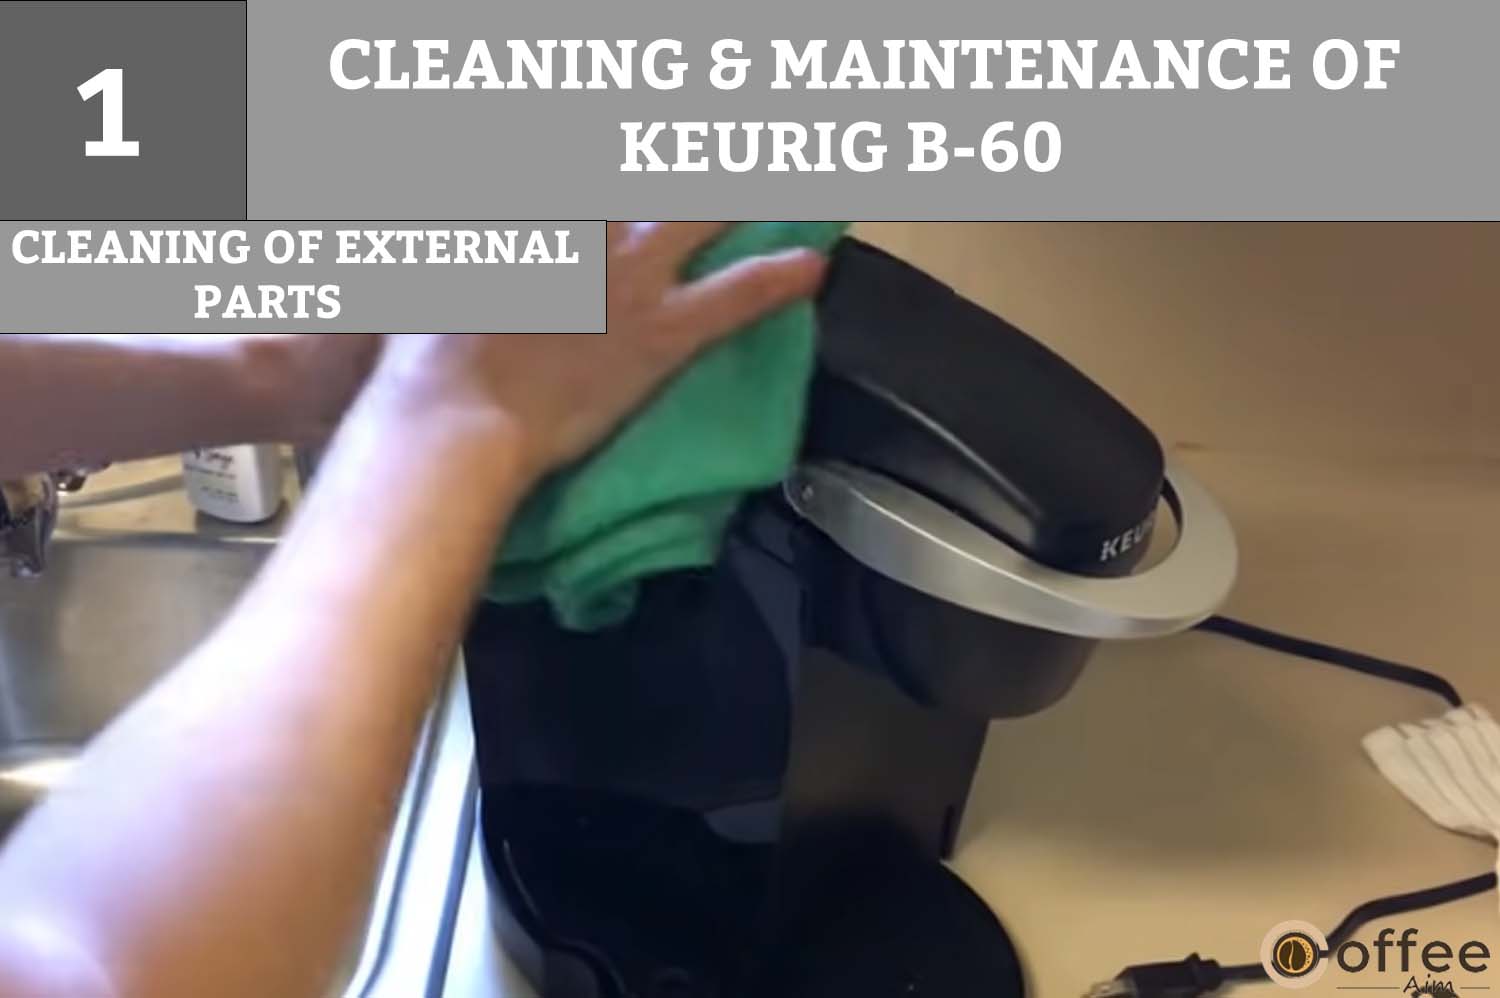
You should keep your brewer clean if you want it to run for a long time properly. Furthermore, regular cleaning will not only extend the life of your brewer but also help it perform better. It will make your life easier and your coffee more enjoyable. Let’s start cleaning!
I recommend you clean all external parts of your brewer in your daily routine. Clean your brewer’s external parts in the ways mentioned below:
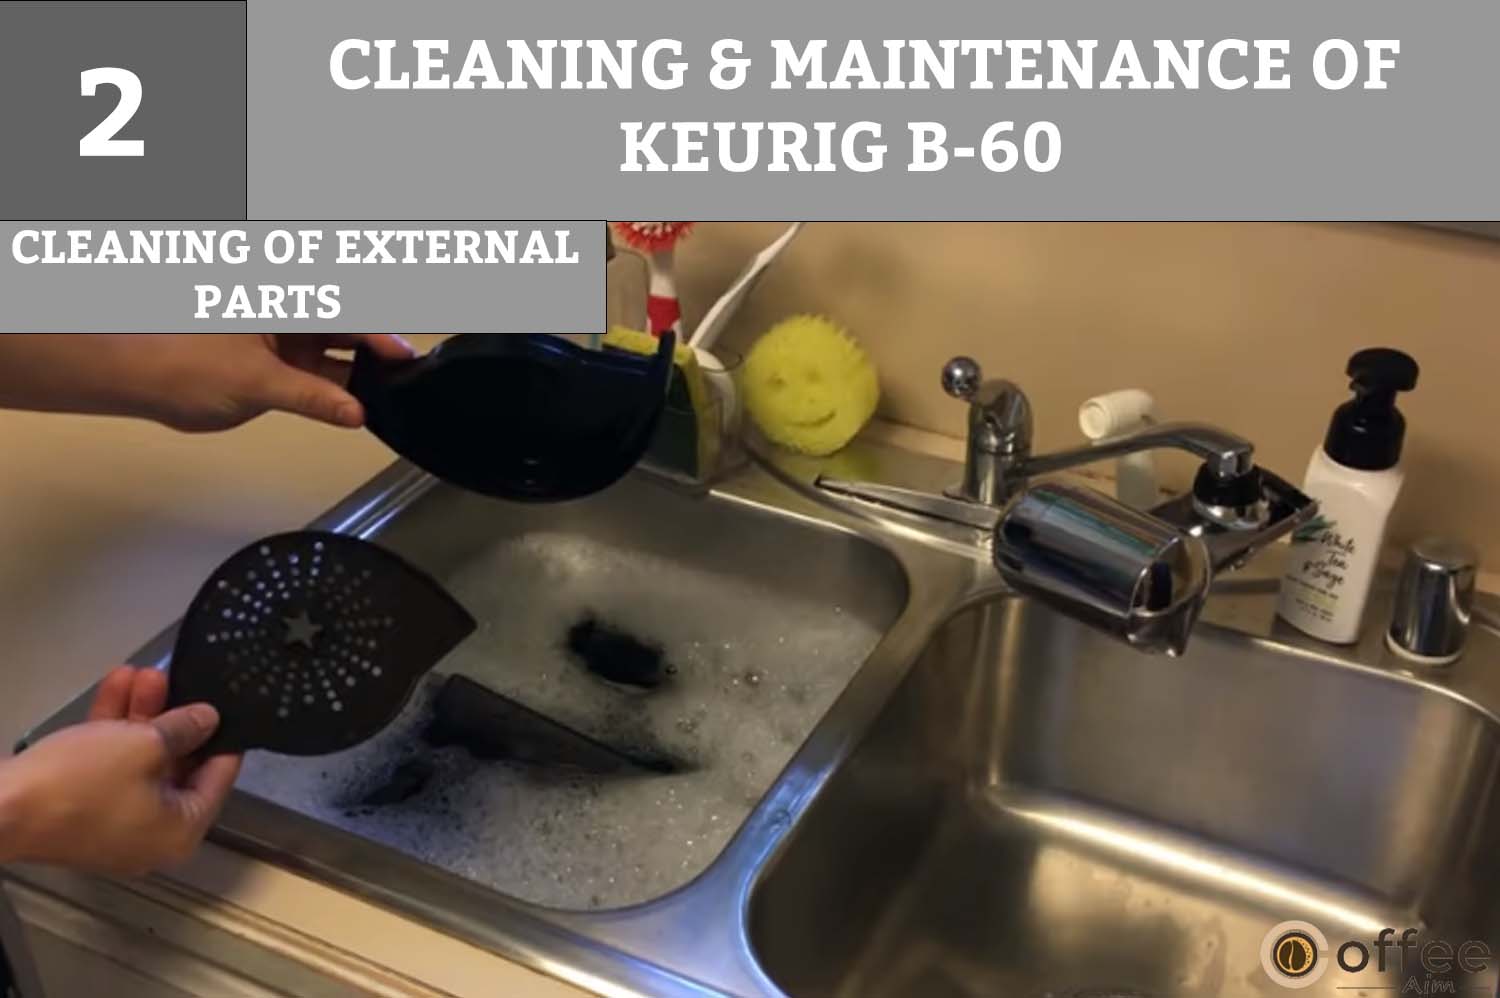
The K-cup holder assembly is dishwasher-safe. However, use low-temperature cycles in the dishwasher while cleaning the K-Cup pod holder. This part is easy to disassemble from the brewer. So, to remove it from the brewer, open the Lid by raising the handle. Grab the K-cup holder from the top with one hand and use another to push its bottom from the underside until it releases. After cleaning the K-cup holder, align it using its two front ribs as a guide, and snap it in place.

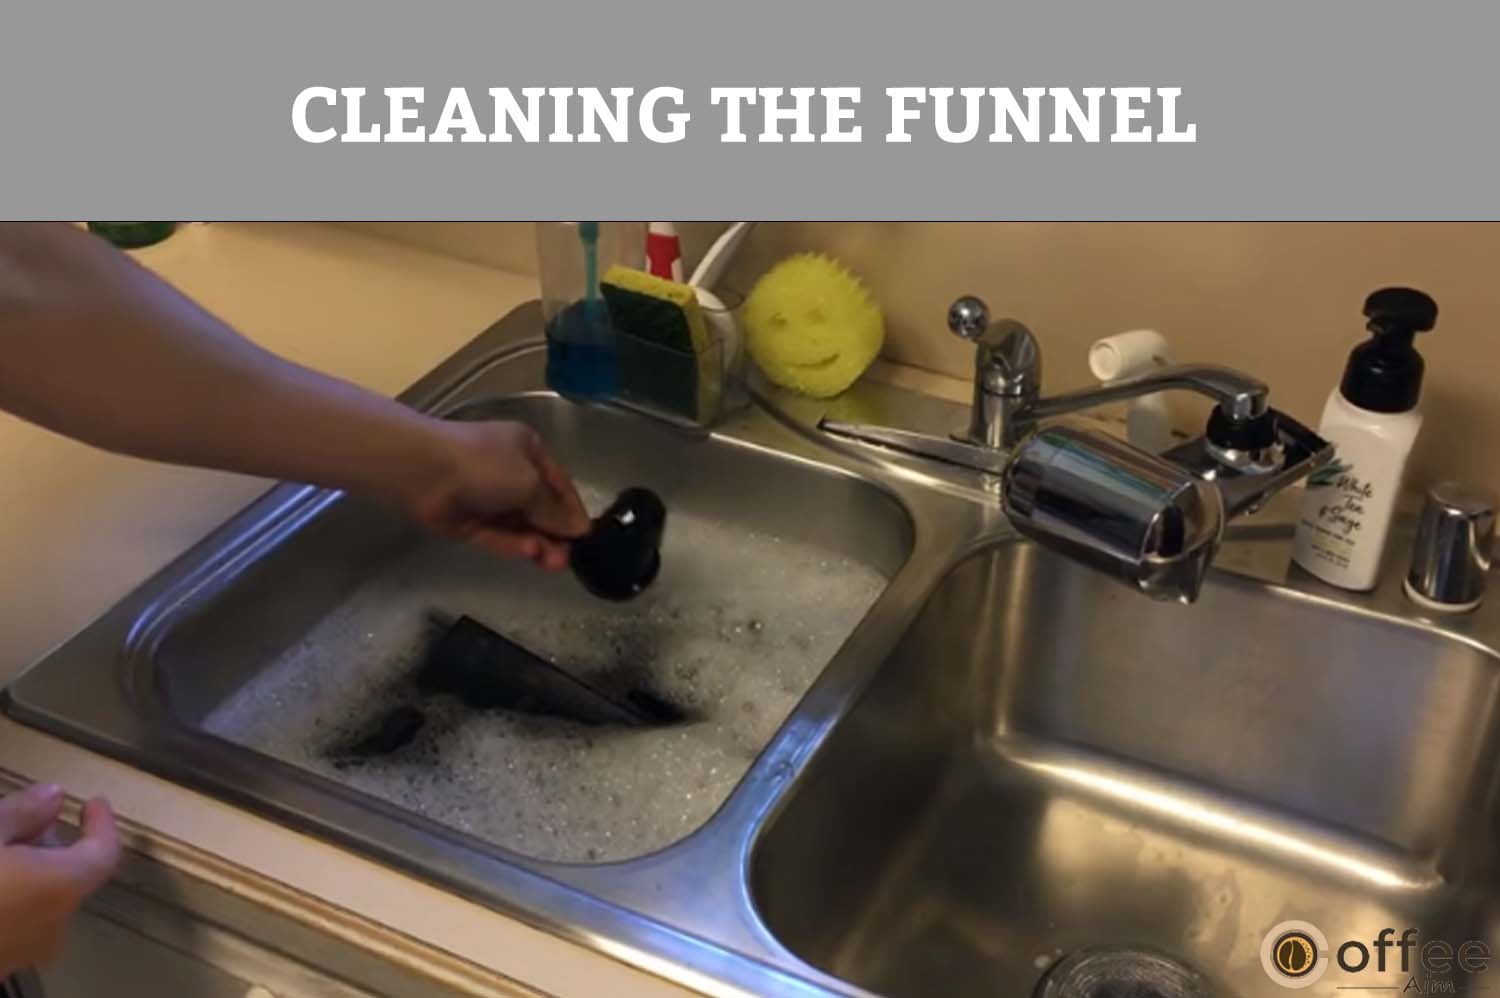
You can remove the funnel by pulling on it until it snaps off. You can put the Funnel in the dishwasher. To replace it, simply snap it back onto the K-Cup Holder Assembly.
This needle is located on the K-cup holder assembly at the inside bottom. Remove the K-cup holder assembly and detach the Funnel. Put a paperclip in the Needle to lose the clog and pull it out. The K-cup holder is dishwasher-safe.
Important: The K-Cup is punctured by sharp needles present in the bottom and above the K-Cup Holder. Therefore, avoid putting your fingers in the K-Cup Chamber to avoid any injury.

NOTE: Do not put the Water Reservoir and Water Reservoir into the dishwasher.
Make sure to clean the water reservoir and lid with a damp, soapy, and non-abrasive cloth and thoroughly rinse them after cleaning. Don’t dry the inside of the water reservoir and the inner side of the lid with a cloth, as lint may remain.

CAUTION: After cleaning, please thoroughly rinse the Water Reservoir to ensure that no cleaners or cleaning solutions remain there, as they may contaminate the water supply in the brewer.
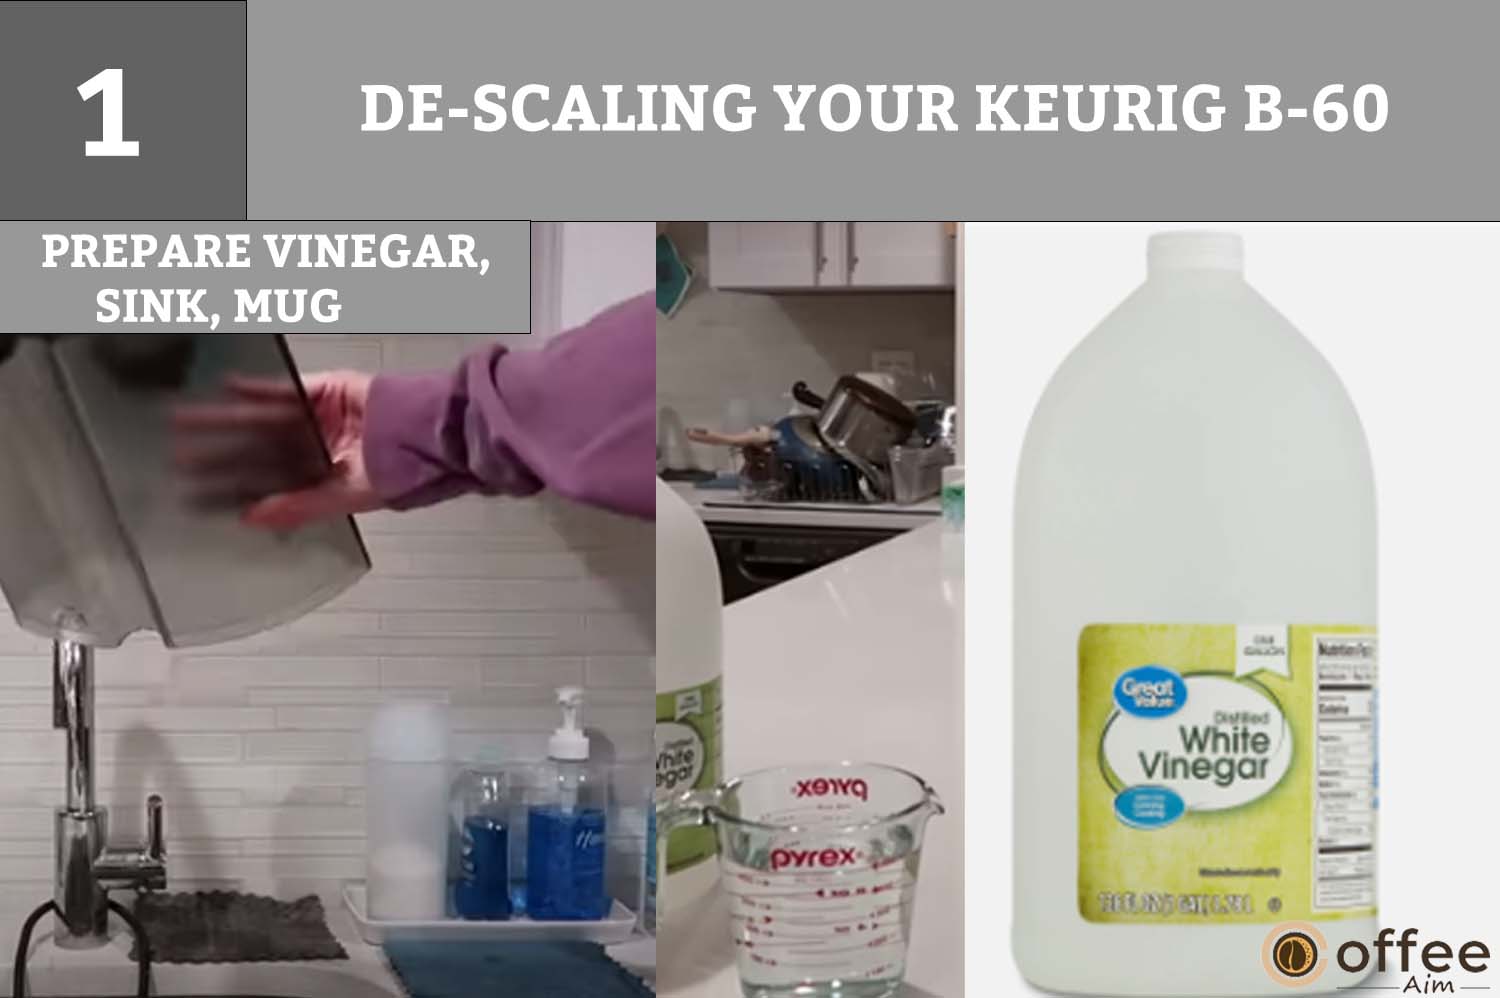
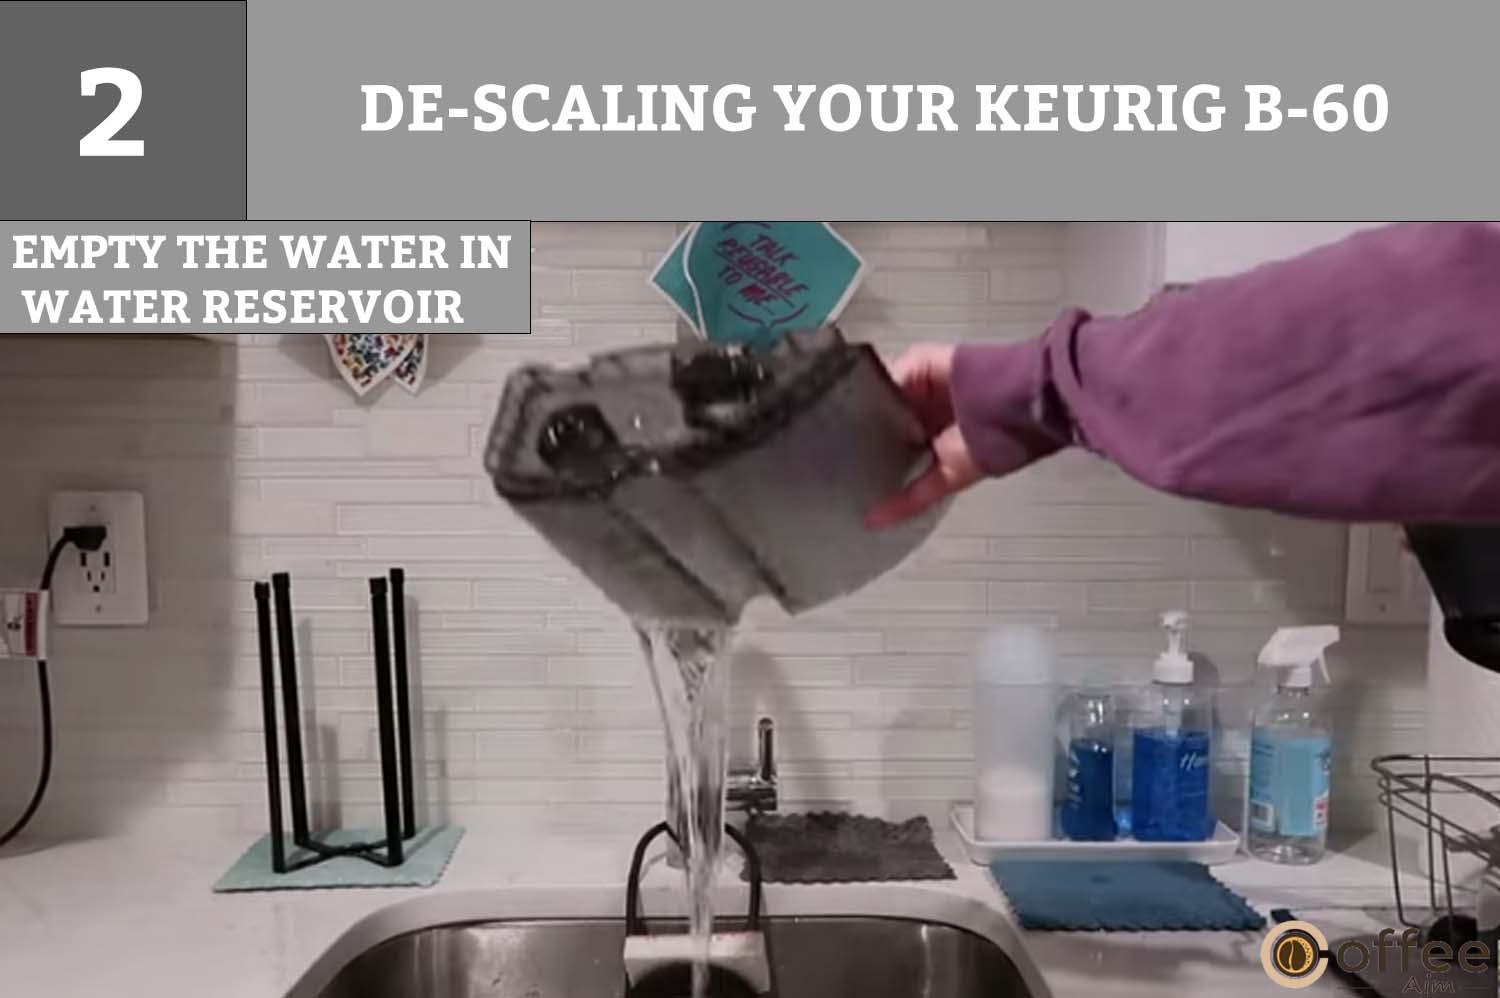
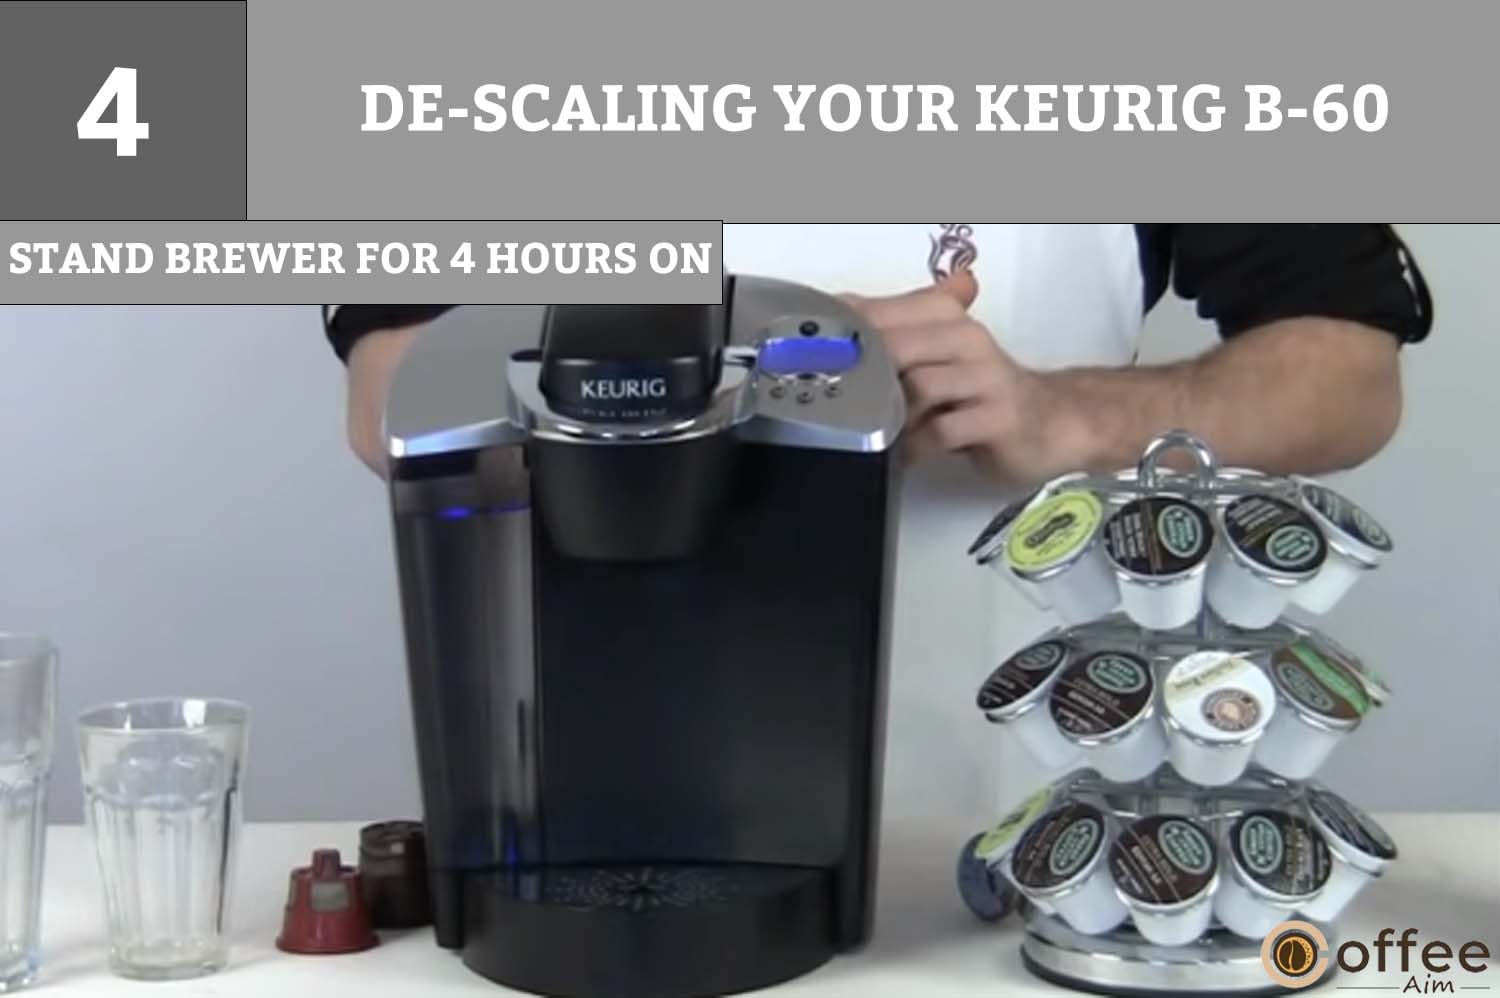
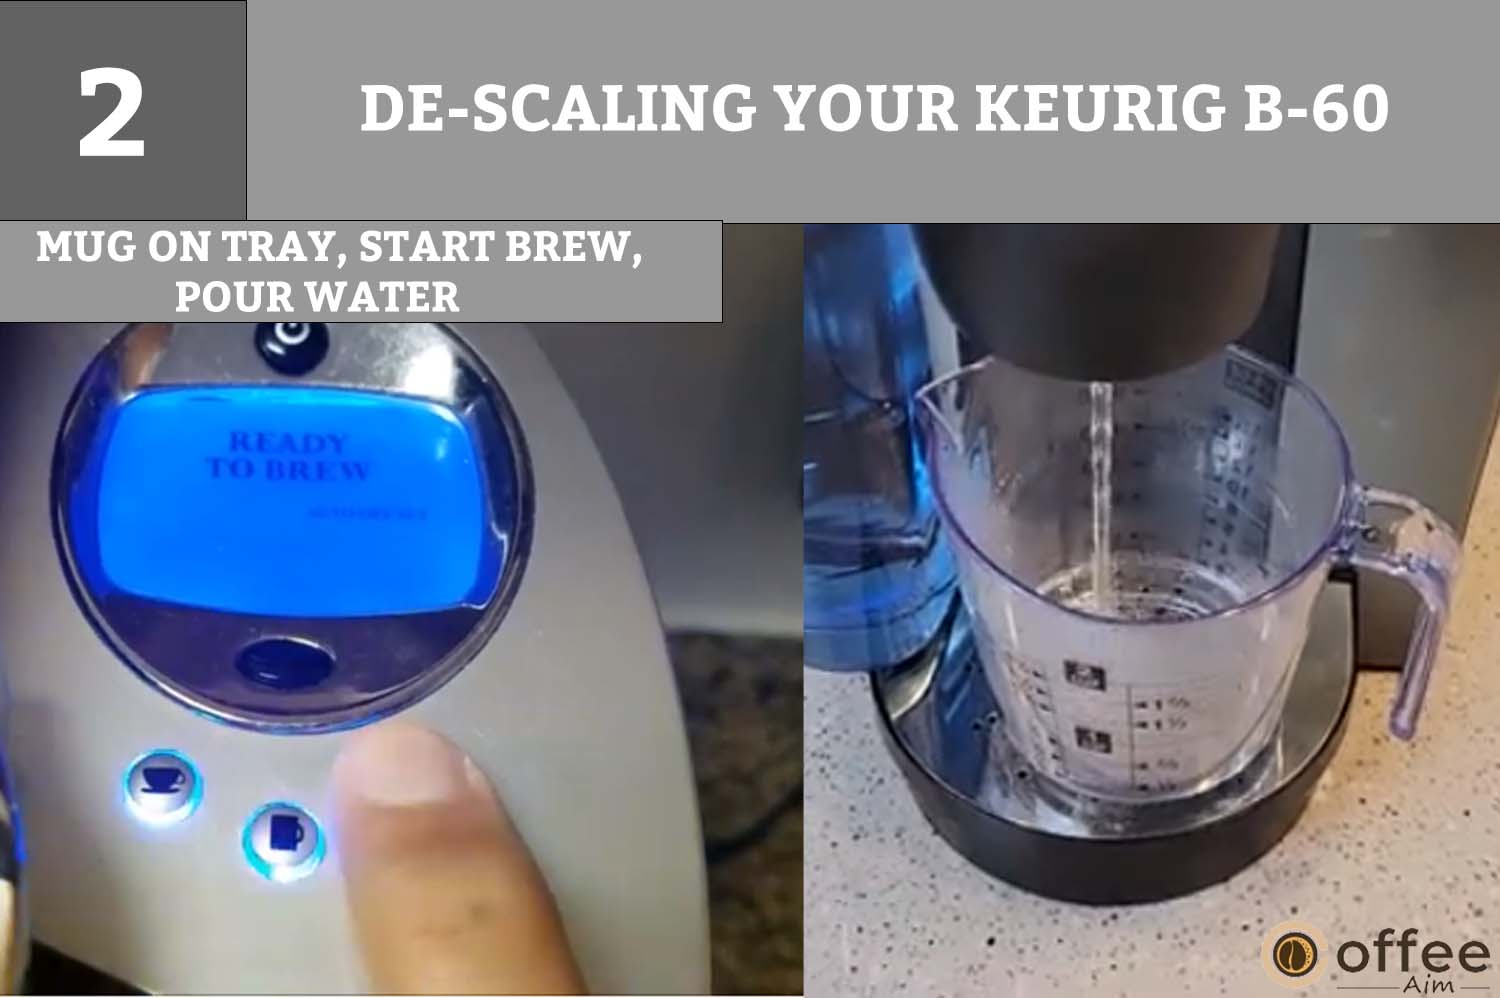
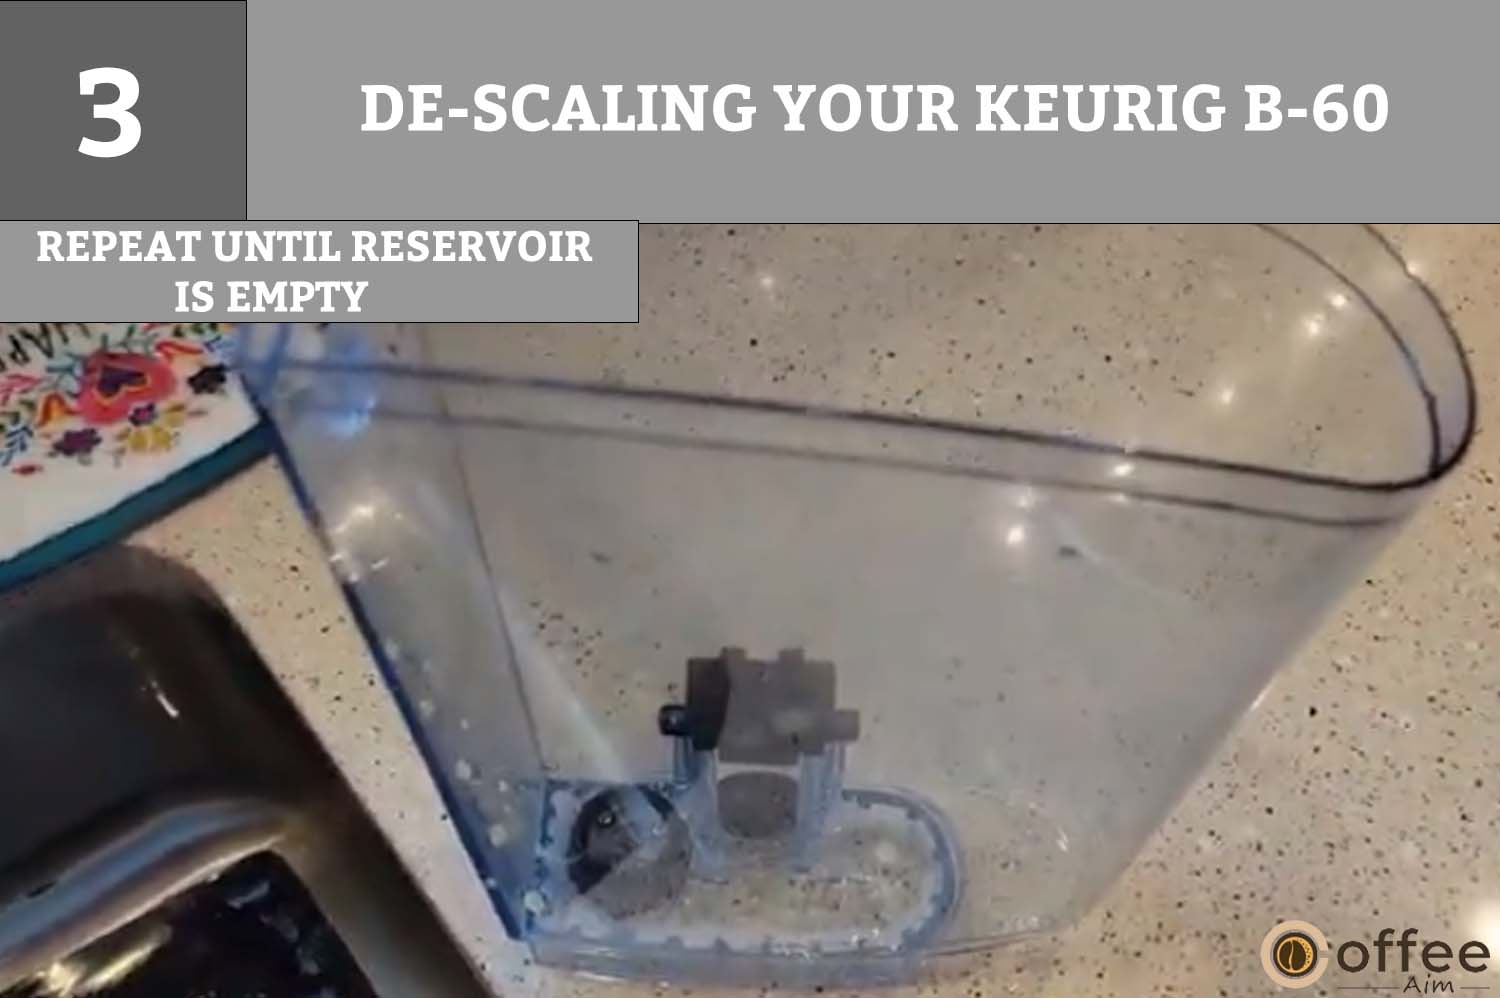
Water’s mineral content varies from region to region. Your Brewer may develop calcium deposits or scale based on the mineral content of the water in your area. Although the scale is not harmful; however, can impair the brewer’s performance if remain un-noticed. By de-scaling your brewer, you will be able to maintain the heating element and other internal parts that come into contact with the water much more easily. Thus, do descaling every 3- 6 months for good performance of your brewer.
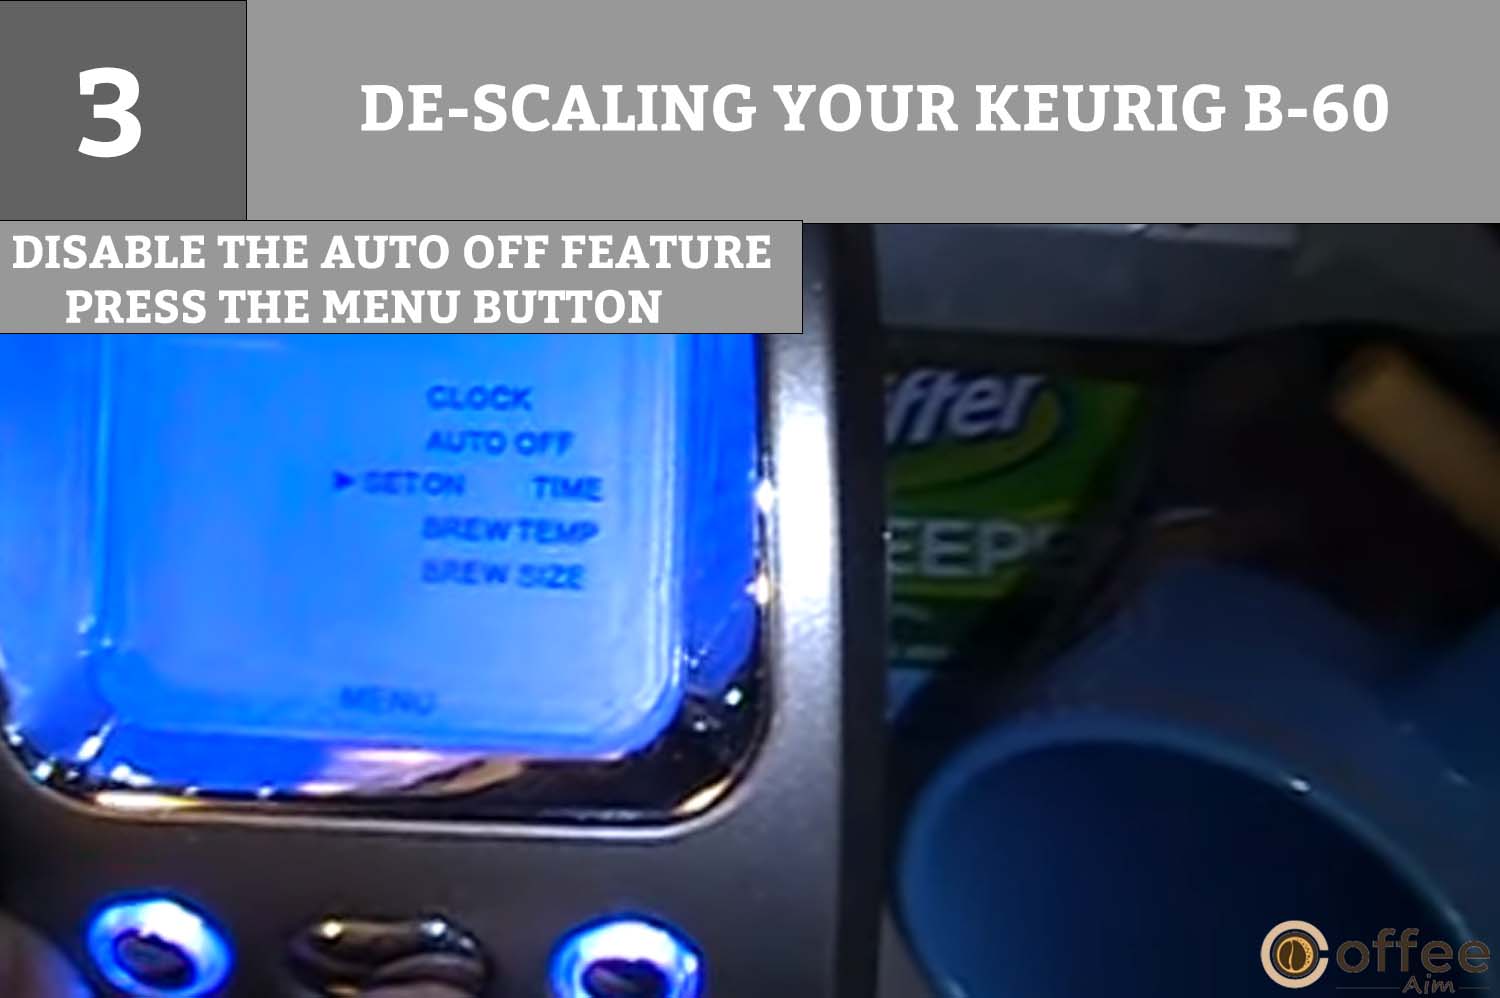
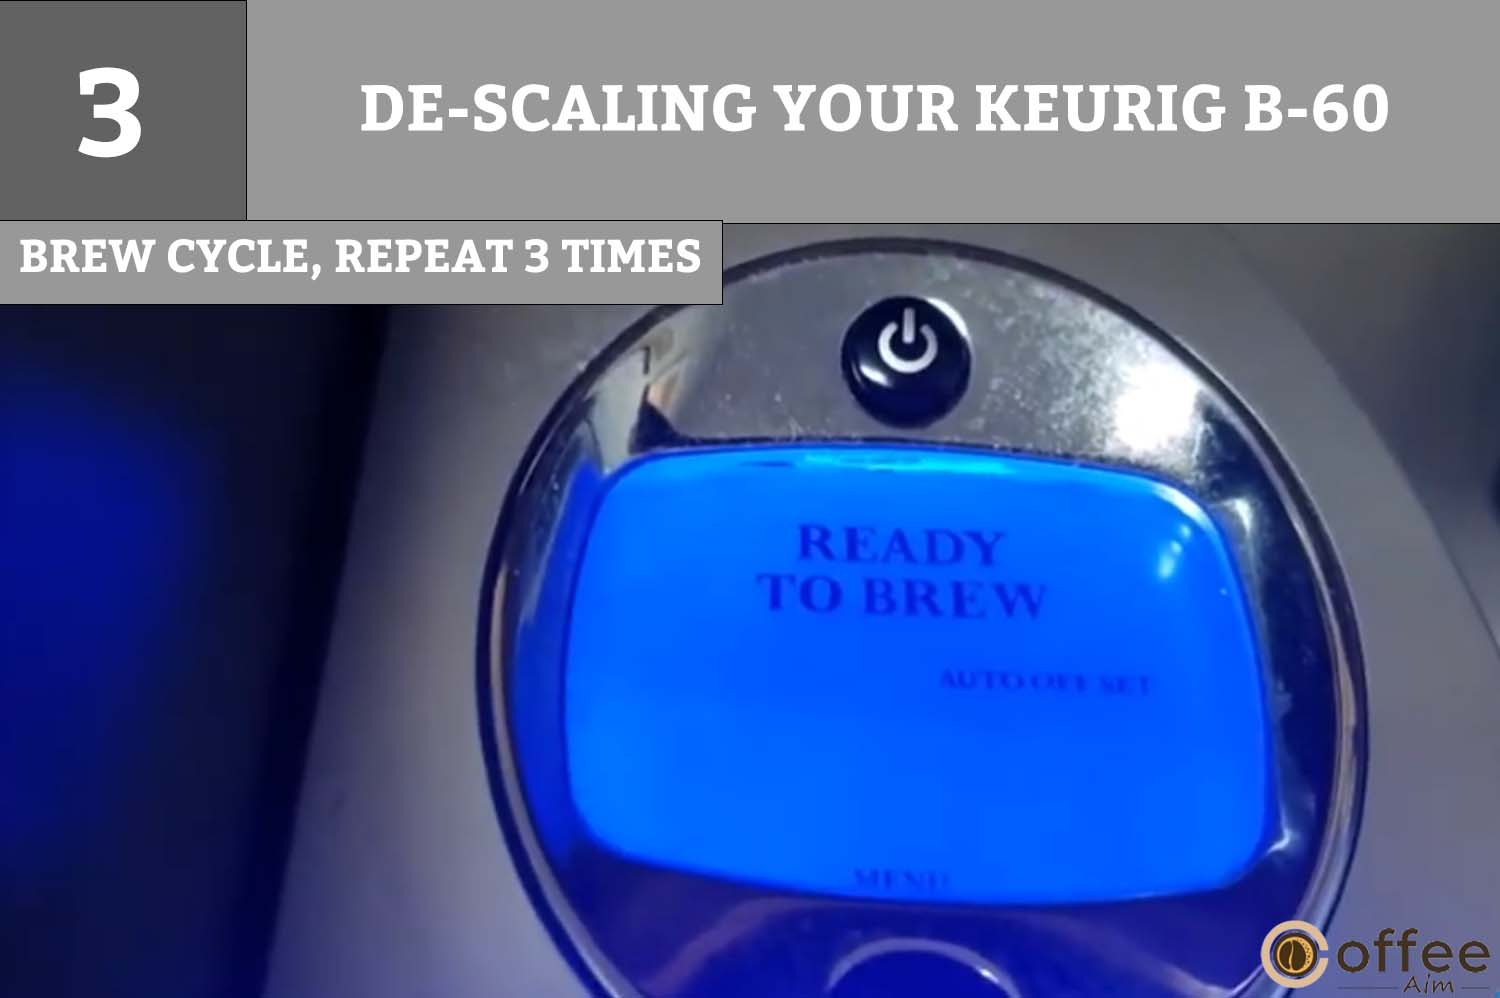
Your Keurig B-60 has sensors that tell when scale buildup affects the brewer’s performance. The LCD Control Center will show “DE-SCALE” when this situation happens. However, you should De-scale your brewer every three to six months even if “DE-SCALE” is not displayed. If the LCD Control Center shows “DE-SCALE,” you should De-scale your brewer as soon as possible. Let’s get started!


Despite all the recommendations, cleaning, and maintenance procedures, still, this brewer is not user serviceable. For service, I refer you to the warranty section of this guide.
Empty the Water Reservoir before you store it, and make sure to keep your Brewer in a safe and frost-free atmosphere. Store your Brewer in an upright position to prevent water leakage from the Inner tank. Don’t store your Brewer in a chilly atmosphere, as the brewer may be damaged if the water freezes inside.
When you decide to use it after storage, you have to wash out the Water Reservoir and refill it with fresh water. I recommend running three cleansing brews without a K-cup before brewing coffee.
If you decide to move to a different location with your Keurig B-60, switch it off, unplug it, and empty the Water Reservoir. If you are in an environment where your brewer faces below-freezing temperature, then be sure to let it settle to room temp for 2 hours before using it.
Despite all the good manufacturing, every appliance can face some technical issues. However, you can resolve these problems yourself before rushing toward a professional. So, let’s get started!
| Problems | Solutions |
| Brewer does not have power. | Brewer needs to be plugged into a separate outlet. Be sure that Brewer is plugged in securely. Plug it into diverse outlets. Be sure that the Power Button is ON. |
| Brewer will not Brew | After inserting the K-Cup portion pack into the K-Cup Holder, press the Small Cup, Mug, or Large Mug Button until the LCD Control Center displays “READY TO BREW,” and the three cup-size buttons blink.If the LCD control center displays” ADD WATER,” simply fill the Water Reservoir with fresh water. Make sure the Water Reservoir is properly seated in its base. After filling the Water Reservoir, the LCD control center still displays the” ADD WATER” Contact Customer Service Center at ”1.866.901 Brew( 2739). |
| Brewing a Partial Cup | The Exit Needle may be clogged (see the section ” Cleaning the Exit needle”)Clean the K-cup holder and rinse under the tap (see the section “Clean the K-cup portion holder”).You may have removed the Water Reservoir during the brewing process. Now, replace the water reservoir and run a water cleansing cycle (without a coffee pod). “De-Scale” your brewer.If you have already performed” De-Scaling” two times and still, the brewer only brews half cup, Contact Keurig Customer Service (1.866.901.BREW (2739)). |
There is no time displayed on the LCD Message Center. | The time will not be displayed on LCD until you have not set it. If the power is interrupted to the Brewer, you need to set the clock again. (see the section “Set clock in Keurig B-60”). |
| My Brewer is turned ON and OFF automatically. | Make sure your brewer is not programmed for ON/OFF feature. Select the programming options by pressing the black Menu button below ‘MENU’. When it comes to Auto Off Timer and On/Off, ‘OFF’ should be displayed. If “off” is not displayed, then see the instructions mentioned in the section “Program ON/OFF feature on Keurig B-60”. |
Under home use, Keurig guarantees that your Brewer will be free of defects in materials for a year from the date of purchase. The warranty card that came with your Brewer should be filled out and returned so that we can keep track of your purchase information in the Keurig system. You can show the receipt as proof if any change and replacement, or restoration of the Brewer is required; you don’t have to charge for any repair or replacement. If Replacement of the Brewer is required, then you get a new one-year warranty for the replacement brewer.
This One-year warranty only applies to the brewer in the United States and Canada. This warranty gives you legal rights that vary from place to place around the United States and the different provinces of Canada. This warranty does not cover consequential accidental damage. And also does not cover the incidental cost and expenses resulting in the incidents.
This guarantee does not cover incidental costs or expenses that arise from a warranty violation, even if they were reasonably anticipated.
Incidental Costs and expenses resulting from any breach of this warranty, even if foreseeable, are not covered by this warranty. This warranty does not cover consequential or incidental damages, such as property damage. Because some states and provinces prohibit the exclusion or limitation of incidental or consequential damages, the preceding limitation or exclusion may not apply to you based on the state or province from which you purchased the item.
Damages brought on by services provided by anyone other than Keurig or authorized service providers, the use of parts other than genuine Keurig parts, or external factors like abuse, misuse, an inappropriate power supply, or natural disasters are not covered by this warranty either.
There is no other written or oral warranty other than this warranty. This warranty also disclaims any implied warranties of merchantability or fitness for a particular purpose in regard to your Keurig B-60 Brewer. The mentioned restriction may not apply to you depending on the state or province where you purchased the product because some states or provinces prohibit these limitations.
If you need warranty service, contact Keurig Customer Service at 1-866-901-BREW (2739). Before sending your brewer for servicing, it’s necessary to speak to Keurig Customer Service to receive an Authorization TO Return Number (RTA). Brewers returned without an RTA number will not be serviced and will be returned to the sender.
Keurig, Incorporated
55 Walkers Brook Drive
Reading, MA 01867
1.866.901.BREW (2739)
As you have surpassed all the hurdles in the way of making a hot cup of coffee with your Keurig B-60. Therefore, it’s time to say goodbye to cafe struggles and make your home cafe. I am sure that after reading this guide carefully, you will never get stuck during the coffee-making process. I hope this article has cleared all your confusion and fears. However, if you are still confused, then better to re-read the article.
Furthermore, if you want to know more about coffee-making and coffee beans or machines, then hit on the link “CoffeeAim” and get valuable content.
The K-Cups are designed to use only once. However, there are many reusable K-Cups available in the market, such as Keurig My K-Cup coffee filter.
K-Cup plastic is free of BPA and made of “Plastic# 7”, so yes, we can say that K-Cups are safe to use
Copyright © 2024 CoffeeAim.com